介绍
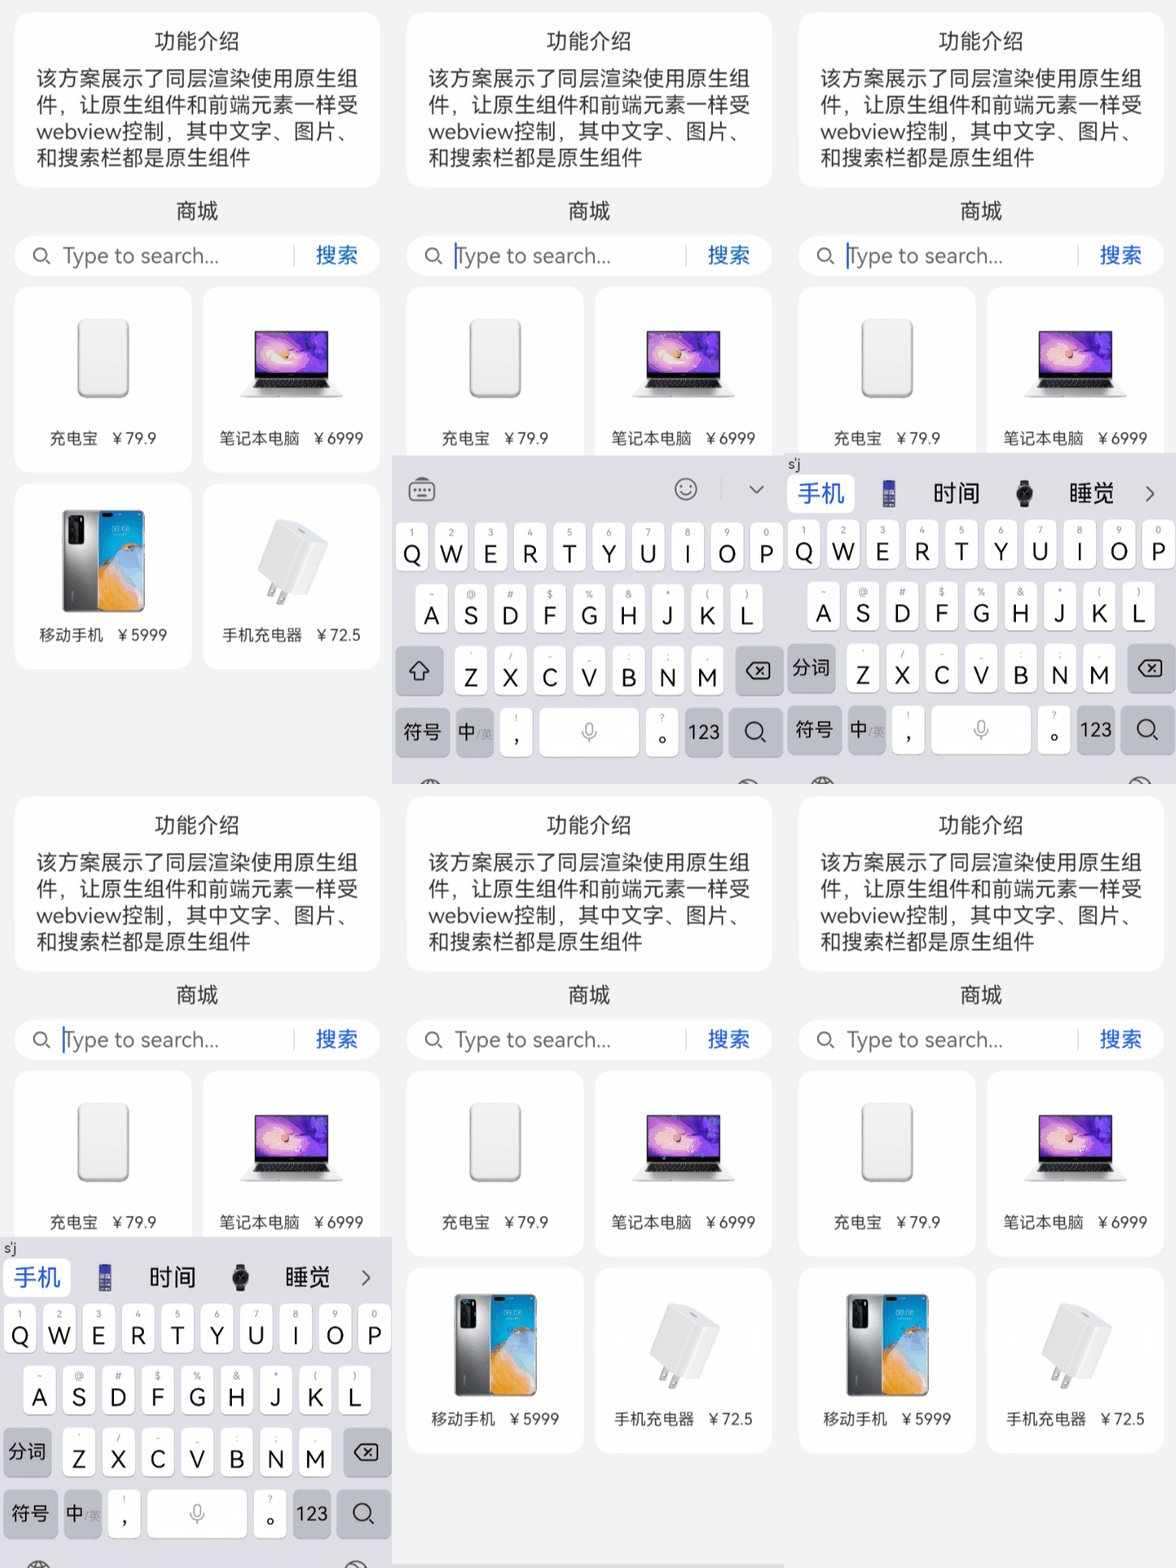
该方案展示了ArkWeb同层渲染:将系统原生组件直接渲染到前端H5页面上,原生组件不仅可以提供H5组件无法实现的一些功能,还能提升用户体验的流畅度
效果图预览

使用说明
- 进入页面即可看到同层渲染效果,Text,search,image都是原生组件。
实现思路
- 添加权限。
"ohos.permission.INTERNET"
- 创建控制器管理绑定的NodeContainer组件。
class SearchNodeController extends NodeController {
  private rootNode: BuilderNode<[Params]> | undefined | null = null;
  private embedId : string = "";
  private surfaceId : string = "";
  private renderType :NodeRenderType = NodeRenderType.RENDER_componentTypeDISPLAY;
  private componentWidth : number = 0;
  private componentHeight : number = 0;
  private componentType : string = "";

  setRenderOption(params : NodeControllerParams): void {
    this.surfaceId = params.surfaceId;
    this.renderType = params.renderType;
    this.embedId = params.embedId;
    this.componentWidth = params.width;
    this.componentHeight = params.height;
    this.componentType = params.type;
  }
  /**
   * 在对应NodeContainer创建的时候调用、或者通过rebuild方法调用刷新
   */
  makeNode(uiContext: UIContext): FrameNode | null{
    this.rootNode = new BuilderNode(uiContext, { surfaceId: this.surfaceId, type: this.renderType});
    if (this.componentType === 'native/component') {
      this.rootNode.build(wrapBuilder(searchBuilder), { width : this.componentWidth, height : this.componentHeight});
    } else {
    }
    // 返回FrameNode节点
    return this.rootNode.getFrameNode();
  }
  /**
   * 设置BuilderNode节点
   */
  setBuilderNode(rootNode: BuilderNode<Params[]> | null): void{
    this.rootNode = rootNode;
  }
  /**
   * 获取BuilderNode节点
   */
  getBuilderNode(): BuilderNode<[Params]> | undefined | null{
    return this.rootNode;
  }
  /**
   * 更新BuilderNode节点
   */
  updateNode(arg: Object): void {
    this.rootNode?.update(arg);
  }
  /**
   * 获取EmbedId
   */
  getEmbedId() : string {
    return this.embedId;
  }
  /**
   * 将触摸事件派发到rootNode创建出的FrameNode上
   */
  postEvent(event: TouchEvent | undefined) : boolean {
    return this.rootNode?.postTouchEvent(event) as boolean;
  }
}
- 添加同层渲染的组件。
@Component
struct SearchComponent {
@Prop params: Params;
controller: SearchController = new SearchController();

build() {
  Column() {
    Column({ space: MARGIN_VERTICAL }) {
      Text($r('app.string.headline')).fontSize($r('app.string.ohos_id_text_size_body1'))
      Text($r('app.string.illustrate')).fontSize($r('app.string.ohos_id_text_size_body1'))
    }
    // 原生Text组件
    Text($r('app.string.mall')).fontSize($r('app.string.ohos_id_text_size_body1'))
    // 原生Search组件
    Search({ placeholder: 'Type to search...', controller: this.controller })
      .searchButton(SEARCH_BUTTON)
    // 原生Grid组件,Grid中包含Image和Text
    Grid() {
      // 性能知识点:此处数据量确定且数量较少,使用了ForEach,在数据量多的情况下,推荐使用LazyForeEach
      ForEach(PRODUCT_DATA, (item: ProductDataModel, index: number) => {
        GridItem() {
          Column({ space: MARGIN_VERTICAL }) {
            Image(item.uri).width($r('app.integer.image_size'))
            Row({ space: MARGIN_VERTICAL }) {
              Text(item.title).fontSize($r('app.string.ohos_id_text_size_body3'))
              Text(item.price).fontSize($r('app.string.ohos_id_text_size_body3'))
            }
          }
        }
      })
    }
    .columnsTemplate('1fr 1fr') // 2列
    .rowsTemplate('1fr 1fr ') // 2行
    .rowsGap($r('app.string.ohos_id_elements_margin_vertical_m')) // 行间距
    .columnsGap($r('app.string.ohos_id_elements_margin_vertical_m')) // 列间距
   }
 }
}
- embed标签可以在H5页面中嵌入任何类型的内容,在H5界面上通过embed标签标识同层元素,应用侧会将原生组件渲染到H5页面embed标签所在位置。
<div>
    <div id="bodyId">
        <!-- 在H5界面上通过embed标签标识同层元素,在应用侧将原生组件渲染到H5页面embed标签所在位置-->
        <embed id="nativeSearch" type = "native/component" width="100%" height="100%" src="view"/>
    </div>
</div>
- 通过WebView的enableNativeEmbedMode()控制同层渲染开关,通过onNativeEmbedLifecycleChange获取embed标签的生命周期变化数据。
build(){
  Column() {
    Stack() {
      // 性能知识点:此处componentId项确定且数量较少,使用了ForEach,在数据量多的情况下,推荐使用LazyForeEach
      ForEach(this.componentIdArr, (componentId: string) => {
        NodeContainer(this.nodeControllerMap.get(componentId));
      }, (embedId: string) => embedId)
      // web组件加载本地test.html页面
      Web({ src: $rawfile("view.html"), controller: this.browserTabController })
        .backgroundColor($r('app.color.ohos_id_color_sub_background'))
        // 不允许执行缩放
        .zoomAccess(false)
        // Todo: 知识点:通过enableNativeEmbedMode()配置同层渲染开关
        .enableNativeEmbedMode(true)
        // Todo: 知识点:通过onNativeEmbedLifecycleChange获取embed标签的生命周期变化数据
        .onNativeEmbedLifecycleChange((embed) => {
          // 获取web侧embed元素的id
          const componentId = embed.info?.id?.toString() as string
          if (embed.status === NativeEmbedStatus.CREATE) {
            // 创建节点控制器,设置参数并rebuild
            let nodeController = new SearchNodeController();
            // 外接纹理与WebView同层渲染
            nodeController.setRenderOption({surfaceId : embed.surfaceId as string, type : embed.info?.type as string, renderType : NodeRenderType.RENDER_componentTypeTEXTURE, embedId : embed.embedId as string, width : px2vp(embed.info?.width), height : px2vp(embed.info?.height)});
            nodeController.rebuild();
            // 根据web传入的embed的id属性作为key,将nodeController存入map
            this.nodeControllerMap.set(componentId, nodeController);
            // 将web传入的embed的id属性存入@State状态数组变量中,用于动态创建nodeContainer节点容器,需要将push动作放在set之后
            this.componentIdArr.push(componentId);
          } else if (embed.status === NativeEmbedStatus.UPDATE) {
            let nodeController = this.nodeControllerMap.get(componentId);
            nodeController?.updateNode({text: 'update', width: px2vp(embed.info?.width), height: px2vp(embed.info?.height)} as ESObject);
            nodeController?.rebuild();
          } else {
            let nodeController = this.nodeControllerMap.get(componentId);
            nodeController?.setBuilderNode(null);
            nodeController?.rebuild();
          }
        })// 获取同层渲染组件触摸事件信息
        .onNativeEmbedGestureEvent((touch) => {
          this.componentIdArr.forEach((componentId: string) => {
            let nodeController = this.nodeControllerMap.get(componentId);
            if (nodeController?.getEmbedId() === touch.embedId) {
              nodeController?.postEvent(touch.touchEvent);
            }
          })
        })
    }
  }
}
- h5侧通过id名获取embed标签信息,并通过embed标签添加同层渲染界面的touch监听事件;应用侧添加onNativeEmbedGestureEvent回调使得手指触摸到embed标签时能获取到触摸事件信息。
let nativeEmbed = {
  // 通过id名获取embed标签
  nativeSearch : document.getElementById('nativeSearch'),
  // 事件
  events:{},
  // 初始化
  init:function(){
    let self = this;
    // 添加touch的监听事件
    self.nativeSearch.addEventListener('touchstart', self.events, false);
  }
};
nativeEmbed.init();
Web({ src: $rawfile("view.html"), controller: this.browserTabController })
  // 获取同层渲染组件触摸事件信息
  .onNativeEmbedGestureEvent((touch) => {
    this.componentIdArr.forEach((componentId: string) => {
      let nodeController = this.nodeControllerMap.get(componentId);
      if (nodeController?.getEmbedId() === touch.embedId) {
        nodeController?.postEvent(touch.touchEvent);
      }
    })
  })
高性能知识点
ArkWeb同层渲染原生组件,原生组件不仅可以提供H5组件无法实现的一些功能,还能提升用户体验的流畅度;同层渲染节点上下树,实现节点复用,节省节点重复开销。
工程结构&模块类型
nativeembed                            // har类型
|---mock
|   |---GoodsMock.ets                  // 数据源
|---model
|   |---GoodsModel.ets                 // 数据类
|---view
|   |---NativeEmbedView.ets            // 视图层
模块依赖
本实例依赖common模块来实现资源的调用。 依赖动态路由模块来实现页面的动态加载。
参考资料
- Web
- BuilderNode
- NodeController
- ArkWeb(方舟Web)
为了能让大家更好的学习鸿蒙(HarmonyOS NEXT)开发技术,这边特意整理了《鸿蒙开发学习手册》(共计890页),希望对大家有所帮助:https://qr21.cn/FV7h05
《鸿蒙开发学习手册》:
如何快速入门:https://qr21.cn/FV7h05
- 基本概念
- 构建第一个ArkTS应用
- ……

开发基础知识:https://qr21.cn/FV7h05
- 应用基础知识
- 配置文件
- 应用数据管理
- 应用安全管理
- 应用隐私保护
- 三方应用调用管控机制
- 资源分类与访问
- 学习ArkTS语言
- ……

基于ArkTS 开发:https://qr21.cn/FV7h05
- Ability开发
- UI开发
- 公共事件与通知
- 窗口管理
- 媒体
- 安全
- 网络与链接
- 电话服务
- 数据管理
- 后台任务(Background Task)管理
- 设备管理
- 设备使用信息统计
- DFX
- 国际化开发
- 折叠屏系列
- ……

鸿蒙开发面试真题(含参考答案):https://qr18.cn/F781PH

鸿蒙开发面试大盘集篇(共计319页):https://qr18.cn/F781PH
1.项目开发必备面试题
2.性能优化方向
3.架构方向
4.鸿蒙开发系统底层方向
5.鸿蒙音视频开发方向
6.鸿蒙车载开发方向
7.鸿蒙南向开发方向


