OpenHarmony为开发者提供了一套全面的开发自测试框架OHA-developer_test,开发者可根据测试需求开发相关测试用例,开发阶段提前发现缺陷,大幅提高代码质量。
本文从基础环境构建,用例开发,编译以及执行等方面介绍OpenHarmony开发自测试执行框架如何运行和使用。
开发自测试框架目录简介
以下是开发自测试框架的目录层级架构,在使用开发自测试框架过程中可在相应目录查找对应组件。
test  # 测试子系统
├── developer_test  # 开发者自测试框架
│   ├── aw  # 测试框架的静态库
│   ├── config  # 测试框架配置
│   │   │ ...
│   │   └── user_config.xml  # 用户使用配置
│   ├── examples  # 测试用例示例
│   ├── src  # 测试框架源码
│   ├── third_party  # 测试框架依赖第三方组件适配
│   ├── reports  # 测试结果报告
│   ├── BUILD.gn  # 测试框架编译入口
│   ├── start.bat  # 开发者测试入口(Windows)
│   └── start.sh  # 开发者测试入口(Linux)
└── xdevice  # 测试框架依赖组件
功能特性
测试用例
测试用例目录规划
使用测试框架过程中,可根据以下层级关系规划测试用例目录。
subsystem  # 子系统
├── partA  # 部件A
│   ├── moduleA  # 模块A
│   │   ├── include
│   │   ├── src  # 业务代码
│   │   └── test  # 测试目录
│   │       ├── unittest  # 单元测试
│   │       │   ├── common  # 公共用例
│   │       │   │   ├── BUILD.gn  # 测试用例编译配置
│   │       │   │   └── testA_test.cpp  # 单元测试用例源码
│   │       │   ├── phone  # 手机形态用例
│   │       │   ├── ivi  # 车机形态用例
│   │       │   └── liteos-a  # ipcamera使用liteos内核的用例
│   │       ├── moduletest  # 模块测试
│   │       ...
│   │
│   ├── moduleB  # 模块B
│   ├── test
│   │   └── resource  # 依赖资源
│   │       ├── moduleA  # 模块A
│   │       │   ├── ohos_test.xml  # 资源配置文件
│   │       ... └── 1.txt  # 资源
│   │
│   ├── bundle.json  # 编译入口配置
│   ...
│
...
注意: 测试用例根据不同设备形态差异分为通用用例和非通用用例,建议将通用用例存放在common目录下,非通用用例存放在相应设备形态目录下。
测试用例编写
本测试框架支持多种类型测试,针对不同测试类型提供了不同的用例编写模板以供参考。
TDD测试(C++)
-
用例源文件命名规范
测试用例源文件名称和测试套内容保持一致,文件命名采用全小写+下划线方式命名,以test结尾,具体格式为:[功能]_[子功能]_test,子功能支持向下细分。
单线程示例: calculator_sub_test.cpp
- 用例示例
/*
 * Copyright (c) 2021 XXXX Device Co., Ltd.
 * Licensed under the Apache License, Version 2.0 (the "License");
 * you may not use this file except in compliance with the License.
 * You may obtain a copy of the License at
 *
 *     http://www.apache.org/licenses/LICENSE-2.0
 *
 * Unless required by applicable law or agreed to in writing, software
 * distributed under the License is distributed on an "AS IS" BASIS,
 * WITHOUT WARRANTIES OR CONDITIONS OF ANY KIND, either express or implied.
 * See the License for the specific language governing permissions and
 * limitations under the License.
 */

#include "calculator.h"
#include <gtest/gtest.h>

using namespace testing::ext;

class CalculatorSubTest : public testing::Test {
public:
    static void SetUpTestCase(void);
    static void TearDownTestCase(void);
    void SetUp();
    void TearDown();
};

void CalculatorSubTest::SetUpTestCase(void)
{
    // input testsuit setup step,setup invoked before all testcases
}

void CalculatorSubTest::TearDownTestCase(void)
{
    // input testsuit teardown step,teardown invoked after all testcases
}

void CalculatorSubTest::SetUp(void)
{
    // input testcase setup step,setup invoked before each testcases
}

void CalculatorSubTest::TearDown(void)
{
    // input testcase teardown step,teardown invoked after each testcases
}

/**
 * @tc.name: integer_sub_001
 * @tc.desc: Verify the sub function.
 * @tc.type: FUNC
 * @tc.require: issueNumber
 */
HWTEST_F(CalculatorSubTest, integer_sub_001, TestSize.Level1)
{
    // step 1:调用函数获取结果
    int actual = Sub(4,0);

    // Step 2:使用断言比较预期与实际结果
    EXPECT_EQ(4, actual);
}
详细内容介绍:
1. 添加测试用例文件头注释信息
/*
 * Copyright (c) 2021 XXXX Device Co., Ltd.
 * Licensed under the Apache License, Version 2.0 (the "License");
 * you may not use this file except in compliance with the License.
 * You may obtain a copy of the License at
 *
 *     http://www.apache.org/licenses/LICENSE-2.0
 *
 * Unless required by applicable law or agreed to in writing, software
 * distributed under the License is distributed on an "AS IS" BASIS,
 * WITHOUT WARRANTIES OR CONDITIONS OF ANY KIND, either express or implied.
 * See the License for the specific language governing permissions and
 * limitations under the License.
 */
- 引用测试框架头文件和命名空间
#include <gtest/gtest.h>

using namespace testing::ext;
- 添加被测试类的头文件
#include "calculator.h"
- 定义测试套(测试类)
class CalculatorSubTest : public testing::Test {
public:
    static void SetUpTestCase(void);
    static void TearDownTestCase(void);
    void SetUp();
    void TearDown();
};

void CalculatorSubTest::SetUpTestCase(void)
{
    // input testsuit setup step,setup invoked before all testcases
}

void CalculatorSubTest::TearDownTestCase(void)
{
    // input testsuit teardown step,teardown invoked after all testcases
}

void CalculatorSubTest::SetUp(void)
{
    // input testcase setup step,setup invoked before each testcases
}

void CalculatorSubTest::TearDown(void)
{
    // input testcase teardown step,teardown invoked after each testcases
}
注意: 在定义测试套时,测试套名称应与编译目标保持一致,采用大驼峰风格。
- 测试用例实现,包含用例注释和逻辑实现
/**
 * @tc.name: integer_sub_001
 * @tc.desc: Verify the sub function.
 * @tc.type: FUNC
 * @tc.require: issueNumber
 */
HWTEST_F(CalculatorSubTest, integer_sub_001, TestSize.Level1)
{
    //step 1:调用函数获取结果
    int actual = Sub(4,0);

    //Step 2:使用断言比较预期与实际结果
    EXPECT_EQ(4, actual);
}
注意: @tc.require: 格式必须以AR/SR或issue开头: 如:issueI56WJ7
多线程示例: base_object_test.cpp
- 多线程用例示例
// 测试用例文件头注释信息及用例注释同单线程用例示例。

#include "base_object.h"
#include <gtest/gtest.h>
#include <gtest/hwext/gtest-multithread.h>
#include <unistd.h>

using namespace testing::ext;
using namespace testing::mt;

namespace OHOS {
namespace AAFwk {
class AAFwkBaseObjectTest : public testing::Test {......}

// Step 1:待测函数,返回阶乘结果
int factorial(int n)
{
	int result = 1;
	for (int i = 1; i <= n; i++) {
		result *= i;
	}
	printf("Factorial Function Result : %d! = %d\n", n, result);
	return result;
}

// Step 2:使用断言比较预期与实际结果
void factorial_test()
{
	int ret = factorial(3); // 调用函数获取结果
	std::thread::id this_id = std::this_thread::get_id();
	std::ostringstream oss;
	oss << this_id;
	std::string this_id_str = oss.str();
	long int thread_id = atol(this_id_str.c_str());
	printf("running thread...: %ld\n", thread_id); // 输出当前线程的id
	EXPECT_EQ(ret, 6);
}

HWTEST_F(AAFwkBaseObjectTest, Factorial_test_001, TestSize.Level1)
{
	SET_THREAD_NUM(4);
	printf("Factorial_test_001 BEGIN\n");
	GTEST_RUN_TASK(factorial_test);
	printf("Factorial_test_001 END\n");
}

HWMTEST_F(AAFwkBaseObjectTest, Factorial_test_002, TestSize.Level1, 6)
{
	printf("Factorial_test_002 BEGIN\n");
	factorial_test();
	printf("Factorial_test_002 END\n");
}

}  // namespace AAFwk
}  // namespace OHOS
详细内容介绍:
- 添加测试用例文件头注释信息
注意: 与单线程用例标准一致。
- 引用测试框架头文件和命名空间
#include <gtest/gtest.h>
#include <gtest/hwext/gtest-multithread.h>
#include <unistd.h>
using namespace testing::ext;
using namespace testing::mt;
- 添加被测试类的头文件
#include "base_object.h"
- 定义测试套(测试类)
class AAFwkBaseObjectTest : public testing::Test {......}
注意: 与单线程用例标准一致。
- 测试用例实现,包含用例注释和逻辑实现
// Step 1:待测函数,返回阶乘结果
int factorial(int n)
{
	int result = 1;
	for (int i = 1; i <= n; i++) {
		result *= i;
	}
	printf("Factorial Function Result : %d! = %d\n", n, result);
	return result;
}

// Step 2:使用断言比较预期与实际结果
void factorial_test()
{
	int ret = factorial(3); // 调用函数获取结果
	std::thread::id this_id = std::this_thread::get_id();
	std::ostringstream oss;
	oss << this_id;
	std::string this_id_str = oss.str();
	long int thread_id = atol(this_id_str.c_str());
	printf("running thread...: %ld\n", thread_id); // 输出当前线程的id
	EXPECT_EQ(ret, 6);
}

// GTEST_RUN_TASK(TestFunction)多线程启动函数,参数为自定义函数。
// 未调用SET_THREAD_NUM()时,默认线程数10个。
HWTEST_F(AAFwkBaseObjectTest, Factorial_test_001, TestSize.Level1)
{
	SET_THREAD_NUM(4); // 设置线程数量,同一测试套中可动态设置线程数。
	printf("Factorial_test_001 BEGIN\n");
	GTEST_RUN_TASK(factorial_test); // 启动factorial_test任务的多线程执行
	printf("Factorial_test_001 END\n");
}

// HWMTEST_F(TEST_SUITE, TEST_TC, TEST_LEVEL, THREAD_NUM)
// THREAD_NUM可设置用例执行的线程数量。
// HWMTEST_F会创建指定数量的线程并执行被测函数。
HWMTEST_F(AAFwkBaseObjectTest, Factorial_test_002, TestSize.Level1, 6)
{
	printf("Factorial_test_002 BEGIN\n");
	factorial_test();
	printf("Factorial_test_002 END\n");
}
// 新增多线程接口MTEST_ADD_TASK(THREAD_ID,ThreadTestFunc),注册多线程,但不在该用例中执行,之后统一执行,适合多个用例组合场景下的多线程测试。
// THREAD_ID从0开始定义区别不同的线程,也可以使用随机THREAD_ID,即传入RANDOM_THREAD_ID,此场景下THREAD_ID是不会重复的。
// 新增多线程接口MTEST_POST_RUN(),统一执行之前注册的多线程用例。
注意: 用例注释与单线程用例标准一致。
在编写用例时,我们提供了四种用例模板供您选择。
| 类型 | 描述 |
|---|---|
| HWTEST(A,B,C) | 用例执行不依赖Setup&Teardown时,可选取 |
| HWTEST_F(A,B,C) | 用例执行(不含参数)依赖于Setup&Teardown时,可选取 |
| HWMTEST_F(A,B,C,D) | 多线程用例执行依赖于Setup&Teardown时,可选取 |
| HWTEST_P(A,B,C) | 用例执行(含参数)依赖于Set&Teardown时,可选取 |
其中,参数A,B,C,D的含义如下:
- 参数A为测试套名。
- 参数B为测试用例名,其命名必须遵循[功能点]_[编号]的格式,编号为3位数字,从001开始。
- 参数C为测试用例等级,具体分为门禁level0 以及非门禁level1-level4共五个等级,其中非门禁level1-level4等级的具体选取规则为:测试用例功能越重要,level等级越低。
- 参数D为多线程用例执行的线程数量设置。
注意:
- 测试用例的预期结果必须有对应的断言。
- 测试用例必须填写用例等级。
- 测试体建议按照模板分步实现。
- 用例描述信息按照标准格式@tc.xxx value书写,注释信息必须包含用例名称,用例描述,用例类型,需求编号四项。其中用例测试类型@tc.type参数的选取,可参考下表。
- 如使用HWMTEST_F编写多线程执行用例,必须填线程数量。
| 测试类型名称 | 类型编码 |
|---|---|
| 功能测试 | FUNC |
| 性能测试 | PERF |
| 可靠性测试 | RELI |
| 安全测试 | SECU |
| 模糊测试 | FUZZ |
TDD测试(JS)
-
用例源文件命名规范
测试用例原文件名称采用大驼峰风格,以TEST结尾,具体格式为:[功能][子功能]TEST,子功能支持向下细分。 示例:
AppInfoTest.js
- 用例示例
/*
 * Copyright (C) 2021 XXXX Device Co., Ltd.
 * Licensed under the Apache License, Version 2.0 (the "License");
 * you may not use this file except in compliance with the License.
 * You may obtain a copy of the License at
 *
 *     http://www.apache.org/licenses/LICENSE-2.0
 *
 * Unless required by applicable law or agreed to in writing, software
 * distributed under the License is distributed on an "AS IS" BASIS,
 * WITHOUT WARRANTIES OR CONDITIONS OF ANY KIND, either express or implied.
 * See the License for the specific language governing permissions and
 * limitations under the License.
 */
import app from '@system.app'

import {describe, beforeAll, beforeEach, afterEach, afterAll, it, expect} from 'deccjsunit/index'

describe("AppInfoTest", function () {
    beforeAll(function() {
        // input testsuit setup step,setup invoked before all testcases
         console.info('beforeAll caled')
    })

    afterAll(function() {
         // input testsuit teardown step,teardown invoked after all testcases
         console.info('afterAll caled')
    })

    beforeEach(function() {
        // input testcase setup step,setup invoked before each testcases
         console.info('beforeEach caled')
    })

    afterEach(function() {
        // input testcase teardown step,teardown invoked after each testcases
         console.info('afterEach caled')
    })

    /*
     * @tc.name:appInfoTest001
     * @tc.desc:verify app info is not null
     * @tc.type: FUNC
     * @tc.require: issueNumber
     */
    it("appInfoTest001", 0, function () {
        //step 1:调用函数获取结果
        var info = app.getInfo()

        //Step 2:使用断言比较预期与实际结果
        expect(info != null).assertEqual(true)
    })
})
详细内容介绍:
- 添加测试用例文件头注释信息
/*
 * Copyright (C) 2021 XXXX Device Co., Ltd.
 * Licensed under the Apache License, Version 2.0 (the "License");
 * you may not use this file except in compliance with the License.
 * You may obtain a copy of the License at
 *
 *     http://www.apache.org/licenses/LICENSE-2.0
 *
 * Unless required by applicable law or agreed to in writing, software
 * distributed under the License is distributed on an "AS IS" BASIS,
 * WITHOUT WARRANTIES OR CONDITIONS OF ANY KIND, either express or implied.
 * See the License for the specific language governing permissions and
 * limitations under the License.
 */
- 导入被测api和jsunit测试库
import app from '@system.app'

import {describe, beforeAll, beforeEach, afterEach, afterAll, it, expect} from 'deccjsunit/index'
- 定义测试套(测试类)
describe("AppInfoTest", function () {
    beforeAll(function() {
        // input testsuit setup step,setup invoked before all testcases
         console.info('beforeAll caled')
    })

    afterAll(function() {
         // input testsuit teardown step,teardown invoked after all testcases
         console.info('afterAll caled')
    })

    beforeEach(function() {
        // input testcase setup step,setup invoked before each testcases
         console.info('beforeEach caled')
    })

    afterEach(function() {
        // input testcase teardown step,teardown invoked after each testcases
         console.info('afterEach caled')
    })
- 测试用例实现
/*
 * @tc.name:appInfoTest001
 * @tc.desc:verify app info is not null
 * @tc.type: FUNC
 * @tc.require: issueNumber
 */
 it("appInfoTest001", 0, function () {
    //step 1:调用函数获取结果
    var info = app.getInfo()

    //Step 2:使用断言比较预期与实际结果
    expect(info != null).assertEqual(true)
 })
注意: @tc.require: 格式必须以AR/SR或issue开头: 如:issueI56WJ7
测试用例编译文件编写
根据测试用例目录规划,当执行某一用例时,测试框架会根据编译文件逐层查找,最终找到所需用例进行编译。下面通过不同示例来讲解gn文件如何编写。
TDD测试
针对不同语言,下面提供不同的编译模板以供参考。
- C++用例编译配置示例
# Copyright (c) 2021 XXXX Device Co., Ltd.

import("//build/test.gni")

module_output_path = "developer_test/calculator"

config("module_private_config") {
  visibility = [ ":*" ]

  include_dirs = [ "../../../include" ]
}

ohos_unittest("CalculatorSubTest") {
  module_out_path = module_output_path

  sources = [
    "../../../include/calculator.h",
    "../../../src/calculator.cpp",
  ]

  sources += [ "calculator_sub_test.cpp" ]

  configs = [ ":module_private_config" ]

  deps = [ "//third_party/googletest:gtest_main" ]
}

group("unittest") {
  testonly = true
  deps = [":CalculatorSubTest"]
}
详细内容如下:
- 添加文件头注释信息
# Copyright (c) 2021 XXXX Device Co., Ltd.
- 导入编译模板文件
import("//build/test.gni")
- 指定文件输出路径
module_output_path = "developer_test/calculator"
说明: 此处输出路径为部件/模块名。
- 配置依赖包含目录
config("module_private_config") {
  visibility = [ ":*" ]

  include_dirs = [ "../../../include" ]
}
说明: 一般在此处对相关配置进行设置,在测试用例编译脚本中可直接引用。
- 指定测试用例编译目标输出的文件名称
ohos_unittest("CalculatorSubTest") {
}
- 编写具体的测试用例编译脚本(添加需要参与编译的源文件、配置和依赖)
ohos_unittest("CalculatorSubTest") {
  module_out_path = module_output_path
  sources = [
    "../../../include/calculator.h",
    "../../../src/calculator.cpp",
    "../../../test/calculator_sub_test.cpp"
  ]
  sources += [ "calculator_sub_test.cpp" ]
  configs = [ ":module_private_config" ]
  deps = [ "//third_party/googletest:gtest_main" ]
}
- 对目标测试用例文件进行条件分组
ohos_unittest("CalculatorSubTest") {
  module_out_path = module_output_path
  sources = [
    "../../../include/calculator.h",
    "../../../src/calculator.cpp",
    "../../../test/calculator_sub_test.cpp"
  ]
  sources += [ "calculator_sub_test.cpp" ]
  configs = [ ":module_private_config" ]
  deps = [ "//third_party/googletest:gtest_main" ]
}
说明: 进行条件分组的目的在于执行用例时可以选择性的执行某一种特定类型的用例。
- ** FA模型JavaScript用例编译配置示例**
# Copyright (C) 2021 XXXX Device Co., Ltd.

import("//build/test.gni")

module_output_path = "developer_test/app_info"

ohos_js_unittest("GetAppInfoJsTest") {
  module_out_path = module_output_path

  hap_profile = "./config.json"
  certificate_profile = "//test/developer_test/signature/openharmony_sx.p7b"
}

group("unittest") {
  testonly = true
  deps = [ ":GetAppInfoJsTest" ]
}
详细内容如下:
- 添加文件头注释信息
# Copyright (C) 2021 XXXX Device Co., Ltd.
- 导入编译模板文件
import("//build/test.gni")
- 指定文件输出路径
module_output_path = "developer_test/app_info"
说明: 此处输出路径为部件/模块名。
- 指定测试用例编译目标输出的文件名称
ohos_js_unittest("GetAppInfoJsTest") {
}
说明:
- 使用模板ohos_js_unittest定义js测试套,注意与C++用例区分。
- js测试套编译输出文件为hap类型,hap名为此处定义的测试套名,测试套名称必须以JsTest结尾。
- 指定hap包配置文件config.json和签名文件,两个配置为必选项
ohos_js_unittest("GetAppInfoJsTest") {
  module_out_path = module_output_path

  hap_profile = "./config.json"
  certificate_profile = "//test/developer_test/signature/openharmony_sx.p7b"
}
config.json为hap编译所需配置文件,需要开发者根据被测sdk版本配置“target”项,其余项可默认,具体如下所示:
{
  "app": {
    "bundleName": "com.example.myapplication",
    "vendor": "example",
    "version": {
      "code": 1,
      "name": "1.0"
    },
    "apiVersion": {
           "compatible": 4,
         "target": 5     // 根据被测sdk版本进行修改,此例为sdk5
    }
  },
  "deviceConfig": {},
  "module": {
    "package": "com.example.myapplication",
    "name": ".MyApplication",
    "deviceType": [
      "phone"
    ],
    "distro": {
      "deliveryWithInstall": true,
      "moduleName": "entry",
      "moduleType": "entry"
    },
    "abilities": [
      {
      "skills": [
          {
            "entities": [
              "entity.system.home"
            ],
            "actions": [
              "action.system.home"
            ]
          }
        ],
        "name": "com.example.myapplication.MainAbility",
        "icon": "$media:icon",
        "description": "$string:mainability_description",
        "label": "MyApplication",
        "type": "page",
        "launchType": "standard"
      }
    ],
    "js": [
      {
        "pages": [
          "pages/index/index"
        ],
        "name": "default",
          "window": {
             "designWidth": 720,
             "autoDesignWidth": false
          }
        }
      ]
    }
  }
- 对目标测试用例文件进行条件分组
group("unittest") {
  testonly = true
  deps = [ ":GetAppInfoJsTest" ]
}
说明: 进行条件分组的目的在于执行用例时可以选择性的执行某一种特定类型的用例。
- stage模型ets用例编译配置示例
# Copyright (C) 2022 XXXX Device Co., Ltd.

import("//build/test.gni")

want_output_path = "developer_test/stage_test"

ohos_js_stage_unittest("ActsBundleMgrStageEtsTest") {
  hap_profile = "entry/src/main/module.json"
  deps = [
    ":actbmsstageetstest_js_assets",
    ":actbmsstageetstest_resources",
  ]
  ets2abc = true
  certificate_profile = "signature/openharmony_sx.p7b"
  hap_name = "ActsBundleMgrStageEtsTest"
  subsystem_name = "developer_test"
  part_name = "stage_test"  // 部件名称
  module_out_path = want_output_path   // 必须定义输出路径
}
ohos_app_scope("actbmsstageetstest_app_profile") {
  app_profile = "AppScope/app.json"
  sources = [ "AppScope/resources" ]
}
ohos_js_assets("actbmsstageetstest_js_assets") {
  source_dir = "entry/src/main/ets"
}
ohos_resources("actbmsstageetstest_resources") {
  sources = [ "entry/src/main/resources" ]
  deps = [ ":actbmsstageetstest_app_profile" ]
  hap_profile = "entry/src/main/module.json"
}
group("unittest") {
  testonly = true
  deps = []
  deps += [ ":ActsBundleMgrStageEtsTest" ]
}
说明: 进行条件分组的目的在于执行用例时可以选择性的执行某一种特定类型的用例。
编译入口配置文件bundle.json
当完成用例编译配置文件编写后,需要进一步编写部件编译配置文件,以关联到具体的测试用例。
"build": {
    "sub_component": [
		"//test/testfwk/developer_test/examples/app_info:app_info",
		"//test/testfwk/developer_test/examples/detector:detector",
		"//test/testfwk/developer_test/examples/calculator:calculator"
    ],
    "inner_list": [
		{
			"header": {
				"header_base": "test/testfwk/developer_test/examples/detector/include",
				"header_files": [
					"detector.h"
				]
		},
		"name": "//test/testfwk/developer_test/examples/detector:detector"
	  }
    ],
    "test": [ //配置模块calculator下的test
      "//test/testfwk/developer_test/examples/app_info/test:unittest",
      "//test/testfwk/developer_test/examples/calculator/test:unittest",
      "//test/testfwk/developer_test/examples/calculator/test:fuzztest"
 }
说明: test_list中配置的是对应模块的测试用例。
测试用例资源配置
测试依赖资源主要包括测试用例在执行过程中需要的图片文件,视频文件、第三方库等对外的文件资源,目前只支持静态资源的配置。
依赖资源文件配置步骤如下:
-
在部件的test目录下创建resource目录,在resource目录下创建对应的模块,在模块目录中存放该模块所需要的资源文件
-
在resource目录下对应的模块目录中创建一个ohos_test.xml文件,文件内容格式如下:
<?xml version="1.0" encoding="UTF-8"?>
<configuration ver="2.0">
    <target name="CalculatorSubTest">
        <preparer>
            <option name="push" value="test.jpg -> /data/test/resource" src="res"/>
            <option name="push" value="libc++.z.so -> /data/test/resource" src="out"/>
        </preparer>
    </target>
</configuration>
- 在测试用例的编译配置文件中定义resource_config_file进行指引,用来指定对应的资源文件ohos_test.xml
ohos_unittest("CalculatorSubTest") {
  resource_config_file = "//system/subsystem/partA/test/resource/calculator/ohos_test.xml"
}
说明:
- target_name: 测试套的名称,定义在测试目录的BUILD.gn中。preparer: 表示该测试套执行前执行的动作。
- src=“res”: 表示测试资源位于test目录下的resource目录下,src=“out”:表示位于out/release/$(部件)目录下。
测试用例执行
在执行测试用例之前,针对用例使用设备的不同,需要对相应配置进行修改,修改完成即可执行测试用例。
user_config.xml配置
<user_config>
  <build>
    <!-- 是否编译demo用例, 默认为false,如果需要编译demo可修改为true -->
    <example>false</example>
    <!-- 是否编译版本, 默认为false -->
    <version>false</version>
    <!-- 是否编译测试用例, 默认为true,若已完成编译,再执行用例之前可修改为false,防止重新编译 -->
    <testcase>true</testcase>
	<!-- 在编译测试用例的情况下,选择编译target_cpu是64位的还是32位的,默认为空(32bit)可以选择: arm64 -->
    <parameter>
       <target_cpu></target_cpu>
    </parameter>
  </build>
  <environment>
    <!-- 配置远程映射机器的IP及端口,以支持HDC连接的设备 -->
    <device type="usb-hdc">
      <ip></ip>
      <port></port>
      <sn></sn>
    </device>
    <!-- 配置设备的串口信息,以支持串口连接的设备 -->
    <device type="com" label="ipcamera">
      <serial>
        <com></com>
        <type>cmd</type>
        <baud_rate>115200</baud_rate>
        <data_bits>8</data_bits>
        <stop_bits>1</stop_bits>
        <timeout>1</timeout>
      </serial>
    </device>
  </environment>
  <!-- 配置测试用例路径,若测试用例未编译,即<testcase>标签属性为true时,此处默认不填写;若编译已完成,需在此处指定测试用例的实际路径 -->
  <test_cases>
    <dir></dir>
  </test_cases>
  <!-- 配置覆盖率编译路径 -->
  <coverage>
    <outpath></outpath>
  </coverage>
  <!-- NFS挂载信息配置,被测设备仅支持串口连接时配置,指定NFS的映射路径,host_dir为PC侧的NFS目录,board_dir为板侧创建的目录 -->
  <NFS>
    <host_dir></host_dir>
    <mnt_cmd></mnt_cmd>
    <board_dir></board_dir>
  </NFS>
</user_config>
**说明:**在执行测试用例之前,若使用HDC连接设备,用例仅需配置设备IP和端口号即可,其余信息均默认不修改。
Windows环境执行
测试用例编译
由于Windows环境下无法实现用例编译,因此执行用例前需要在Linux环境下进行用例编译,用例编译命令:
./build.sh --product-name {product_name} --build-target make_test
说明:
- product-name:指定编译产品名称。
- build-target:指定所需编译用例,make_test表示指定全部用例,实际开发中可指定特定用例。
编译完成后,测试用例将自动保存在out/ohos-arm-release/packages/phone/tests目录下。
搭建执行环境
- 在Windows环境创建测试框架目录Test,并在此目录下创建testcase目录
- 从Linux环境拷贝测试框架developer_test和xdevice到创建的Test目录下,拷贝编译好的测试用例到testcase目录下
说明: 将测试框架及测试用例从Linux环境移植到Windows环境,以便后续执行。
- 修改user_config.xml
<build>
  <!-- 由于测试用例已编译完成,此标签属性需改为false -->
  <testcase>false</testcase>
</build>
<test_cases>
  <!-- 由于已将测试用例拷贝到Windows环境下,测试用例输出路径发生改变,需要修改为拷贝后所存放的路径 -->
  <dir>D:\Test\testcase\tests</dir>
</test_cases>
说明:
<testcase>标签表示是否需要编译用例;<dir>标签表示测试用例查找路径。
执行用例
- 启动测试框架
start.bat
-
选择产品形态
进入测试框架,系统会自动提示您选择产品形态,请根据实际的开发板进行选择。
如需手动添加,请在config/framework_config.xml的标签内增加产品项。
-
执行测试用例
当选择完产品形态,可参考如下指令执行TDD测试用例。
run -t UT
run -t UT -tp PartName
run -t UT -tp PartName -tm TestModuleName
run -t UT -tp ability_base -ts base_object_test
run -t UT -tp PartName -tm TestModuleName -ts CalculatorSubTest
run -t UT -ts base_object_test
run -t UT -ts base_object_test -tc AAFwkBaseObjectTest.BaseObject_test_001
run -t UT -ts CalculatorSubTest -tc CalculatorSubTest.interger_sub_00l
run -t UT -cov coverage
run -t UT -ra random
run -t UT -tp PartName -pd partdeps
run -t UT -ts base_object_test --repeat 5
run -hl
run -rh 3
run --retry
执行命令参数说明:
-t [TESTTYPE]: 指定测试用例类型,有UT,MST,ST,PERF,FUZZ,BENCHMARK,另外还有ACTS,HATS等。(必选参数)
-tp [TESTPART]: 指定部件,可独立使用。
-tm [TESTMODULE]: 指定模块,不可独立使用,需结合-tp指定上级部件使用。
-ts [TESTSUITE]: 指定测试套,可独立使用。
-tc [TESTCASE]: 指定测试用例,同时需要注明测试套内class名称,不可独立使用,需结合-ts指定上级测试套使用。
-cov [COVERAGE]: 覆盖率执行参数。
-h : 帮助命令
-ra [random]: c++用例乱序执行参数
-pd [partdeps]: 二级依赖部件执行参数
--repeat : 支持设置用例执行次数。
-hl [HISTORYLIST]: 显示最近10条测试用例,超过10条,只显示最近10条。
-rh [RUNHISTORY]: 执行历史记录的第几条记录运行
--retry:检查上次运行结果,如果有失败用例则重复测试
Linux环境执行
远程端口映射
为了在Linux远程服务器以及Linux虚拟机两种环境下执行测试用例,需要对端口进行远程映射,以实现与设备的数据通路连接。具体操作如下:
- HDC Server指令:
hdc kill
hdc -m -s 0.0.0.0:8710
说明: IP和端口号为默认值。
- HDC Client指令:
hdc -s xx.xx.xx.xx:8710 list targets
说明: 此处IP填写设备侧IP地址。
执行用例
- 启动测试框架
./start.sh
-
选择产品形态
进入测试框架,系统会自动提示您选择产品形态,请根据实际的开发板进行选择。
若需要自测试框架编译测试用例,且没有找到需要的产品形态需手动添加,请在config/framework_config.xml的标签内增加产品项。
<framework_config>
 <productform>
  <option name="ipcamera_hispark_aries" />
  <option name="ipcamera_hispark_taurus" />
  <option name="wifiiot_hispark_pegasus" />
  <option name="" />
 </productform>
</framework_config>
-
执行测试用例
1)TDD命令
测试框架在执行用例时会根据指令找到所需用例,自动实现用例编译,执行过程,完成自动化测试。
run -t UT
run -t UT -tp PartName
run -t UT -tp PartName -tm TestModuleName
run -t UT -tp ability_base -ts base_object_test
run -t UT -tp PartName -tm TestModuleName -ts CalculatorSubTest
run -t UT -ts base_object_test
run -t UT -ts base_object_test -tc AAFwkBaseObjectTest.BaseObject_test_001
run -t UT -ts CalculatorSubTest -tc CalculatorSubTest.interger_sub_00l
run -t -cov coverage
run -t UT -ra random
run -t UT -tp PartName -pd partdeps
run -t UT -ts base_object_test --repeat 5
run -hl
run -rh 3
run --retry
执行命令参数说明:
-t [TESTTYPE]: 指定测试用例类型,有UT,MST,ST,PERF,FUZZ,BENCHMARK等。(必选参数)
-tp [TESTPART]: 指定部件,可独立使用。
-tm [TESTMODULE]: 指定模块,不可独立使用,需结合-tp指定上级部件使用。
-ts [TESTSUITE]: 指定测试套,可独立使用。
-tc [TESTCASE]: 指定测试用例,同时需要注明测试套内class名称,不可独立使用,需结合-ts指定上级测试套使用。
-cov [COVERAGE]: 覆盖率执行参数。
-h : 帮助命令
-ra [random]: c++用例乱序执行参数
-pd [partdeps]: 二级依赖部件执行参数
--repeat : 支持设置用例执行次数。
-hl [HISTORYLIST]: 显示最近10条测试用例,超过10条,只显示最近10条。
-rh [RUNHISTORY]: 执行历史记录的第几条记录运行
--retry:检查上次运行结果,如果有失败用例则重复测试
在linux下可以使用help命令查看有哪些产品形态、测试类型、支持的子系统、部件
查看帮助命令:help
查看show命令:help show
查看支持的设备形态:   show productlist
查看支持的测试类型:   show typelist
查看支持的测试子系统: show subsystemlist
查看支持的测试部件:   show partlist
2)ACTS/HATS命令
当选择完产品形态,可以参考如下执行ACTS或HATS测试用例
run -t ACTS
run -t HATS
run -t ACTS -ss arkui
run -t ACTS -ss arkui, modulemanager
run -t ACTS -ss arkui -ts ActsAceEtsTest
run -t HATS -ss telephony -ts HatsHdfV1RilServiceTest
run -t ACTS -ss arkui -tp ActsPartName
run -t ACTS -ss arkui -ts ActsAceEtsTest,ActsAceEtsResultTest
run -t HATS -ss powermgr -ts HatsPowermgrBatteryTest,HatsPowermgrThermalTest
run -t ACTS -ss arkui -ts ActsAceEtsTest -ta class:alphabetIndexerTest#alphabetIndexerTest001
run -t ACTS -ss arkui -ts ActsAceEtsTest -ta class:alphabetIndexerTest#alphabetIndexerTest001 --repeat 2
run -hl
run -rh 1
run --retry
执行命令参数说明,ACTS和HATS命令参数一致,与TDD有所不同:
-t [TESTTYPE]: 指定测试用例类型,有ACTS,HATS等。(必选参数)
-ss [SUBSYSTEM]: 指定子系统,可单独使用,且可以执行多个子系统,用逗号隔开。
-tp [TESTPART]: 指定部件,可独立使用。
-ts [TESTSUITE]: 指定测试套,可独立使用,且可以执行多个测试套,用逗号隔开。
-ta [TESTARGS]: 指定测试类测试方法,需结合-ts指定上级测试套使用。
--repeat : 支持设置用例执行次数。
-hl [HISTORYLIST]: 显示最近10条测试用例,超过10条,只显示最近10条。
-rh [RUNHISTORY]: 执行历史记录的第几条记录运行
--retry:检查上次运行结果,如果有失败用例则重复测试
测试报告日志
当执行完测试指令,控制台会自动生成测试结果,若需要详细测试报告您可在相应的数据文档中进行查找。
测试结果
测试结果输出根路径如下:
test/developer_test/reports/xxxx_xx_xx_xx_xx_xx
说明: 测试报告文件目录将自动生成。
该目录中包含以下几类结果:
| 类型 | 描述 |
|---|---|
| result/ | 测试用例格式化结果 |
| log/plan_log_xxxx_xx_xx_xx_xx_xx.log | 测试用例日志 |
| summary_report.html | 测试报告汇总 |
| details_report.html | 测试报告详情 |
测试框架日志
reports/platform_log_xxxx_xx_xx_xx_xx_xx.log
覆盖率用户指导
- (可选执行)为了屏蔽非核心代码产生的冗余分支数据,可以在源码编译之前进入/test/testfwk/developer_test/localCoverage/restore_comment目录下执行:
python3 build_before_generate.py
选择对应的部件,执行命令例如:
run -tp partname
run -tp partname1 partname2
- 编译版本之前首先修改编译选项,涉及到自己子系统的build.gn文件cflags或者cflags_cc及ldflags选项都需要加–coverage字段:
ldflags = [ "--coverage" ]
C:   cflags = [ "--coverage" ]
C++: cflags_cc = [ "--coverage" ]
3. 执行覆盖率需要安装以下依赖包:
   1)安装lcov, 安装命令:sudo apt install lcov
   2)安装dos2unix, 安装命令:apt install dos2unix.
   3)安装lxml, 安装命令: pip install lxml
   4)安装selectolax, 安装命令: pip install selectolax
   5)安装CppHeaderParser, 安装命令 pip install CppHeaderParser
- 远程映射设备,修改usr_config.xml中的ip号,设备映射方式查看上面介绍的远程端口映射,
    <!-- 配置远程映射机器的IP(设备挂载的pc的ip) -->
    <device type="usb-hdc">
      <ip></ip>
      <port></port>
      <sn></sn>
    </device>
-
执行
./start.sh
命令例如下:
run -t UT -tp 部件名 -cov coverage
run -t UT -ss 子系统名 -cov coverage
run -t UT -ss 子系统名 -tp 部件名 -cov coverage
run -t UT MST ST -tp 部件名 -cov coverage
注意: 必须添加 -cov coverage 参数
-
覆盖率报告路径
代码覆盖率报告:/test/testfwk/developer_test/localCoverage/codeCoverage/results/coverage/reports/cxx/html
接口覆盖率报告:/test/testfwk/developer_test/localCoverage/interfaceCoverage/results/coverage/interface_kits/html
发布版本说明

为了能让大家更好的学习鸿蒙(HarmonyOS NEXT)开发技术,这边特意整理了《鸿蒙开发学习手册》(共计890页),希望对大家有所帮助:https://qr21.cn/FV7h05
《鸿蒙开发学习手册》:
如何快速入门:https://qr21.cn/FV7h05
- 基本概念
- 构建第一个ArkTS应用
- ……
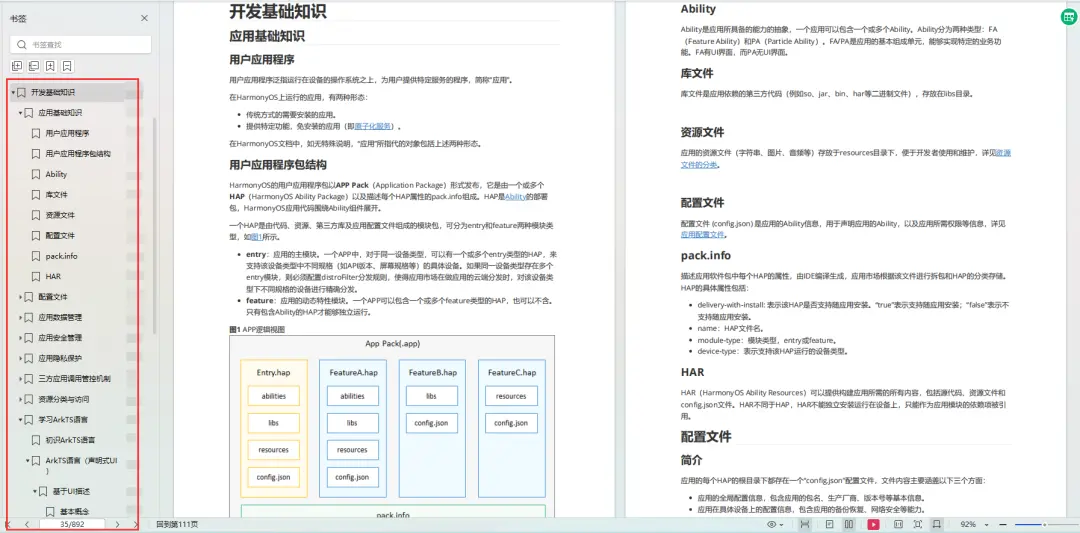
开发基础知识:https://qr21.cn/FV7h05
- 应用基础知识
- 配置文件
- 应用数据管理
- 应用安全管理
- 应用隐私保护
- 三方应用调用管控机制
- 资源分类与访问
- 学习ArkTS语言
- ……
基于ArkTS 开发:https://qr21.cn/FV7h05
- Ability开发
- UI开发
- 公共事件与通知
- 窗口管理
- 媒体
- 安全
- 网络与链接
- 电话服务
- 数据管理
- 后台任务(Background Task)管理
- 设备管理
- 设备使用信息统计
- DFX
- 国际化开发
- 折叠屏系列
- ……

鸿蒙开发面试真题(含参考答案):https://qr18.cn/F781PH
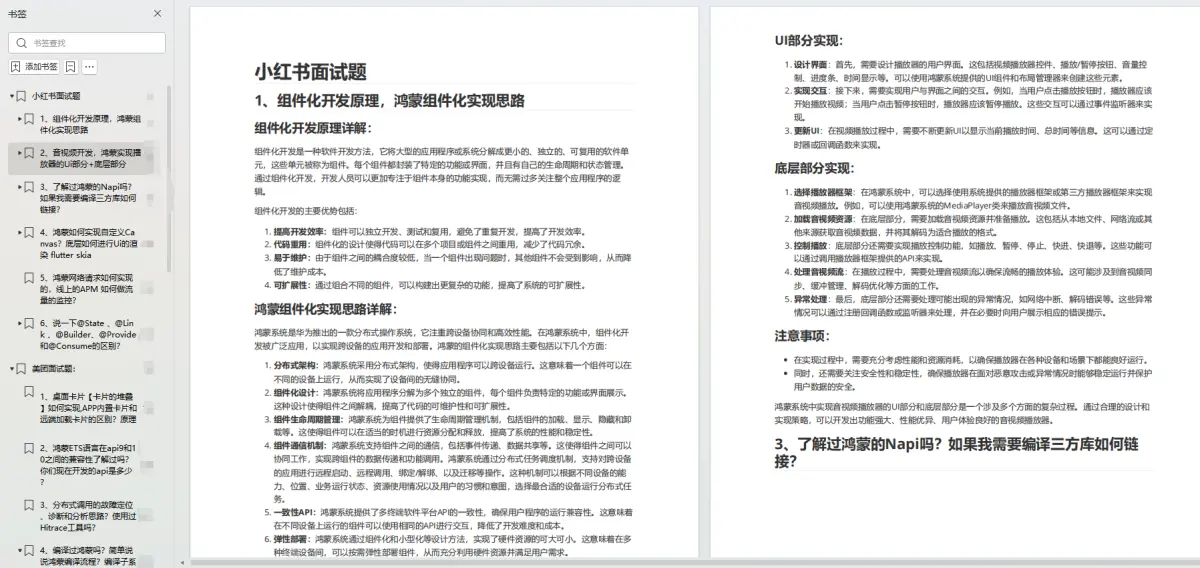
鸿蒙开发面试大盘集篇(共计319页):https://qr18.cn/F781PH
1.项目开发必备面试题
2.性能优化方向
3.架构方向
4.鸿蒙开发系统底层方向
5.鸿蒙音视频开发方向
6.鸿蒙车载开发方向
7.鸿蒙南向开发方向