场景介绍
Neural Network Runtime 作为 AI 推理引擎和加速芯片的桥梁,为 AI 推理引擎提供精简的 Native 接口,满足推理引擎通过加速芯片执行端到端推理的需求。
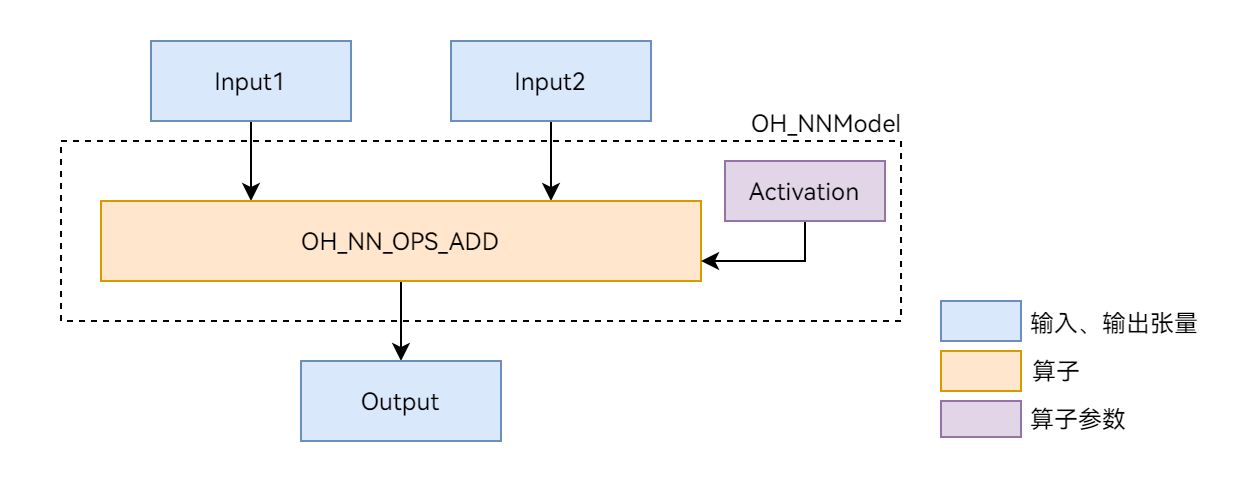
本文以图 1 展示的 Add 单算子模型为例,介绍 Neural Network Runtime 的开发流程。Add 算子包含两个输入、一个参数和一个输出,其中的 activation 参数用于指定 Add 算子中激活函数的类型。
图 1 Add 单算子网络示意图
环境准备
环境要求
Neural Network Runtime 部件的环境要求如下:
● 开发环境:Ubuntu 18.04 及以上。
● 接入设备:HarmonyOS 定义的标准设备,并且系统中内置的硬件加速器驱动,已通过 HDI 接口对接 Neural Network Runtime。
由于 Neural Network Runtime 通过 Native API 对外开放,需要通过 Native 开发套件编译 Neural Network Runtime 应用。
环境搭建
1. 打开 Ubuntu 编译服务器的终端。
2. 把下载好的 Native 开发套件压缩包拷贝至当前用户根目录下。
3. 执行以下命令解压 Native 开发套件的压缩包。
unzip native-linux-{版本号}.zip
解压缩后的内容如下(随版本迭代,目录下的内容可能发生变化,请以最新版本的 Native API 为准):
native/├── build // 交叉编译工具链├── build-tools // 编译构建工具├── docs├── llvm├── nativeapi_syscap_config.json├── ndk_system_capability.json├── NOTICE.txt├── oh-uni-package.json└── sysroot // Native API头文件和库
接口说明
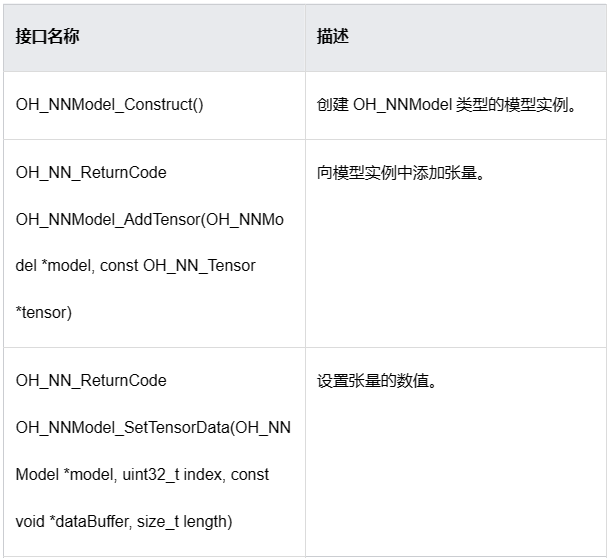
这里给出 Neural Network Runtime 开发流程中通用的接口,具体请见下列表格。
结构体

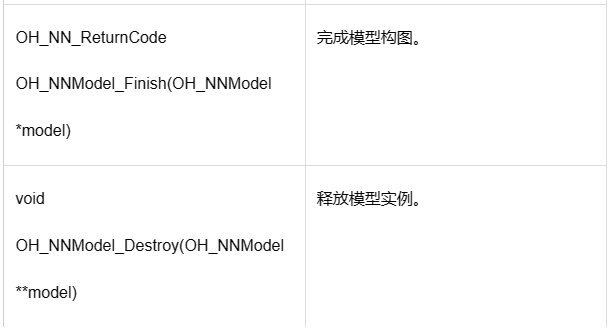
模型构造相关接口

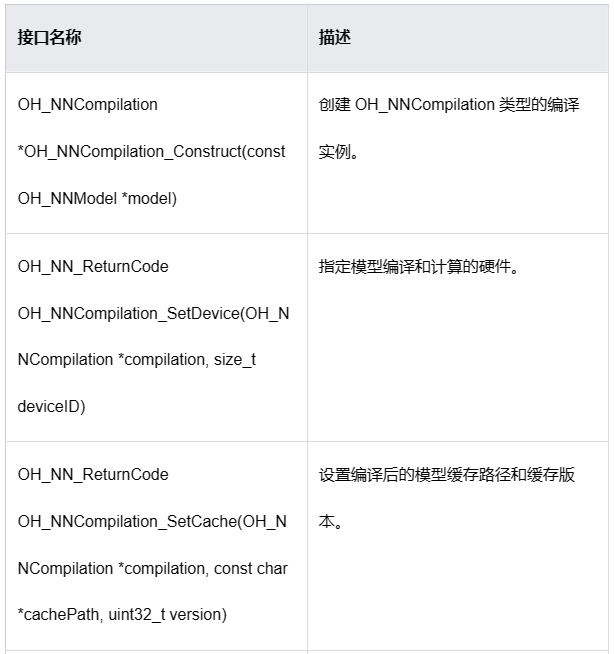
模型编译相关接口
执行推理相关接口

设备管理相关接口

开发步骤
Neural Network Runtime 的开发流程主要包含模型构造、模型编译和推理执行三个阶段。以下开发步骤以 Add 单算子模型为例,介绍调用 Neural Network Runtime 接口,开发应用的过程。
1. 创建应用样例文件。
首先,创建 Neural Network Runtime 应用样例的源文件。在项目目录下执行以下命令,创建 nnrt_example/目录,在目录下创建 nnrt_example.cpp 源文件。
mkdir ~/nnrt_example && cd ~/nnrt_exampletouch nnrt_example.cpp
2. 导入 Neural Network Runtime。
在 nnrt_example.cpp 文件的开头添加以下代码,引入 Neural Network Runtime 模块。
#include <cstdint>#include <iostream>#include <vector>#include "neural_network_runtime/neural_network_runtime.h"// 常量,用于指定输入、输出数据的字节长度const size_t DATA_LENGTH = 4 * 12;
3. 构造模型。
使用 Neural Network Runtime 接口,构造 Add 单算子样例模型。
OH_NN_ReturnCode BuildModel(OH_NNModel** pModel)
{
// 创建模型实例,进行模型构造
OH_NNModel* model = OH_NNModel_Construct();
if (model == nullptr) {
std::cout << "Create model failed." << std::endl;
return OH_NN_MEMORY_ERROR;
}
// 添加Add算子的第一个输入Tensor,类型为float32,张量形状为[1, 2, 2, 3]
int32_t inputDims[4] = {1, 2, 2, 3};
OH_NN_Tensor input1 = {OH_NN_FLOAT32, 4, inputDims, nullptr, OH_NN_TENSOR};
OH_NN_ReturnCode ret = OH_NNModel_AddTensor(model, &input1);
if (ret != OH_NN_SUCCESS) {
std::cout << "BuildModel failed, add Tensor of first input failed." << std::endl;
return ret;
}
// 添加Add算子的第二个输入Tensor,类型为float32,张量形状为[1, 2, 2, 3]
OH_NN_Tensor input2 = {OH_NN_FLOAT32, 4, inputDims, nullptr, OH_NN_TENSOR};
ret = OH_NNModel_AddTensor(model, &input2);
if (ret != OH_NN_SUCCESS) {
std::cout << "BuildModel failed, add Tensor of second input failed." << std::endl;
return ret;
}
// 添加Add算子的参数Tensor,该参数Tensor用于指定激活函数的类型,Tensor的数据类型为int8。
int32_t activationDims = 1;
int8_t activationValue = OH_NN_FUSED_NONE;
OH_NN_Tensor activation = {OH_NN_INT8, 1, &activationDims, nullptr, OH_NN_ADD_ACTIVATIONTYPE};
ret = OH_NNModel_AddTensor(model, &activation);
if (ret != OH_NN_SUCCESS) {
std::cout << "BuildModel failed, add Tensor of activation failed." << std::endl;
return ret;
}
// 将激活函数类型设置为OH_NN_FUSED_NONE,表示该算子不添加激活函数。
ret = OH_NNModel_SetTensorData(model, 2, &activationValue, sizeof(int8_t));
if (ret != OH_NN_SUCCESS) {
std::cout << "BuildModel failed, set value of activation failed." << std::endl;
return ret;
}
// 设置Add算子的输出,类型为float32,张量形状为[1, 2, 2, 3]
OH_NN_Tensor output = {OH_NN_FLOAT32, 4, inputDims, nullptr, OH_NN_TENSOR};
ret = OH_NNModel_AddTensor(model, &output);
if (ret != OH_NN_SUCCESS) {
std::cout << "BuildModel failed, add Tensor of output failed." << std::endl;
return ret;
}
// 指定Add算子的输入、参数和输出索引
uint32_t inputIndicesValues[2] = {0, 1};
uint32_t paramIndicesValues = 2;
uint32_t outputIndicesValues = 3;
OH_NN_UInt32Array paramIndices = {¶mIndicesValues, 1};
OH_NN_UInt32Array inputIndices = {inputIndicesValues, 2};
OH_NN_UInt32Array outputIndices = {&outputIndicesValues, 1};
// 向模型实例添加Add算子
ret = OH_NNModel_AddOperation(model, OH_NN_OPS_ADD, ¶mIndices, &inputIndices, &outputIndices);
if (ret != OH_NN_SUCCESS) {
std::cout << "BuildModel failed, add operation failed." << std::endl;
return ret;
}
// 设置模型实例的输入、输出索引
ret = OH_NNModel_SpecifyInputsAndOutputs(model, &inputIndices, &outputIndices);
if (ret != OH_NN_SUCCESS) {
std::cout << "BuildModel failed, specify inputs and outputs failed." << std::endl;
return ret;
}
// 完成模型实例的构建
ret = OH_NNModel_Finish(model);
if (ret != OH_NN_SUCCESS) {
std::cout << "BuildModel failed, error happened when finishing model construction." << std::endl;
return ret;
}
*pModel = model;
return OH_NN_SUCCESS;
}
4. 查询 Neural Network Runtime 已经对接的加速芯片。
Neural Network Runtime 支持通过 HDI 接口,对接多种加速芯片。在执行模型编译前,需要查询当前设备下,Neural Network Runtime 已经对接的加速芯片。每个加速芯片对应唯一的 ID 值,在编译阶段需要通过设备 ID,指定模型编译的芯片。
void GetAvailableDevices(std::vector<size_t>& availableDevice){availableDevice.clear();// 获取可用的硬件IDconst size_t* devices = nullptr;uint32_t deviceCount = 0;OH_NN_ReturnCode ret = OH_NNDevice_GetAllDevicesID(&devices, &deviceCount);if (ret != OH_NN_SUCCESS) {std::cout << "GetAllDevicesID failed, get no available device." << std::endl;return;}for (uint32_t i = 0; i < deviceCount; i++) {availableDevice.emplace_back(devices[i]);}}
5. 在指定的设备上编译模型。
Neural Network Runtime 使用抽象的模型表达描述 AI 模型的拓扑结构,在加速芯片上执行前,需要通过 Neural Network Runtime 提供的编译模块,将抽象的模型表达下发至芯片驱动层,转换成可以直接推理计算的格式。
OH_NN_ReturnCode CreateCompilation(OH_NNModel* model, const std::vector<size_t>& availableDevice, OH_NNCompilation** pCompilation)
{
    // 创建编译实例,用于将模型传递至底层硬件编译
    OH_NNCompilation* compilation = OH_NNCompilation_Construct(model);
    if (compilation == nullptr) {
        std::cout << "CreateCompilation failed, error happened when creating compilation." << std::endl;
        return OH_NN_MEMORY_ERROR;
    }

    // 设置编译的硬件、缓存路径、性能模式、计算优先级、是否开启float16低精度计算等选项

    // 选择在第一个设备上编译模型
    OH_NN_ReturnCode ret = OH_NNCompilation_SetDevice(compilation, availableDevice[0]);
    if (ret != OH_NN_SUCCESS) {
        std::cout << "CreateCompilation failed, error happened when setting device." << std::endl;
        return ret;
    }

    // 将模型编译结果缓存在/data/local/tmp目录下,版本号指定为1
    ret = OH_NNCompilation_SetCache(compilation, "/data/local/tmp", 1);
    if (ret != OH_NN_SUCCESS) {
        std::cout << "CreateCompilation failed, error happened when setting cache path." << std::endl;
        return ret;
    }

    // 完成编译设置,进行模型编译
    ret = OH_NNCompilation_Build(compilation);
    if (ret != OH_NN_SUCCESS) {
        std::cout << "CreateCompilation failed, error happened when building compilation." << std::endl;
        return ret;
    }

    *pCompilation = compilation;
    return OH_NN_SUCCESS;
}
6. 创建执行器。
完成模型编译后,需要调用 Neural Network Runtime 的执行模块,创建推理执行器。执行阶段,设置模型输入、获取模型输出和触发推理计算的操作均围绕执行器完成。
OH_NNExecutor* CreateExecutor(OH_NNCompilation* compilation){// 创建执行实例OH_NNExecutor* executor = OH_NNExecutor_Construct(compilation);return executor;}
7. 执行推理计算,并打印计算结果。
通过执行模块提供的接口,将推理计算所需要的输入数据传递给执行器,触发执行器完成一次推理计算,获取模型的推理计算结果。
OH_NN_ReturnCode Run(OH_NNExecutor* executor)
{
    // 构造示例数据
    float input1[12] = {0, 1, 2, 3, 4, 5, 6, 7, 8, 9, 10, 11};
    float input2[12] = {11, 12, 13, 14, 15, 16, 17, 18, 19, 20, 21, 22};

    int32_t inputDims[4] = {1, 2, 2, 3};
    OH_NN_Tensor inputTensor1 = {OH_NN_FLOAT32, 4, inputDims, nullptr, OH_NN_TENSOR};
    OH_NN_Tensor inputTensor2 = {OH_NN_FLOAT32, 4, inputDims, nullptr, OH_NN_TENSOR};

    // 设置执行的输入

    // 设置执行的第一个输入,输入数据由input1指定
    OH_NN_ReturnCode ret = OH_NNExecutor_SetInput(executor, 0, &inputTensor1, input1, DATA_LENGTH);
    if (ret != OH_NN_SUCCESS) {
        std::cout << "Run failed, error happened when setting first input." << std::endl;
        return ret;
    }

    // 设置执行的第二个输入,输入数据由input2指定
    ret = OH_NNExecutor_SetInput(executor, 1, &inputTensor2, input2, DATA_LENGTH);
    if (ret != OH_NN_SUCCESS) {
        std::cout << "Run failed, error happened when setting second input." << std::endl;
        return ret;
    }

    // 设置输出的数据缓冲区,OH_NNExecutor_Run执行计算后,输出结果将保留在output中
    float output[12];
    ret = OH_NNExecutor_SetOutput(executor, 0, output, DATA_LENGTH);
    if (ret != OH_NN_SUCCESS) {
        std::cout << "Run failed, error happened when setting output buffer." << std::endl;
        return ret;
    }

    // 执行计算
    ret = OH_NNExecutor_Run(executor);
    if (ret != OH_NN_SUCCESS) {
        std::cout << "Run failed, error doing execution." << std::endl;
        return ret;
    }

    // 打印输出结果
    for (uint32_t i = 0; i < 12; i++) {
        std::cout << "Output index: " << i << ", value is: " << output[i] << "." << std::endl;
    }

    return OH_NN_SUCCESS;
}
8. 构建端到端模型构造-编译-执行流程。
步骤 3-步骤 7 实现了模型的模型构造、编译和执行流程,并封装成 4 个函数,便于模块化开发。以下示例代码将 4 个函数串联成完整的 Neural Network Runtime 开发流程。
int main(){OH_NNModel* model = nullptr;OH_NNCompilation* compilation = nullptr;OH_NNExecutor* executor = nullptr;std::vector<size_t> availableDevices;// 模型构造阶段OH_NN_ReturnCode ret = BuildModel(&model);if (ret != OH_NN_SUCCESS) {std::cout << "BuildModel failed." << std::endl;OH_NNModel_Destroy(&model);return -1;}// 获取可执行的设备GetAvailableDevices(availableDevices);if (availableDevices.empty()) {std::cout << "No available device." << std::endl;OH_NNModel_Destroy(&model);return -1;}// 模型编译阶段ret = CreateCompilation(model, availableDevices, &compilation);if (ret != OH_NN_SUCCESS) {std::cout << "CreateCompilation failed." << std::endl;OH_NNModel_Destroy(&model);OH_NNCompilation_Destroy(&compilation);return -1;}// 创建模型的推理执行器executor = CreateExecutor(compilation);if (executor == nullptr) {std::cout << "CreateExecutor failed, no executor is created." << std::endl;OH_NNModel_Destroy(&model);OH_NNCompilation_Destroy(&compilation);return -1;}// 使用上一步创建的执行器,执行单步推理计算ret = Run(executor);if (ret != OH_NN_SUCCESS) {std::cout << "Run failed." << std::endl;OH_NNModel_Destroy(&model);OH_NNCompilation_Destroy(&compilation);OH_NNExecutor_Destroy(&executor);return -1;}// 释放申请的资源OH_NNModel_Destroy(&model);OH_NNCompilation_Destroy(&compilation);OH_NNExecutor_Destroy(&executor);return 0;}
调测验证
1. 准备应用样例的编译配置文件。
新建一个 CMakeLists.txt 文件,为开发步骤中的应用样例文件 nnrt_example.cpp 添加编译配置。以下提供简单的 CMakeLists.txt 示例:
cmake_minimum_required(VERSION 3.16)project(nnrt_example C CXX)add_executable(nnrt_example./nnrt_example.cpp)target_link_libraries(nnrt_exampleneural_network_runtime.z)
2. 编译应用样例。
执行以下命令,在当前目录下新建 build/目录,在 build/目录下编译 nnrt_example.cpp,得到二进制文件 nnrt_example。
mkdir build && cd build
cmake -DCMAKE_TOOLCHAIN_FILE={交叉编译工具链的路径}/build/cmake/ohos.toolchain.cmake -DOHOS_ARCH=arm64-v8a -DOHOS_PLATFORM=OHOS -DOHOS_STL=c++_static ..
make
3. 执行以下代码,将样例推送到设备上执行。
# 将编译得到的 `nnrt_example` 推送到设备上,执行样例。hdc_std file send ./nnrt_example /data/local/tmp/.# 给测试用例可执行文件加上权限。hdc_std shell "chmod +x /data/local/tmp/nnrt_example"# 执行测试用例hdc_std shell "/data/local/tmp/nnrt_example"
如果样例执行正常,应该得到以下输出。
Output index: 0, value is: 11.000000.Output index: 1, value is: 13.000000.Output index: 2, value is: 15.000000.Output index: 3, value is: 17.000000.Output index: 4, value is: 19.000000.Output index: 5, value is: 21.000000.Output index: 6, value is: 23.000000.Output index: 7, value is: 25.000000.Output index: 8, value is: 27.000000.Output index: 9, value is: 29.000000.Output index: 10, value is: 31.000000.Output index: 11, value is: 33.000000.
4. 检查模型缓存(可选)。
如果在调测环境下,Neural Network Runtime 对接的 HDI 服务支持模型缓存功能,执行完 nnrt_example, 可以在 /data/local/tmp 目录下找到生成的缓存文件。
说明
模型的 IR 需要传递到硬件驱动层,由 HDI 服务将统一的 IR 图,编译成硬件专用的计算图,编译的过程非常耗时。Neural Network Runtime 支持计算图缓存的特性,可以将 HDI 服务编译生成的计算图,缓存到设备存储中。当下一次在同一个加速芯片上编译同一个模型时,通过指定缓存的路径,Neural Network Runtime 可以直接加载缓存文件中的计算图,减少编译消耗的时间。
检查缓存目录下的缓存文件:
ls /data/local/tmp
以下为打印结果:
# 0.nncache cache_info.nncache
如果缓存不再使用,需要手动删除缓存,可以参考以下命令,删除缓存文件。
rm /data/local/tmp/*nncache