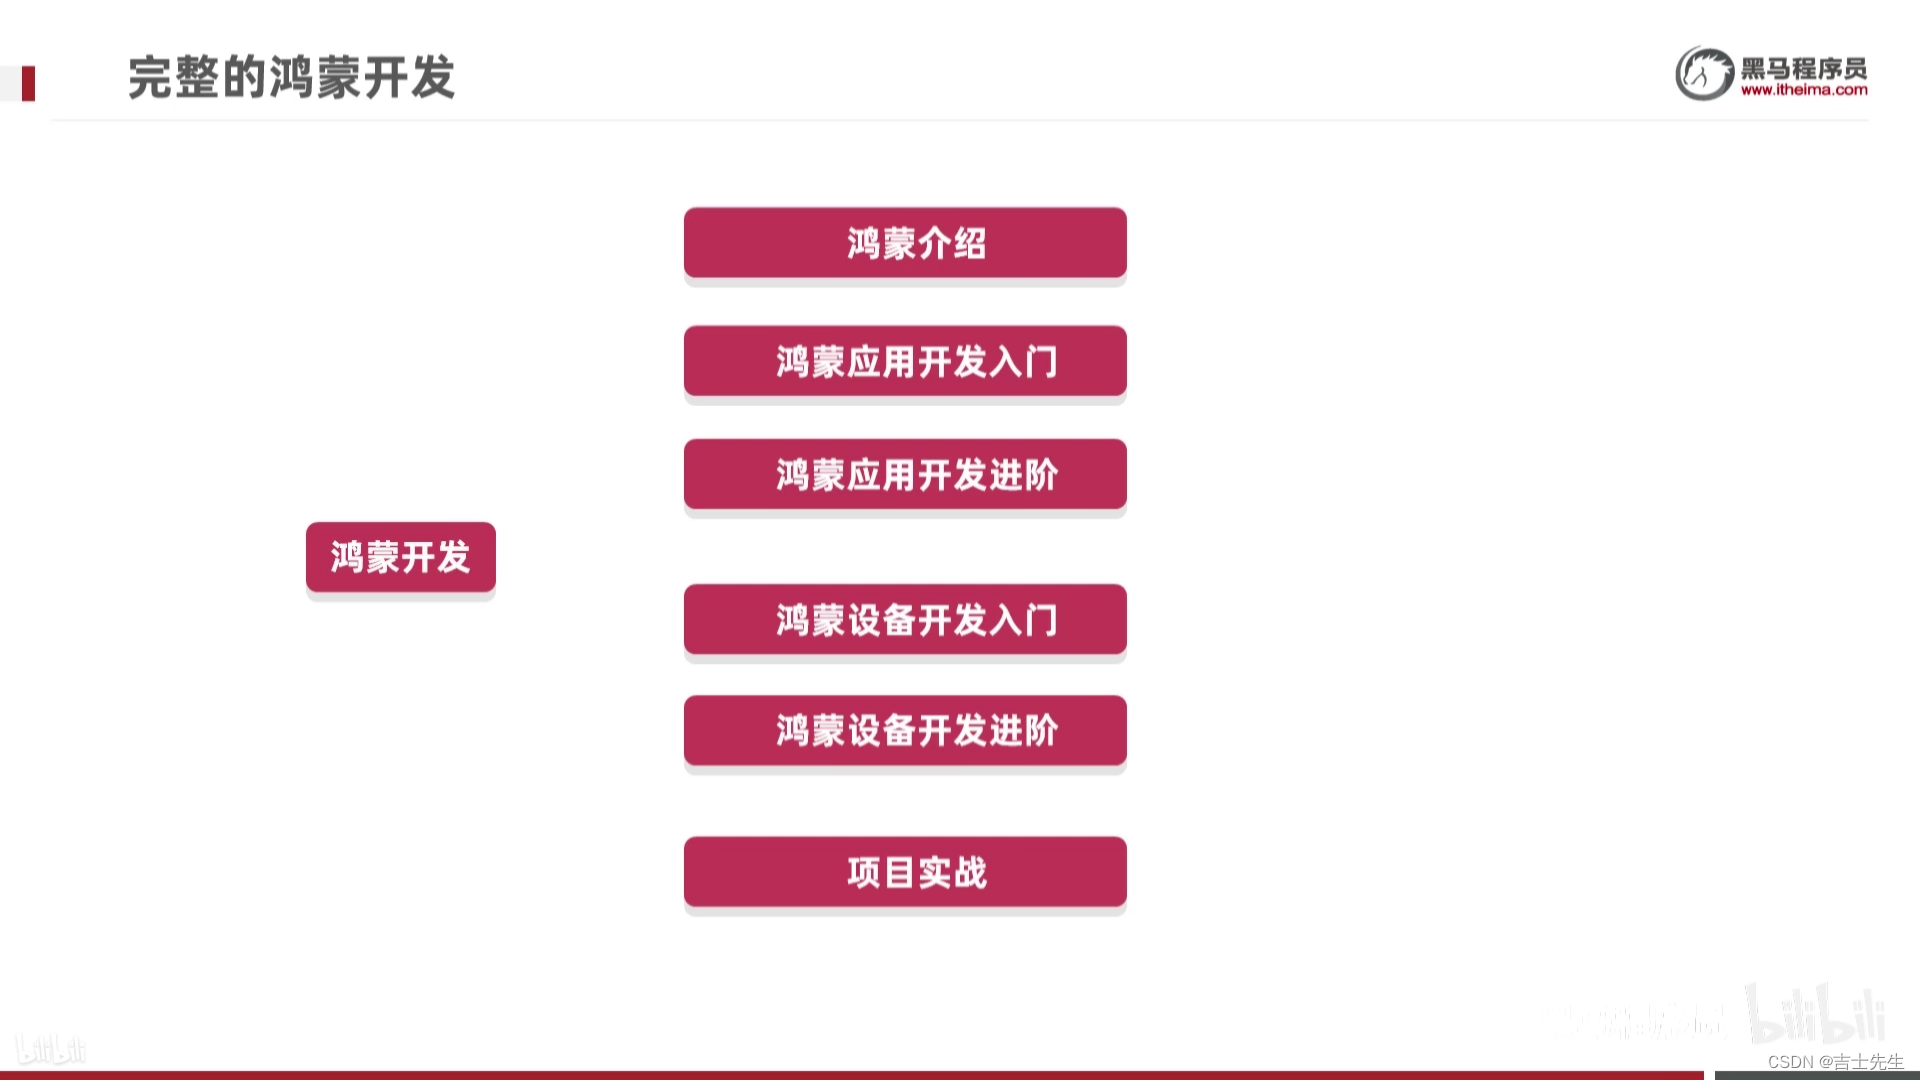
鸿蒙开发
- (一)、初识鸿蒙
- 1.初识鸿蒙
- (1).移动通讯技术的发展
- (2).完整的鸿蒙开发
- (二)、鸿蒙系统介绍
- 1.鸿蒙系统的官方定义
- (1).鸿蒙操作系统概述
- (2).鸿蒙的生态
- 2.鸿蒙系统的特点
- 3.鸿蒙和安卓的对比
- 4.鸿蒙开发的发展前景
- (三)、鸿蒙开发准备工作
- 1.鸿蒙OS的完整开发流程
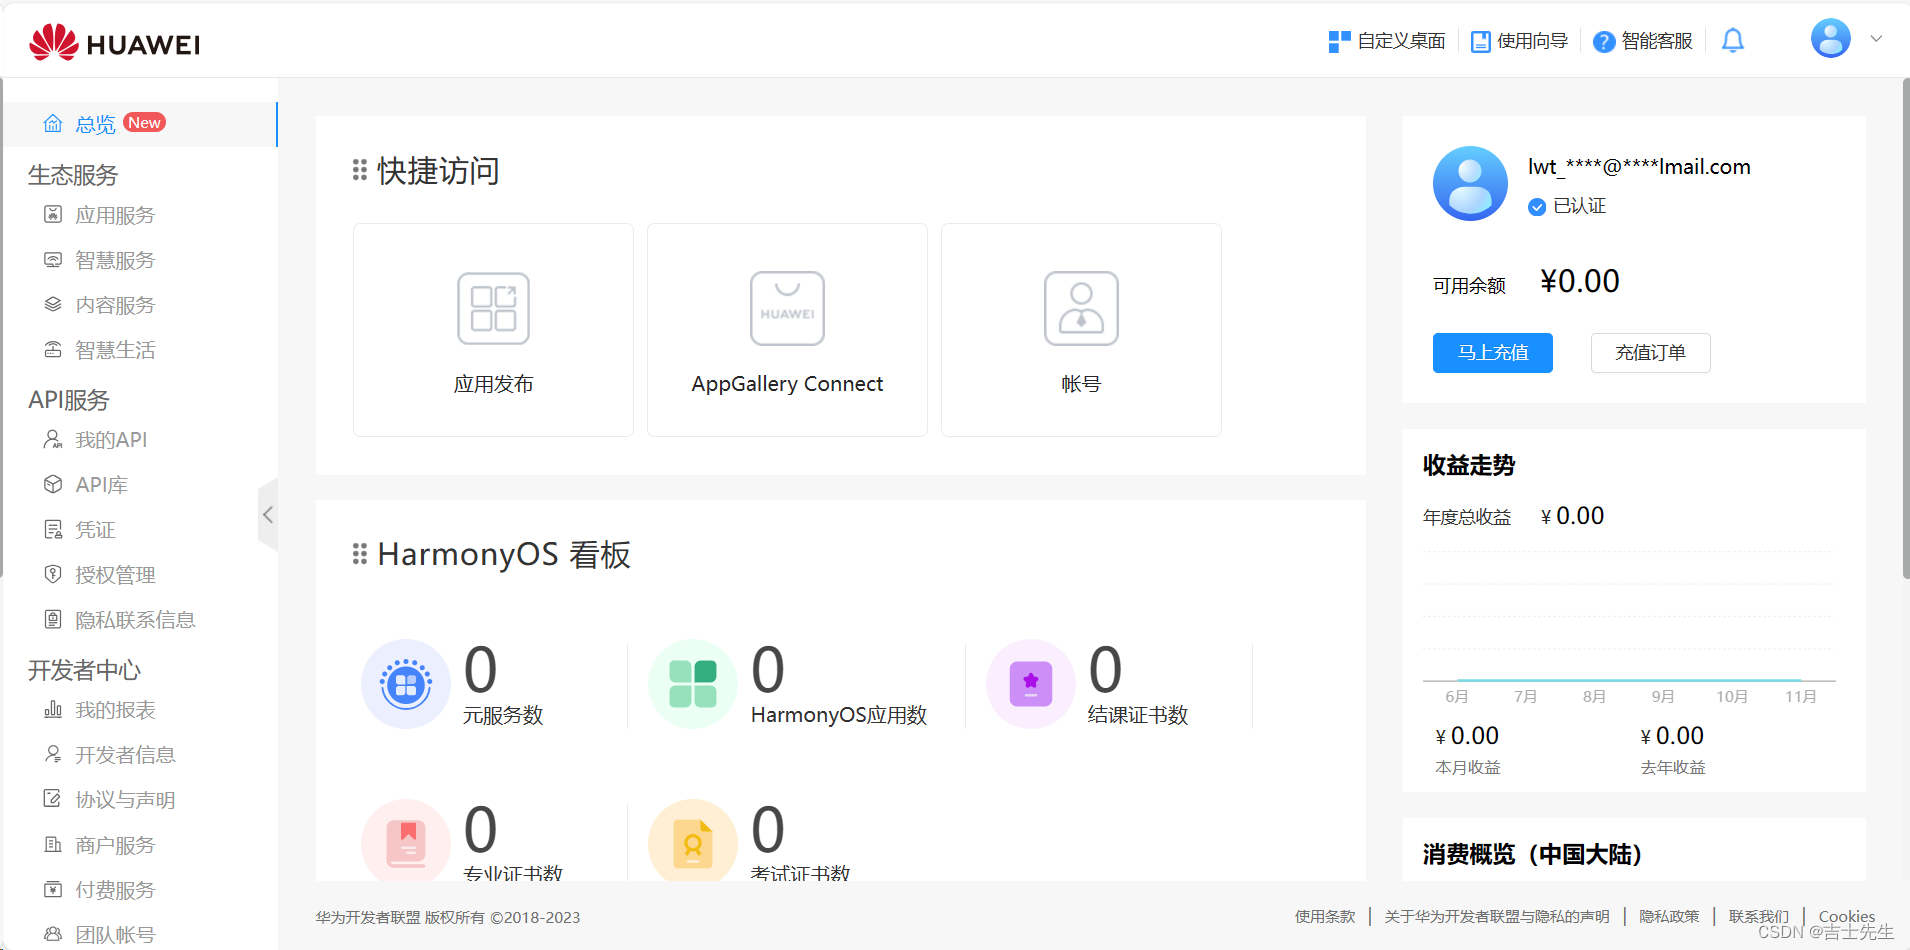
- 2.注册并实名认证华为开发者账号
- 3.下载并安装开发工具
- 4.开发工具的常见设置
- 5.开发工具项目结构介绍
- (四)、鸿蒙入门应用
- 1.第一个应用: HelloWorld
- (1).如何运行项目
- (2).页面中的包含关系
- (3).为什么存在子页面呢?
- (4).学习项目的配置文件: config.json
- (5).了解程序的运行过程
- 2.第二个应用: 页面跳转
- (1).编写第一个页面 (文本+按钮) XML实现
- (2).编写第二个页面 (文本) java实现
- (3).给按钮添加一个跳转
- (五)、组件、布局、事件
- 1.组件、布局、事件的关系
- (1).组件
- (2).布局
- (3).事件
- (六)、三大件之事件
- 1.什么是事件
- 2.常见的事件
- (1).单击事件 ✅
- (2).事件的四种写法
- (2.1).自己编写实现类
- (2).当前类实现接口 ⭐
- (2.3).匿名内部类
- (2.4).方法引用 ⭐
- (3).双击事件✅
- (3.1).双击按钮之后,文本修改成双击字样
- (4).长按事件✅
- (4.1).长按按钮之后,文本修改成长安字样
- (5).滑动事件
- (5.1).按下、松开、移动测试
- (5.2).上下左右移动 (起始位置)
- 3.案列
- (1).多按钮被点击
- (2).双击点赞
- (3).随机更换段子
- (4).单机随机图片
- (5).统计点击次数
- (七)、三大件之组件
- 1.组件的概述
- (1).什么是组件
- (2).组件分类
- 2.显示类组件
- (1).Text组件 (文本)
- (1).练习_登入页面
- (2).练习_修改密码页面
- (3).练习_文本域 (跑马灯效果)
- (2).Image组件 (图片)
- (1).常用属性展示
- (2).剪切 (clip_alignment)
- (3).缩放 (scale_mode)
- (3).综合练习
- (1).前端业务开发
- (2).后端业务逻辑
- (4).Clock组件 (时钟)
- (4.1). 按照24小时的操作
- (4.2). 按照12小时的 (视图存在bug)
- (4.3).按照12小时的 (代码可以解决bug)
- (4.4).综合练习
- (5).TickTimer组件 (定时器)
- (4.1).计时功能 (仍然存在bug)
- (5.2)计时功能 (解决BUG)
- (5.3).综合练习
- (6).ProgressBar组件 (进度条)
- (6.1).基本进度条
- (6.2).点击进度条 (进度条加5%)
- (7).RoundProgressBar组件 (圆形进度条)
- (7.1).点击进度条 (进度条加5%)
- 3.交互类组件
- (1).CommonDialog _ 普通弹框组件
- (1.1).普通的弹窗展示
- (1.2).自定义弹框组件 (弹窗中内嵌一个xml视图)
- (1.3).抽取公共弹窗组件
- (2).ToastDialog_吐司弹窗
- (2.1).土司弹窗介绍
- (2.2)自定义弹框组件 + 抽取工具类
- (3).TexFileld组件 (输入框)
- (3.1).基本用法
- (3.2).获取按钮文字 (明文展示)
- (3.3).基线和非明文展示
- (3.4).自定义气泡
- (3.5).密码明文暗文切换
- (4).Checkboc多选框组件
- (4.1).基本多选框
- (4.2).无问题的多选框监听
- (4.3).有问题的多选框监听
- (4.3).综合练习
- (5).RadioButton单选框组件
- (5.1).基本用法
- (5.2).监听事件
(一)、初识鸿蒙
1.初识鸿蒙
(1).移动通讯技术的发展
- 1G: 大哥大
- 2G: 诺基亚、摩托罗拉 (操作系统->塞班) 可以打电话、发短信。
- 2.5G: 诺基亚、摩托罗拉(操作系统->塞班) 可以接受图片。G
- 3G: 三星、苹果、小米 (操作系统->Android、IOS) 可以进行视频通话。 H H+
- 4G: 三星、苹果(操作系统->Android、IOS)手机直播、打游戏
- 5G: 华为(操作系统->鸿蒙)军事
(2).完整的鸿蒙开发
5G: 万物互联。手机可以控制电视、监控、电脑等。
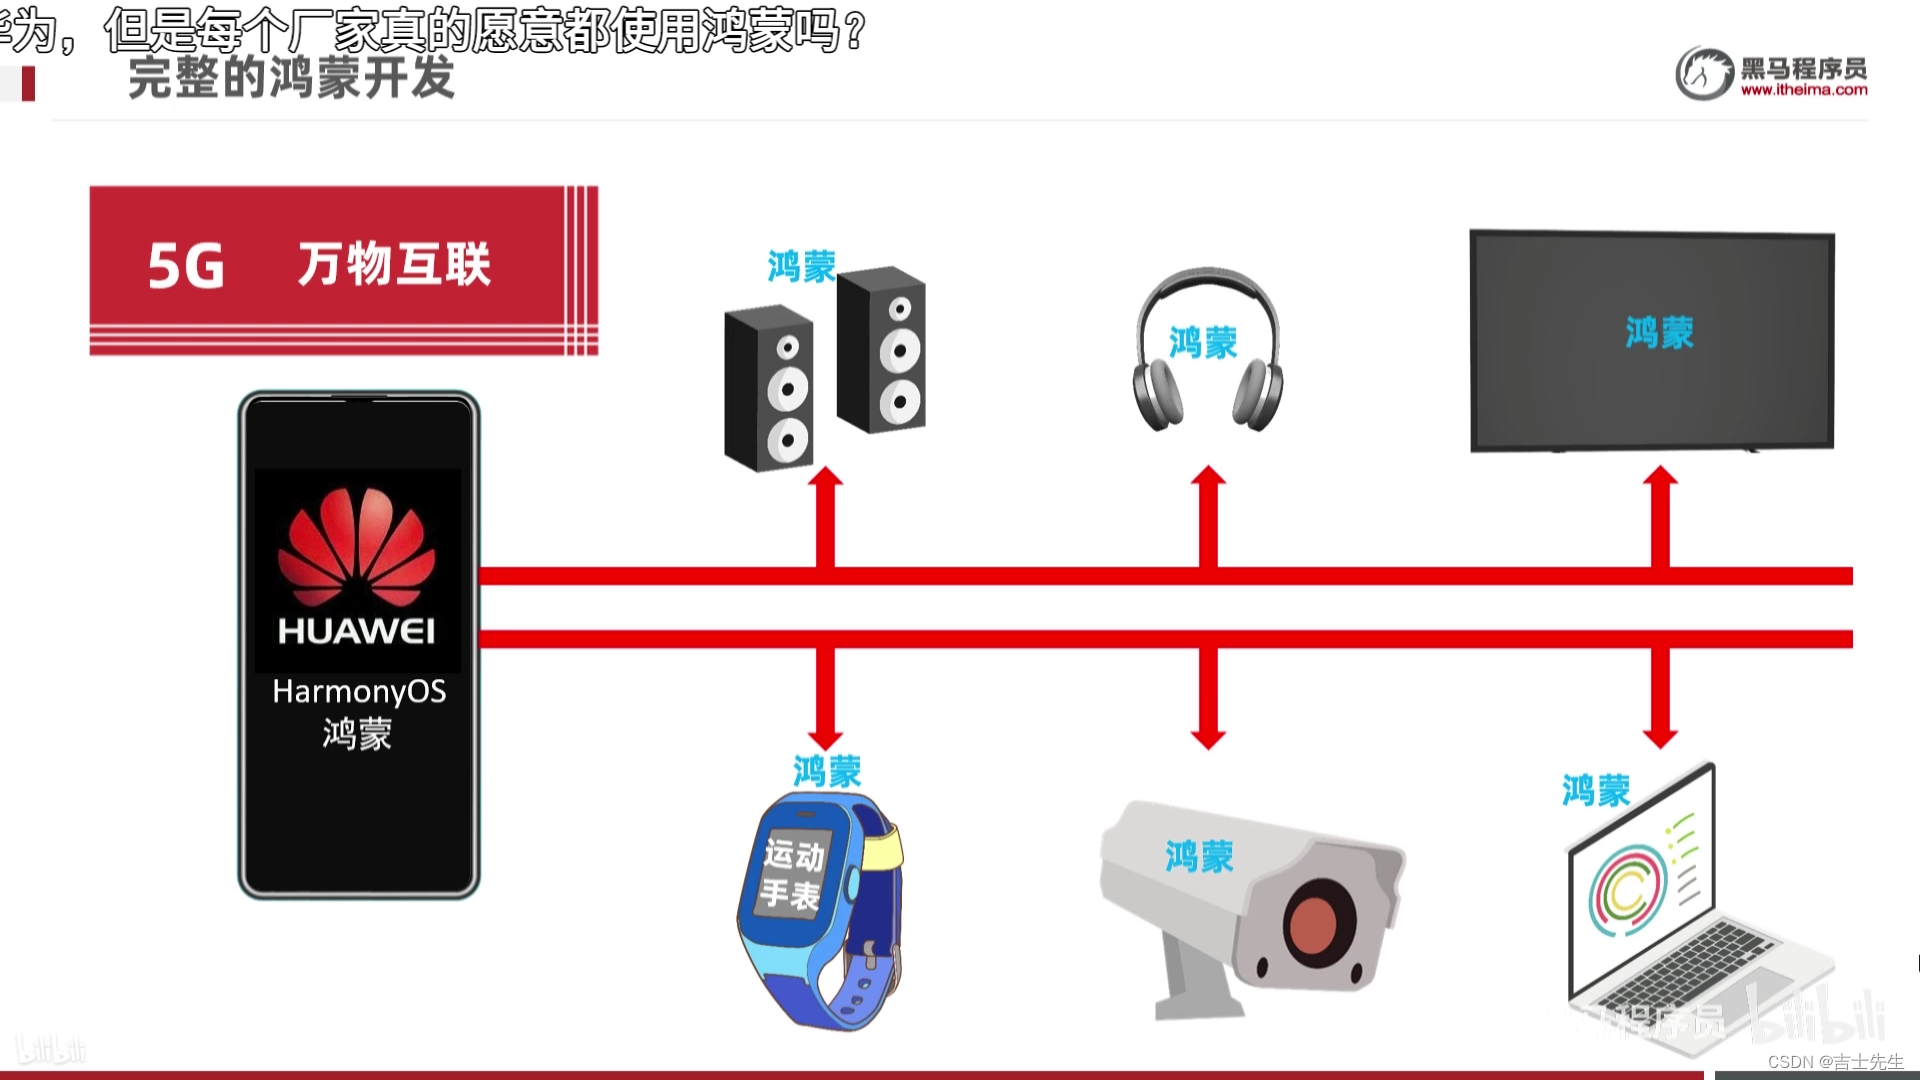
- 鸿蒙介绍
- 鸿蒙应用开发(手机APP)
- 鸿蒙设备开发(硬件开发)
- 项目实战
(二)、鸿蒙系统介绍
1.鸿蒙系统的官方定义
(1).鸿蒙操作系统概述
鸿蒙是一个全场景,面向未来的操作系统。鸿蒙并不是一个单纯的手机操作系统,可以安装在: 手机 和 只能设备。 操作系统(Operatinf System),鸿蒙系统称为鸿蒙OS 或者 HarmonyOS。
(2).鸿蒙的生态
1 + 8 +n
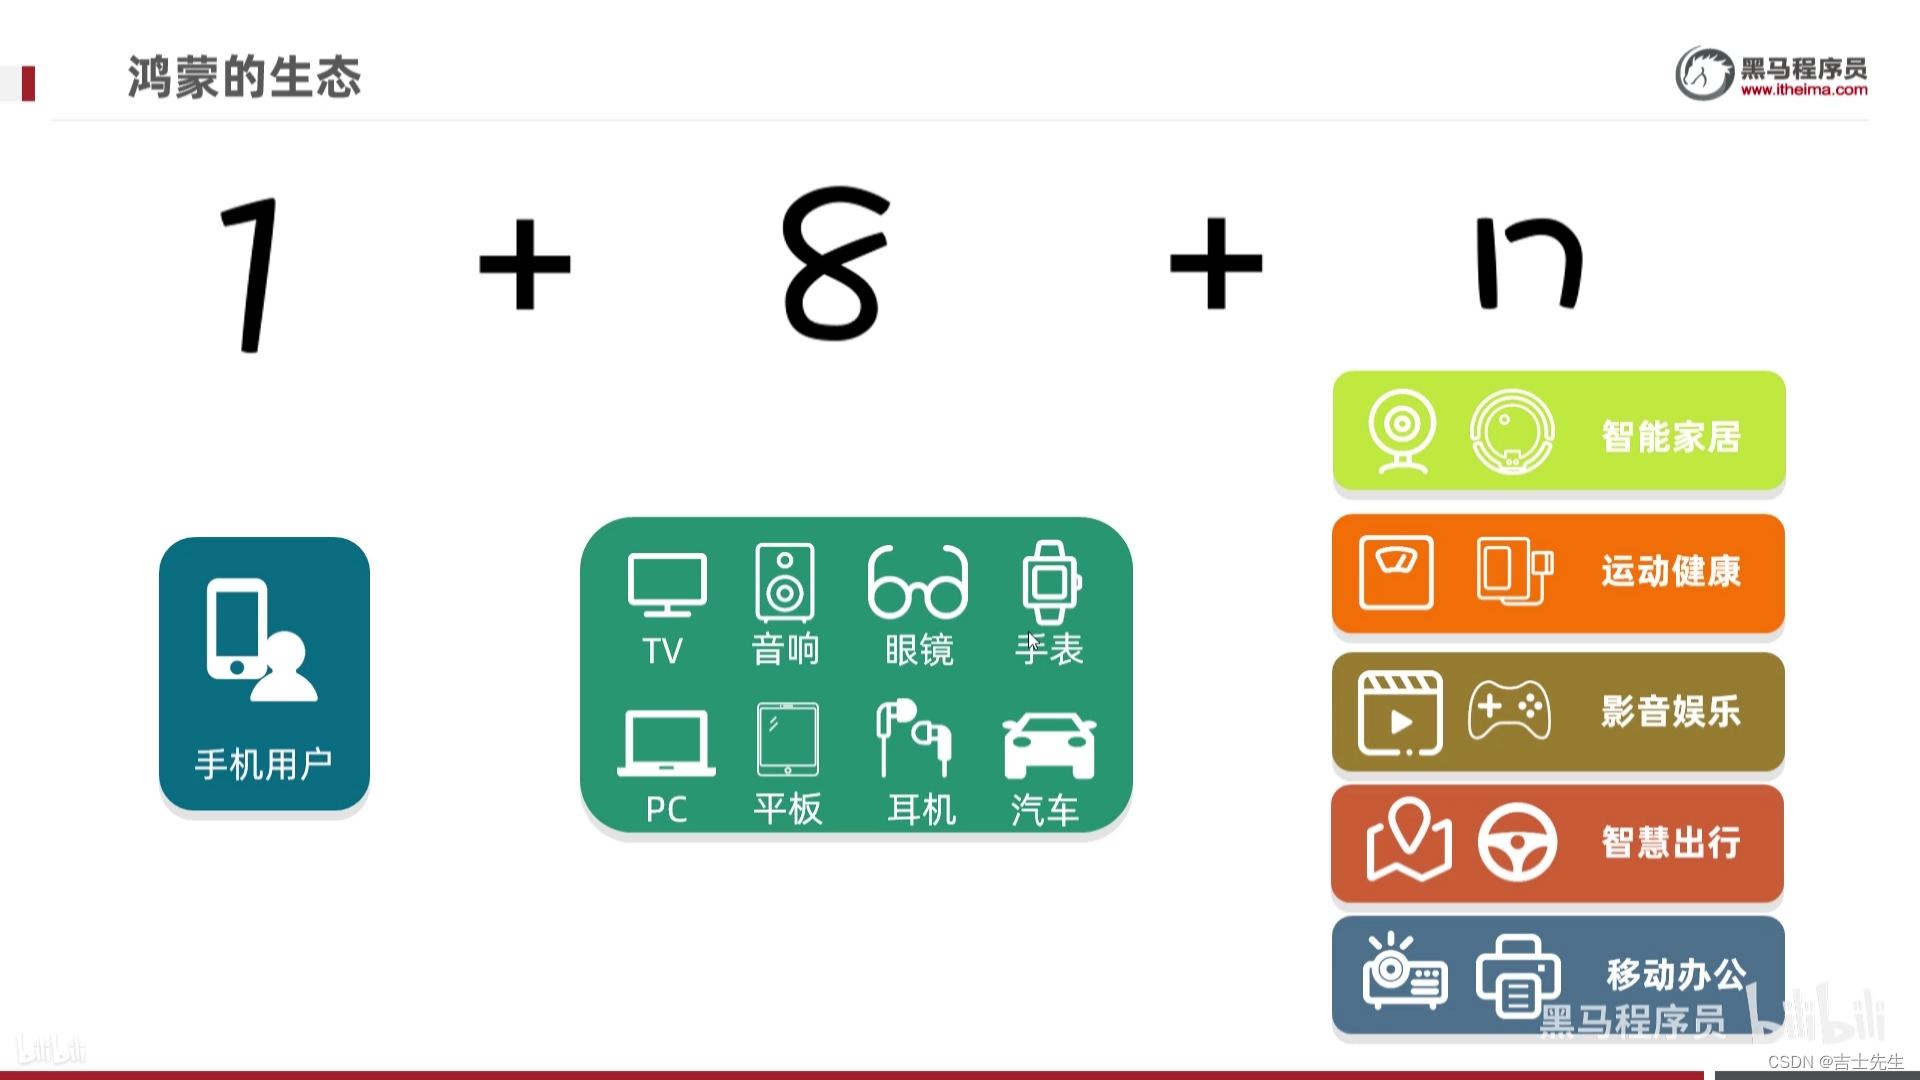
- 1: 是指手机用户。
- 8: 家庭中常用的八大件(TV、音响、眼睛、手表、PC、平板、耳机、汽车)。
- n: 智能家居+运动监控+健康出行。
鸿蒙视频介绍
- 超级终端: 手机作为控制器
- 服务流转: 把手机中的音频、视频、图片、游戏直接在其他设备上允许。
2.鸿蒙系统的特点
-
统一OS,弹性部署: 一套操作系统,满足大大小小所有设备的需求,小到二级,大到汽车,智慧屏,手机等。让不同设备使用同一种语言无缝沟通。
-
硬件互助,资源共享: 搭载HarmonyOS 的每一个设备都不是孤立的,在系统层让多终端融为一体,成为 “超级终端”。
-
一次开发,多端部署: 开发者基于分布式应用框架,写一次逻辑代码,就可以部署在多种终端上。
-
应用自由跨端: HarmonyOS 原子化服务是轻量化服务的新物种,他提供了全新的服务和交互方式。
可分可合,可流转,支持免安装等特性,能够让应用化繁为简,让服务触手可及。 -
用简单激活你的设备智能: 设备可实现一碰入网,无屏变有屏,操作可视化,一键直达原厂服务等全新功能。通过简单而只能的服务,实现设备智能化产业升级。
3.鸿蒙和安卓的对比
-
系统内核的对比
安卓系统: 是基于Linux的宏内核设计,宏内核包含了操作系统绝大多数的功能和模块。而且这些功能和模块都具有最高的权限,只要一个模块出错,整个系统就会崩溃。鸿蒙OS: 是基于微内核设计,微内核仅包括了操作系统必要的功能模块(任务管理、内存分配等)。必要的模块处在核心地位具有最高权限,其他模块不具有最高权限。也就是说其他模块出现问题,对于整个系统的运行是没有阻碍的。微内核稳定性很高。- Linux内核。 (手机操作系统的内核)
- LiteOS内核。 (智能硬件的内核) -> 轻量级、低功耗
-
运行速度的对比
- 安卓系统: 安卓程序不能与系统底层直接进行通信活动,是运行在虚拟机上的。如果虚拟机除了问题的话那系统就是卡住,
- 鸿蒙系统: 鸿蒙系统中的方舟编辑器解决了这个问题的。会把代码直接编译成机器识别的机器码,直接运行在操作系统中,可以直接与系统底层进行通信。
- 鸿蒙的运行速度块,大约60%
-
作为手机操作系统的对比
-
作为手机操作系统的对比
-
连接其他设备的对比
安卓系统: 不管从app开发方面,还有使用方面都非常麻烦。(发现->配对->连接->组合->验证)鸿蒙OS: 从app开发方面,只要写很少的代码就可以调用第三方硬件。从使用的角度来讲,不管是多少设备连在一起,鸿蒙的终极目标是都能像使用一套设备那样简单。
4.鸿蒙开发的发展前景
- 享受鸿蒙开发的红利。
- 成功入职华为相关的生态圈大厂。
- 参加公司核心项目脱颖而出。
(三)、鸿蒙开发准备工作
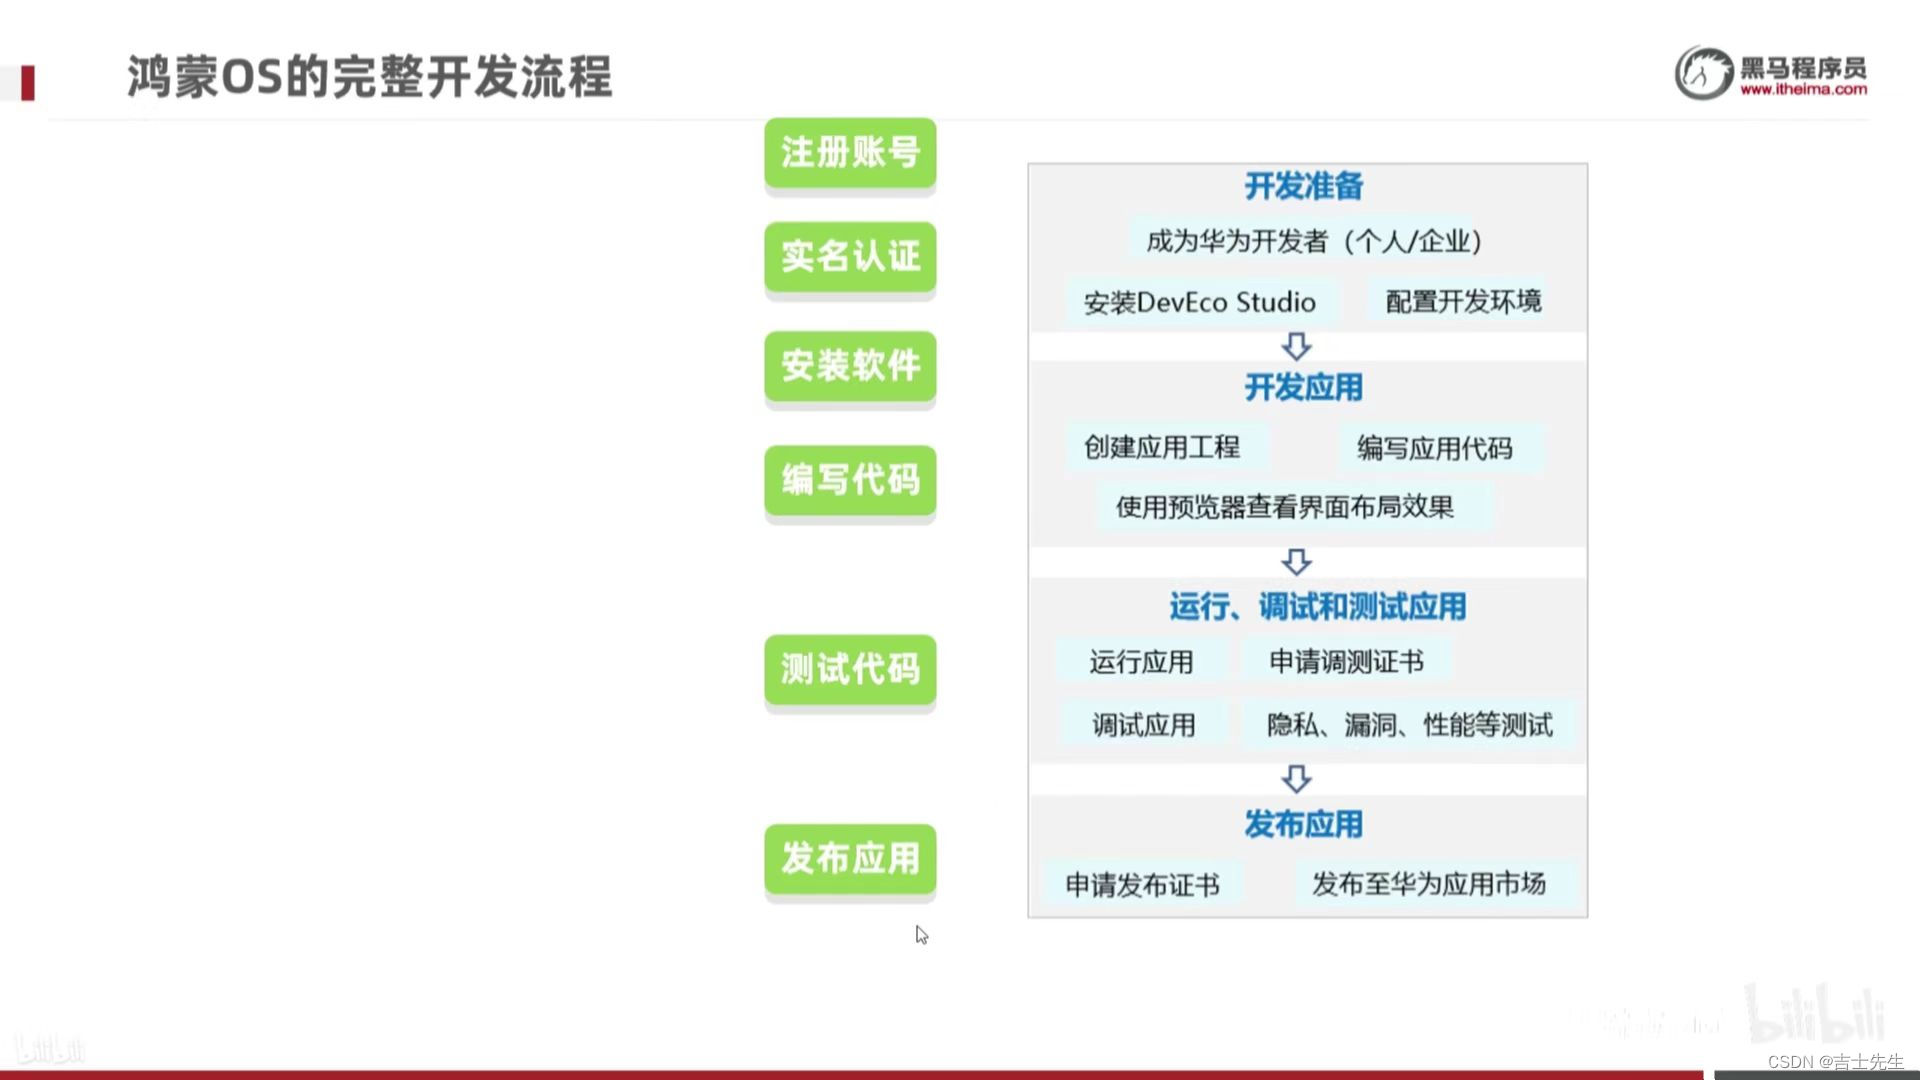
1.鸿蒙OS的完整开发流程
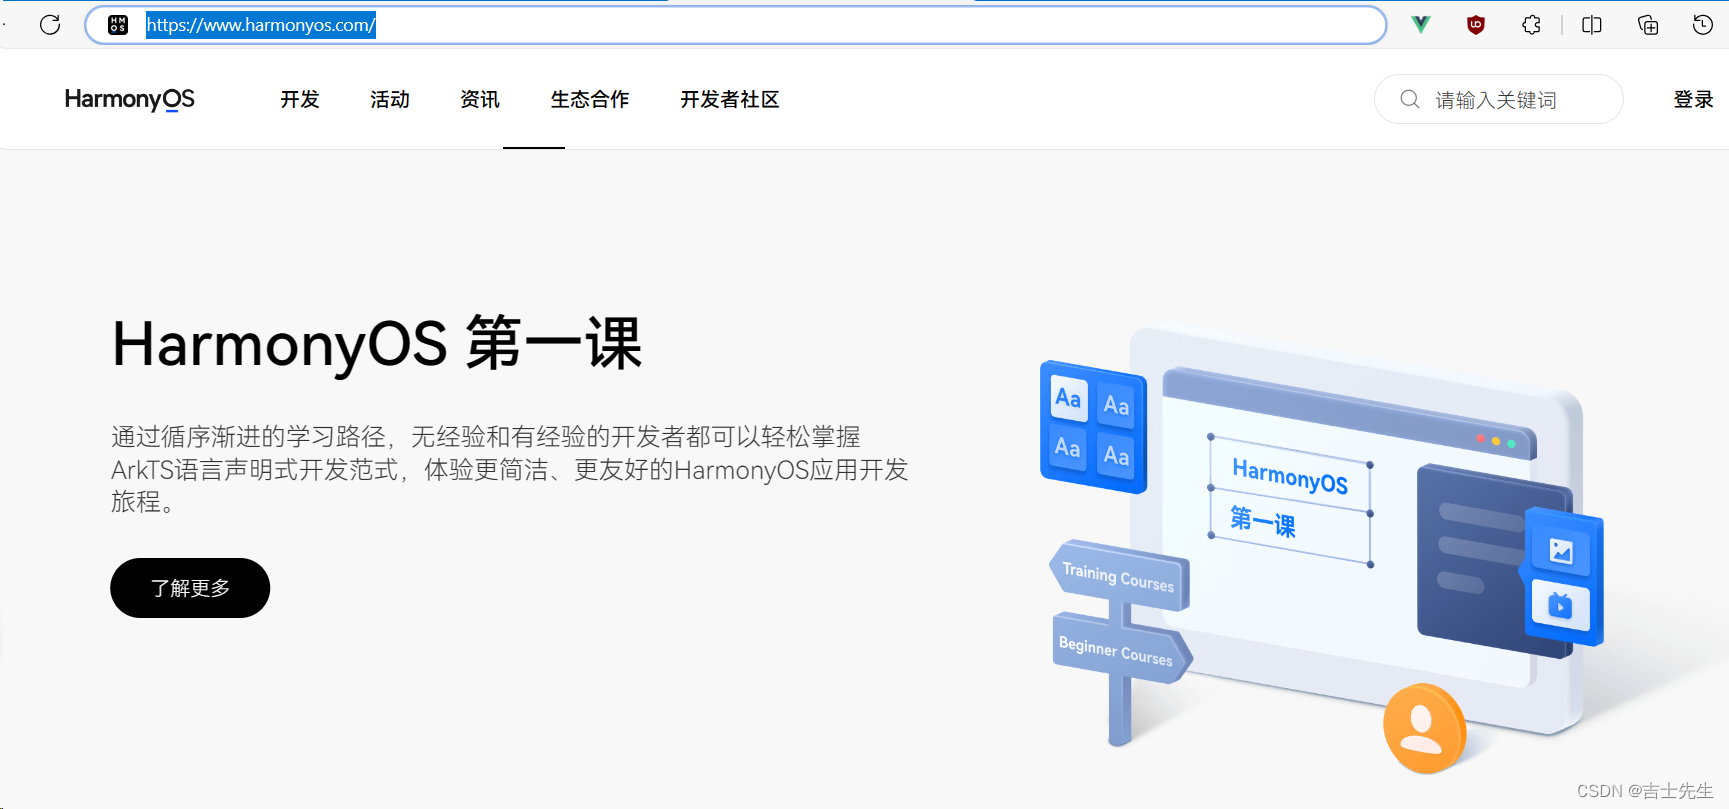
2.注册并实名认证华为开发者账号
https://www.harmonyos.com/
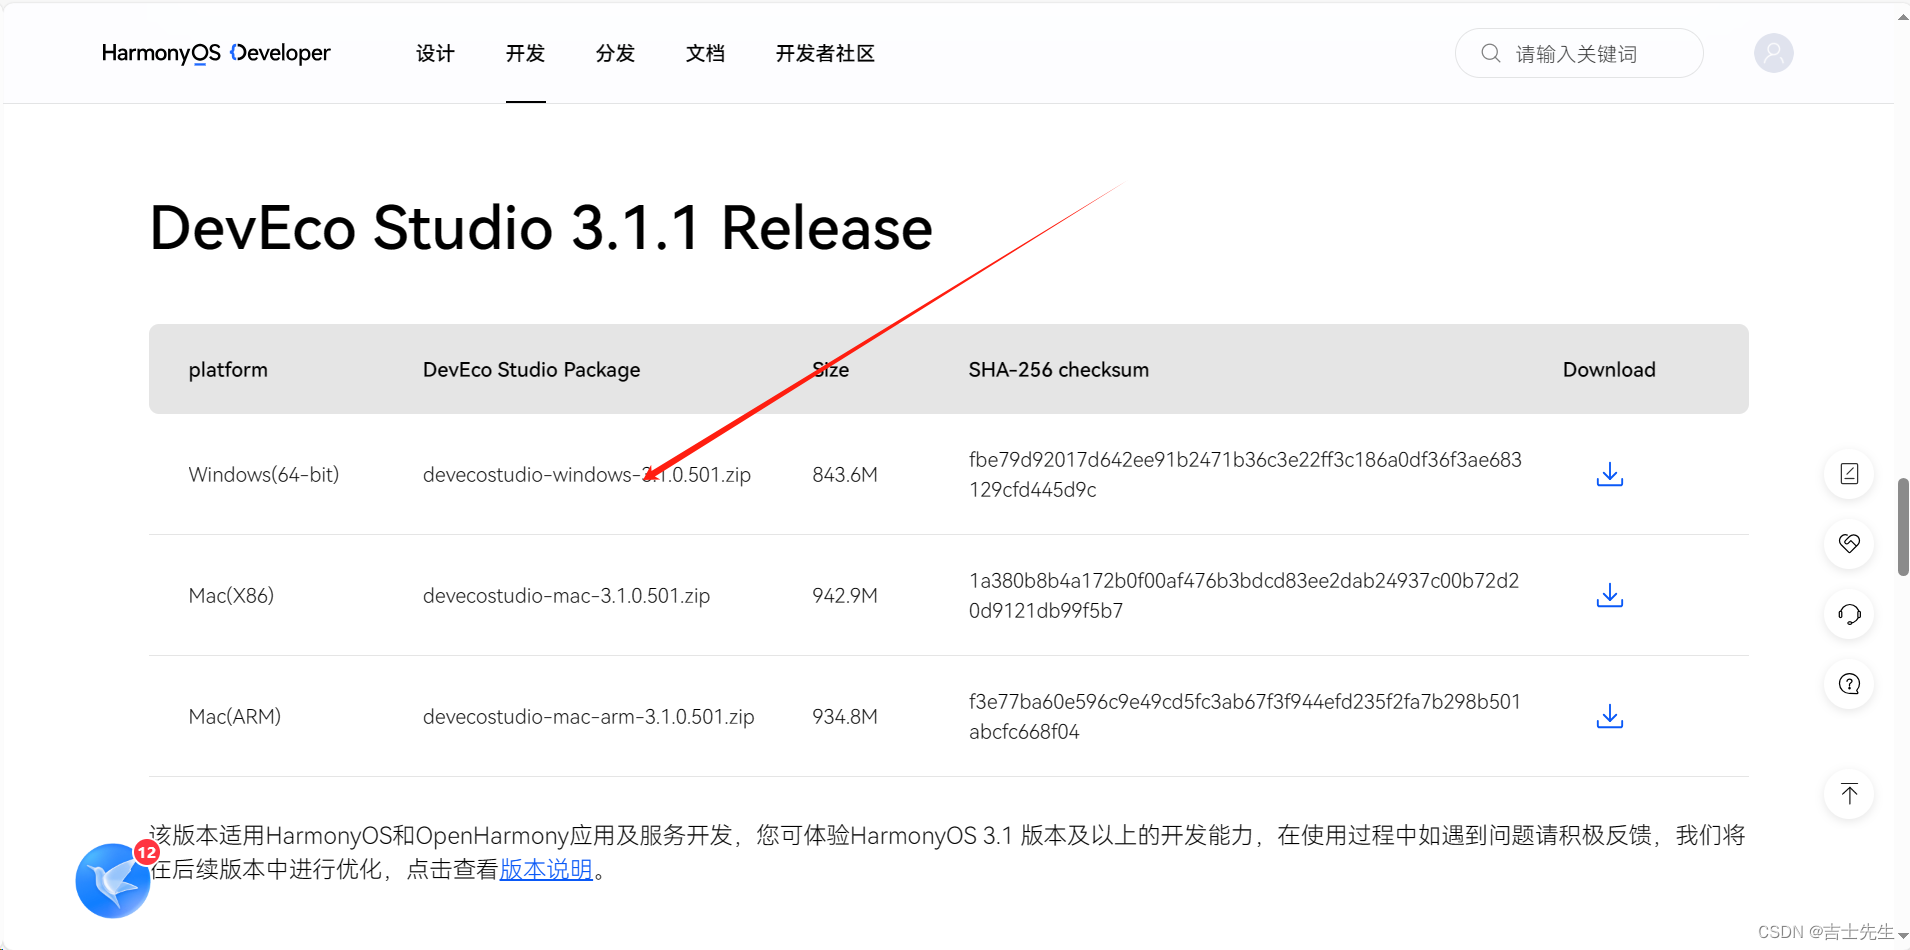
3.下载并安装开发工具
- 鸿蒙应用开发 (手机app)
- Java (最主要的还是Java)
- JS
- C/C++
- 仓颉
- 鸿蒙设备开发 (硬件开发)
- C/C++
- 下载我们的编译软件
https://developer.harmonyos.com/cn/develop/deveco-studio#download
1.找到我们的应用
2.解压傻瓜式安装!!!
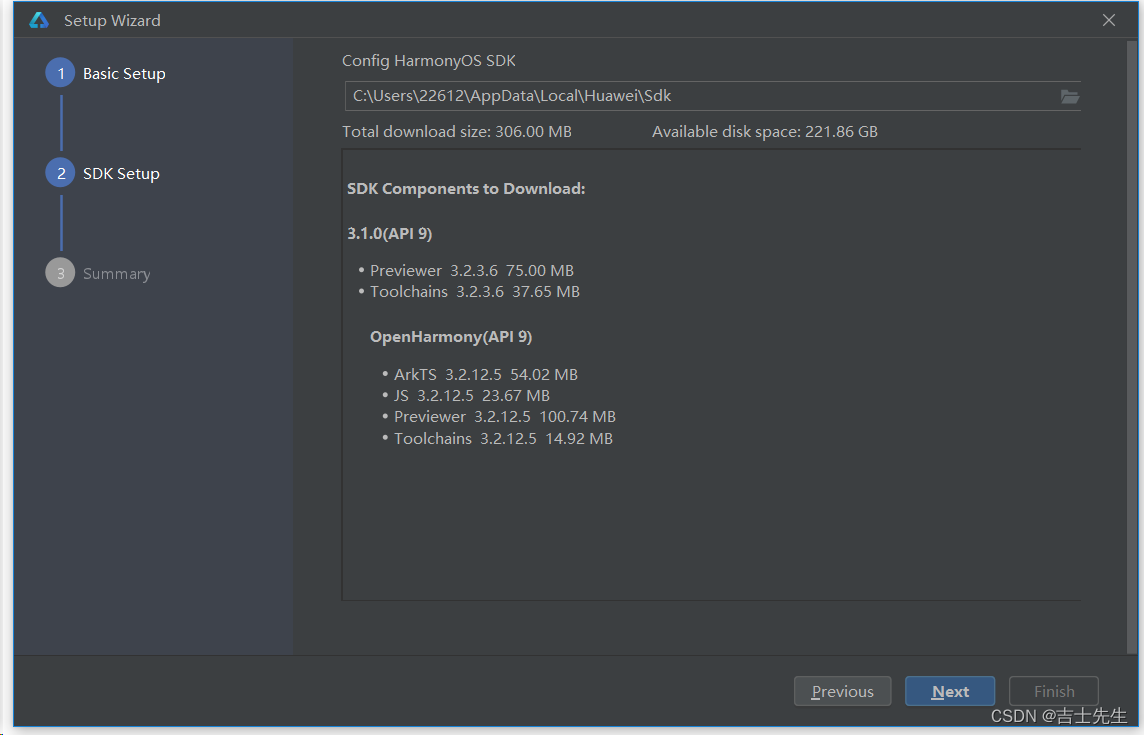
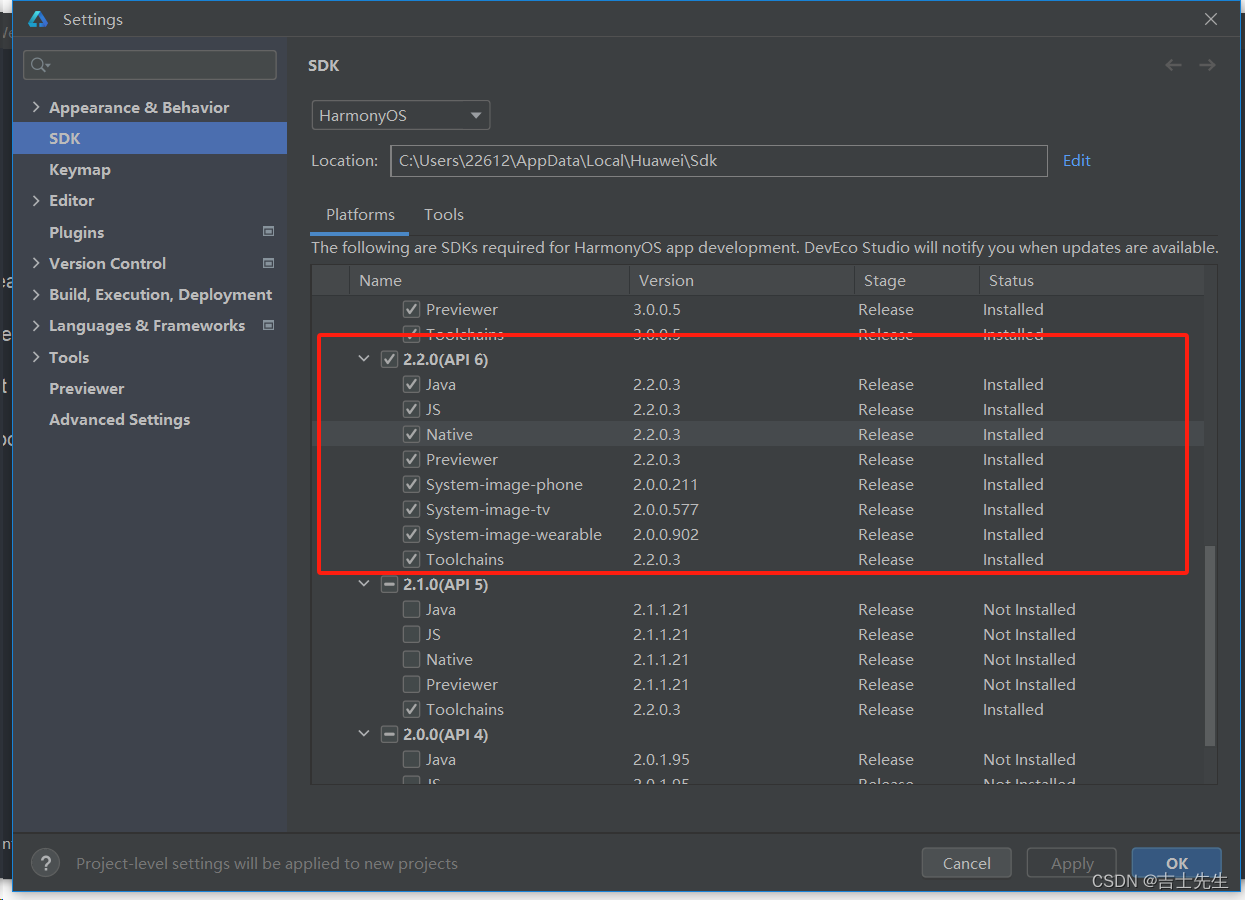
3.进行安装我们的SDK
4.鸿蒙开发程序首页
5.查看我们的配置是否生效
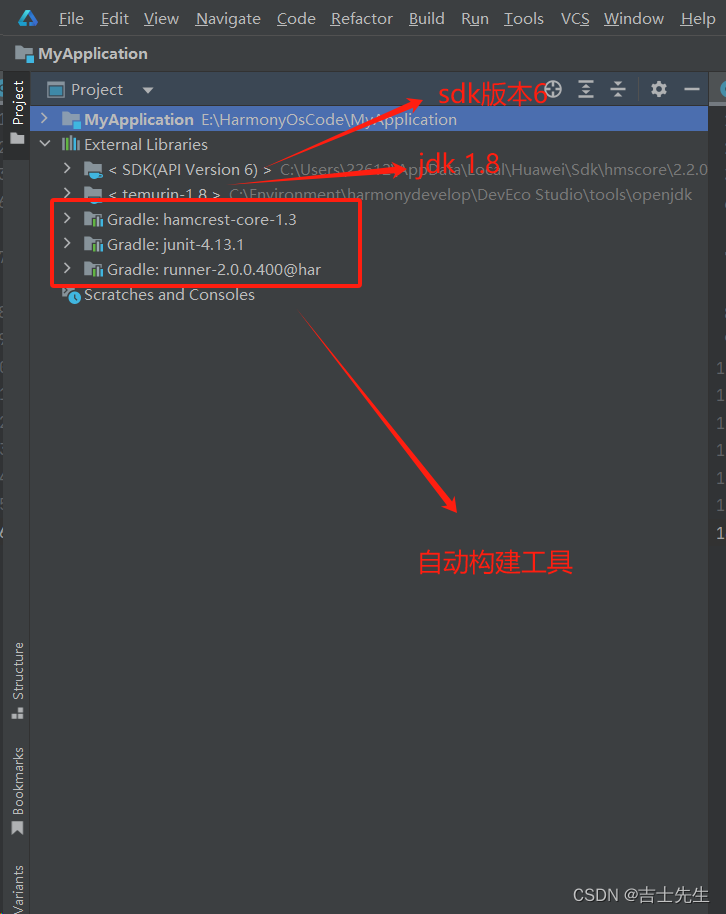
4.开发工具的常见设置
1.新建一个项目: 项目为一个空项目
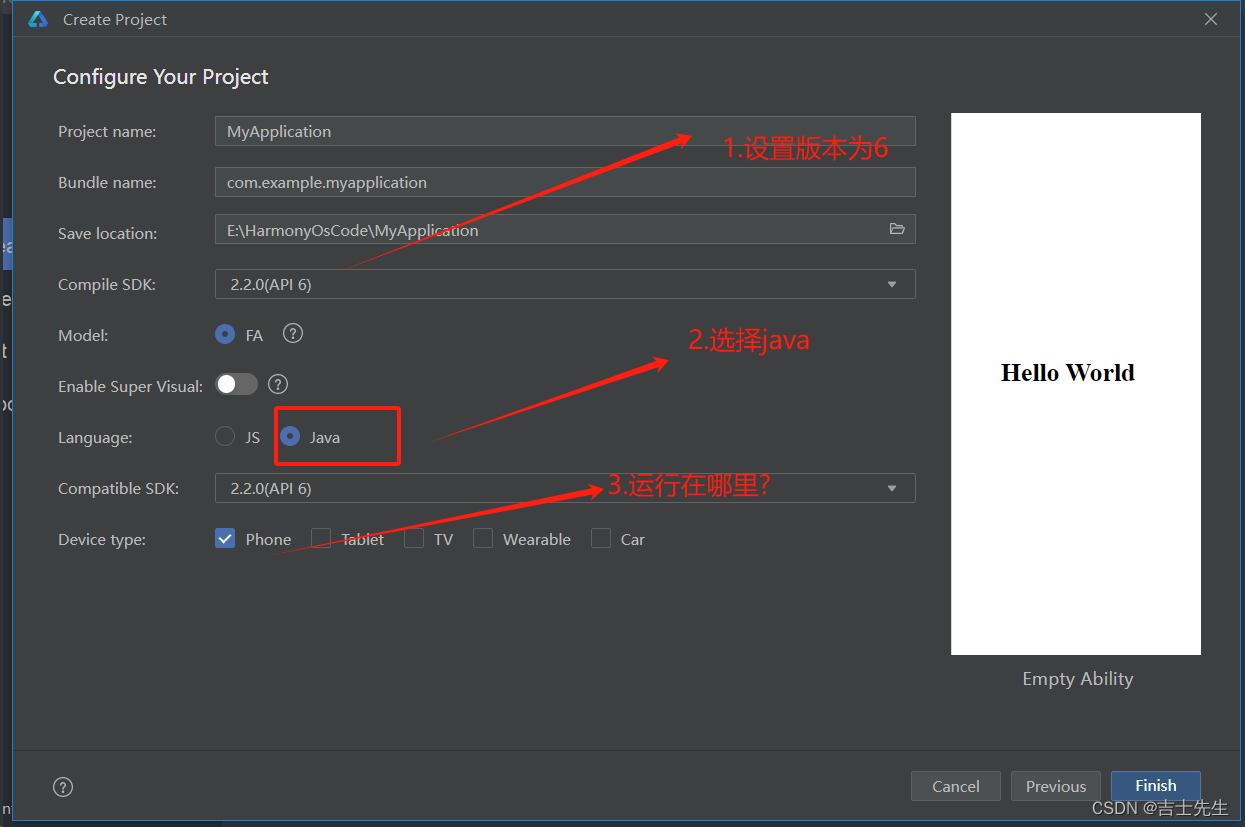
2.等待我们的项目Builder完成

3.构建完成的项目如下:
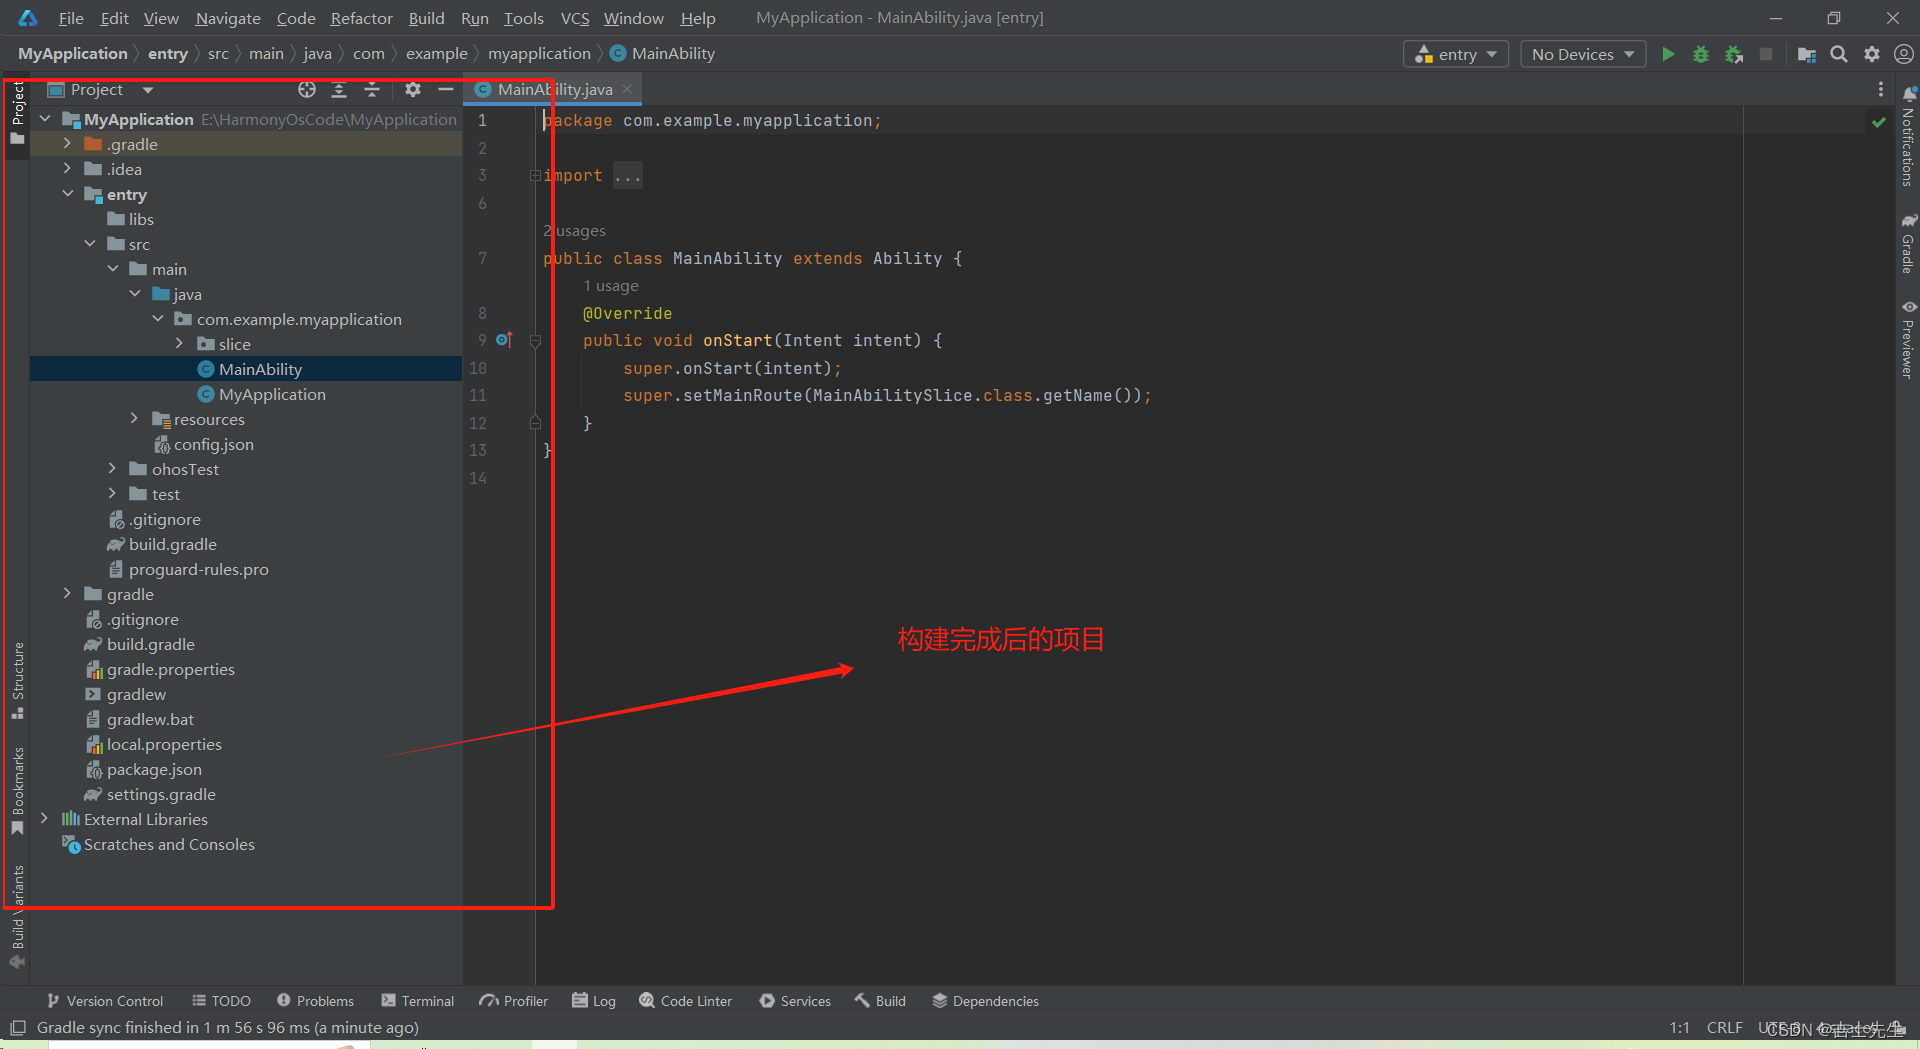
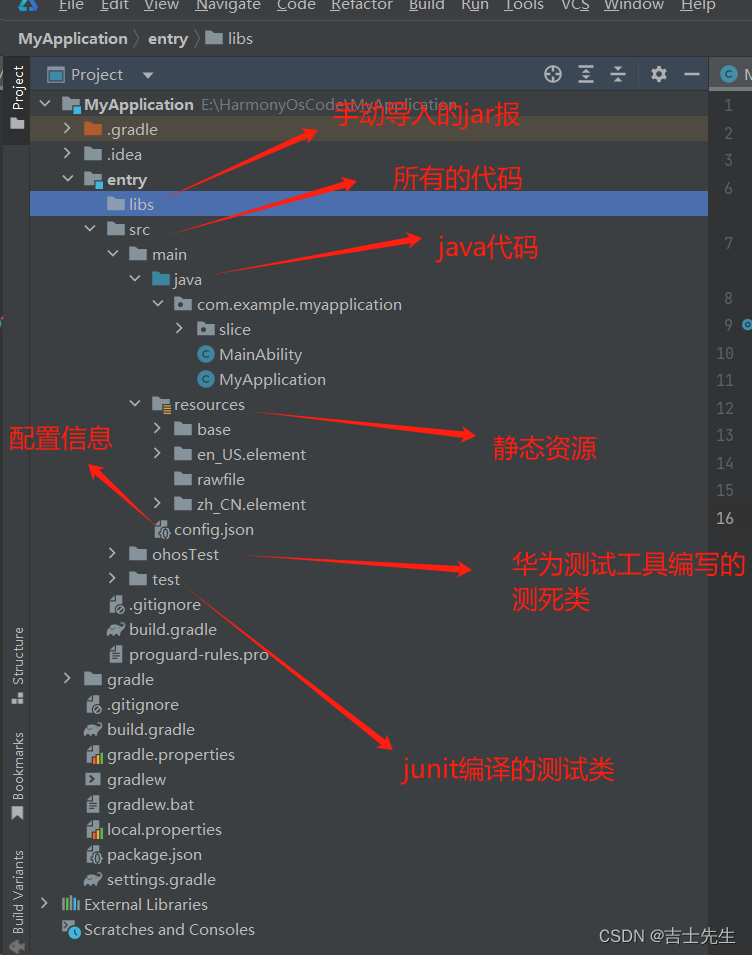
5.开发工具项目结构介绍
1. 扩展依赖:
2. 目录信息:
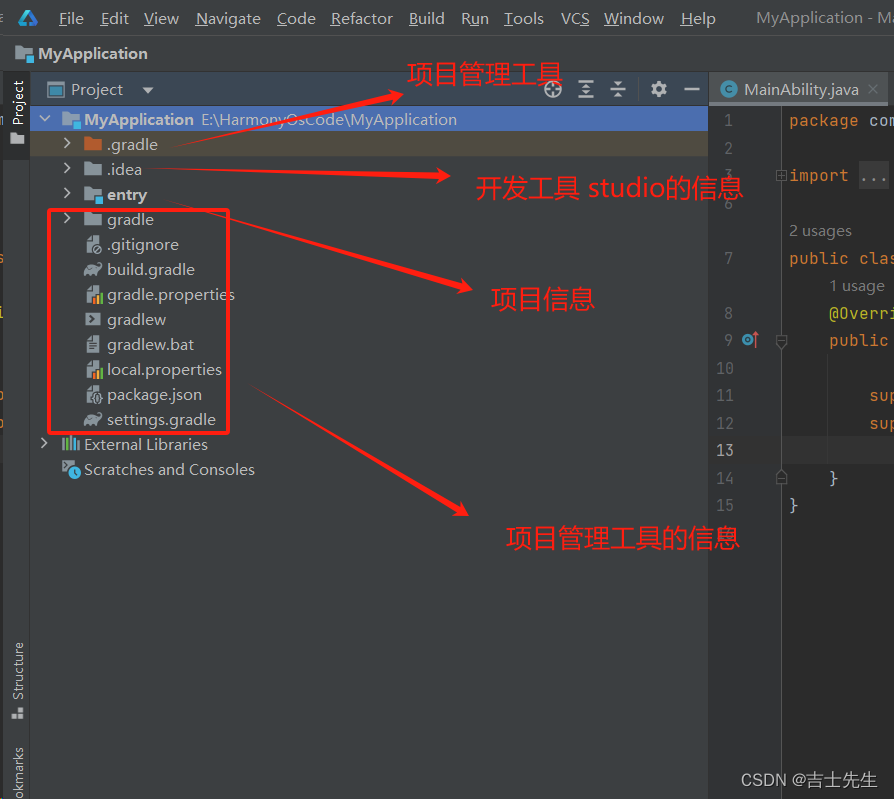
3.主要项目的代码:
(四)、鸿蒙入门应用
1.第一个应用: HelloWorld
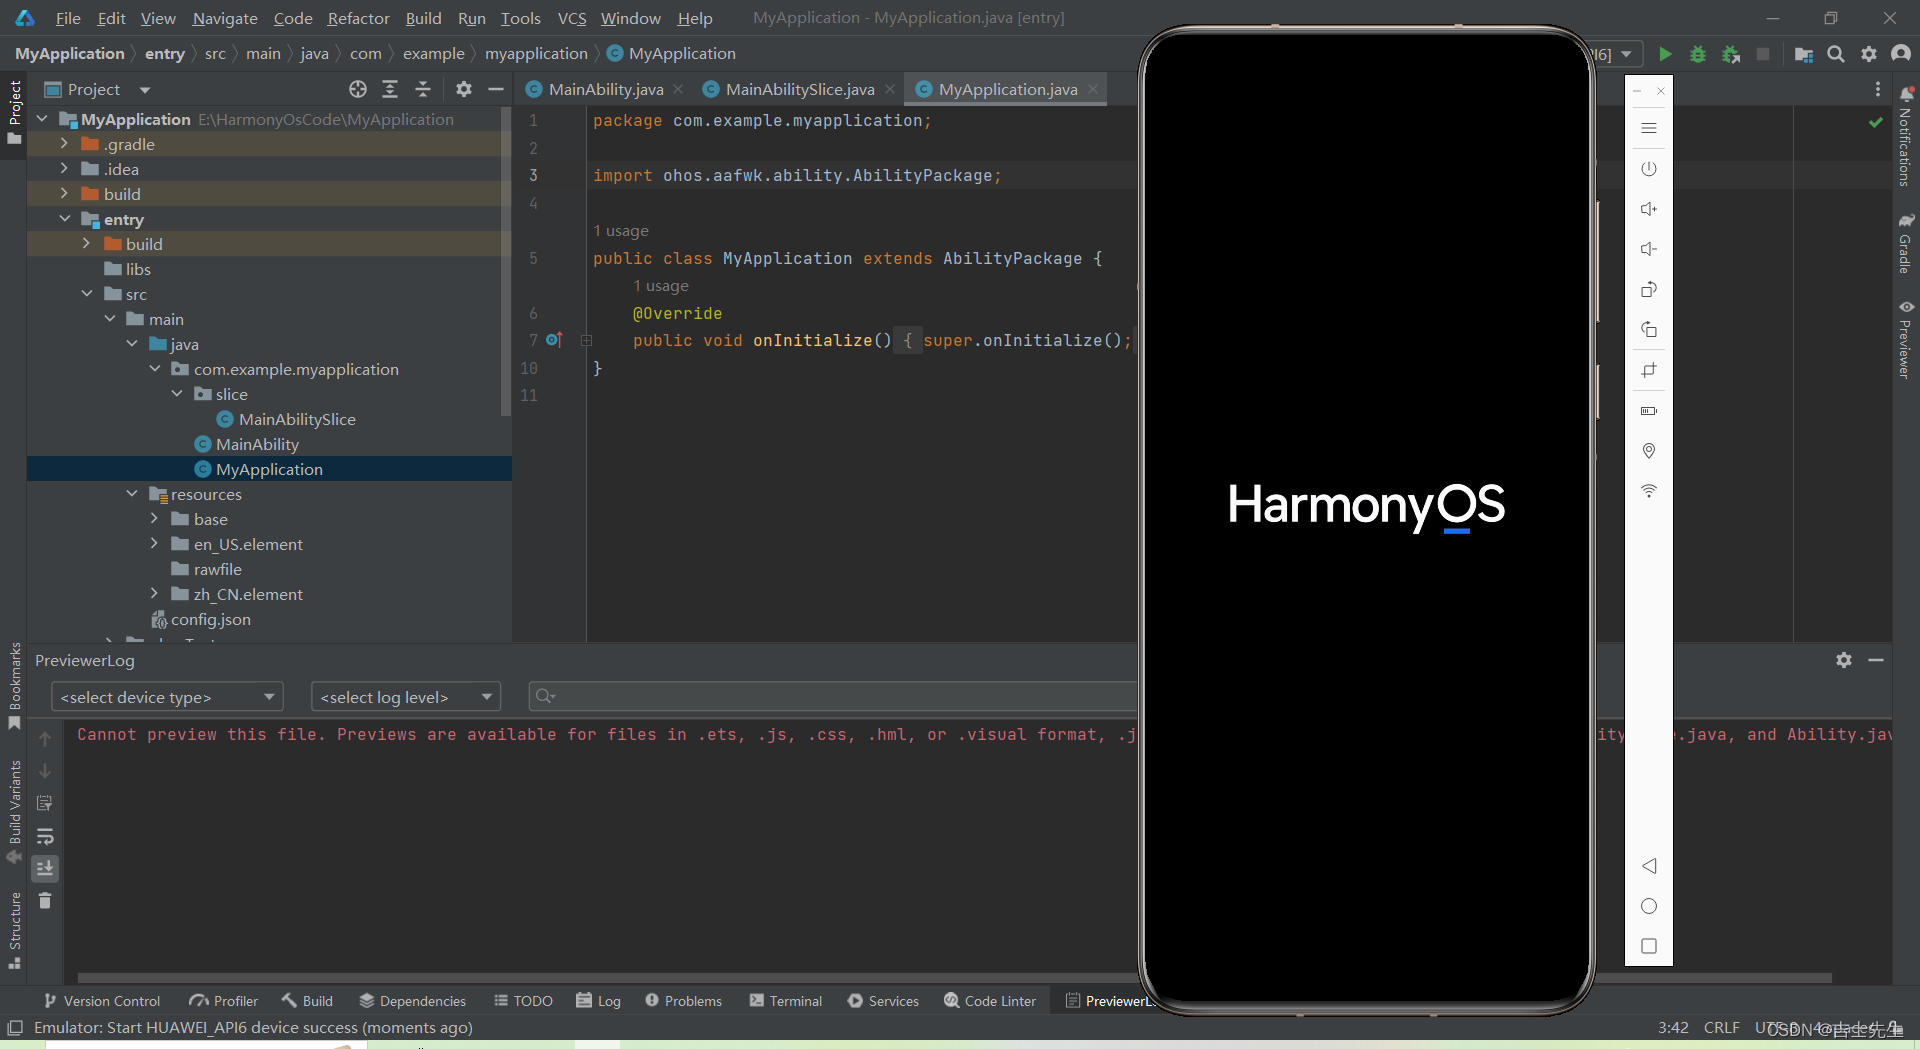
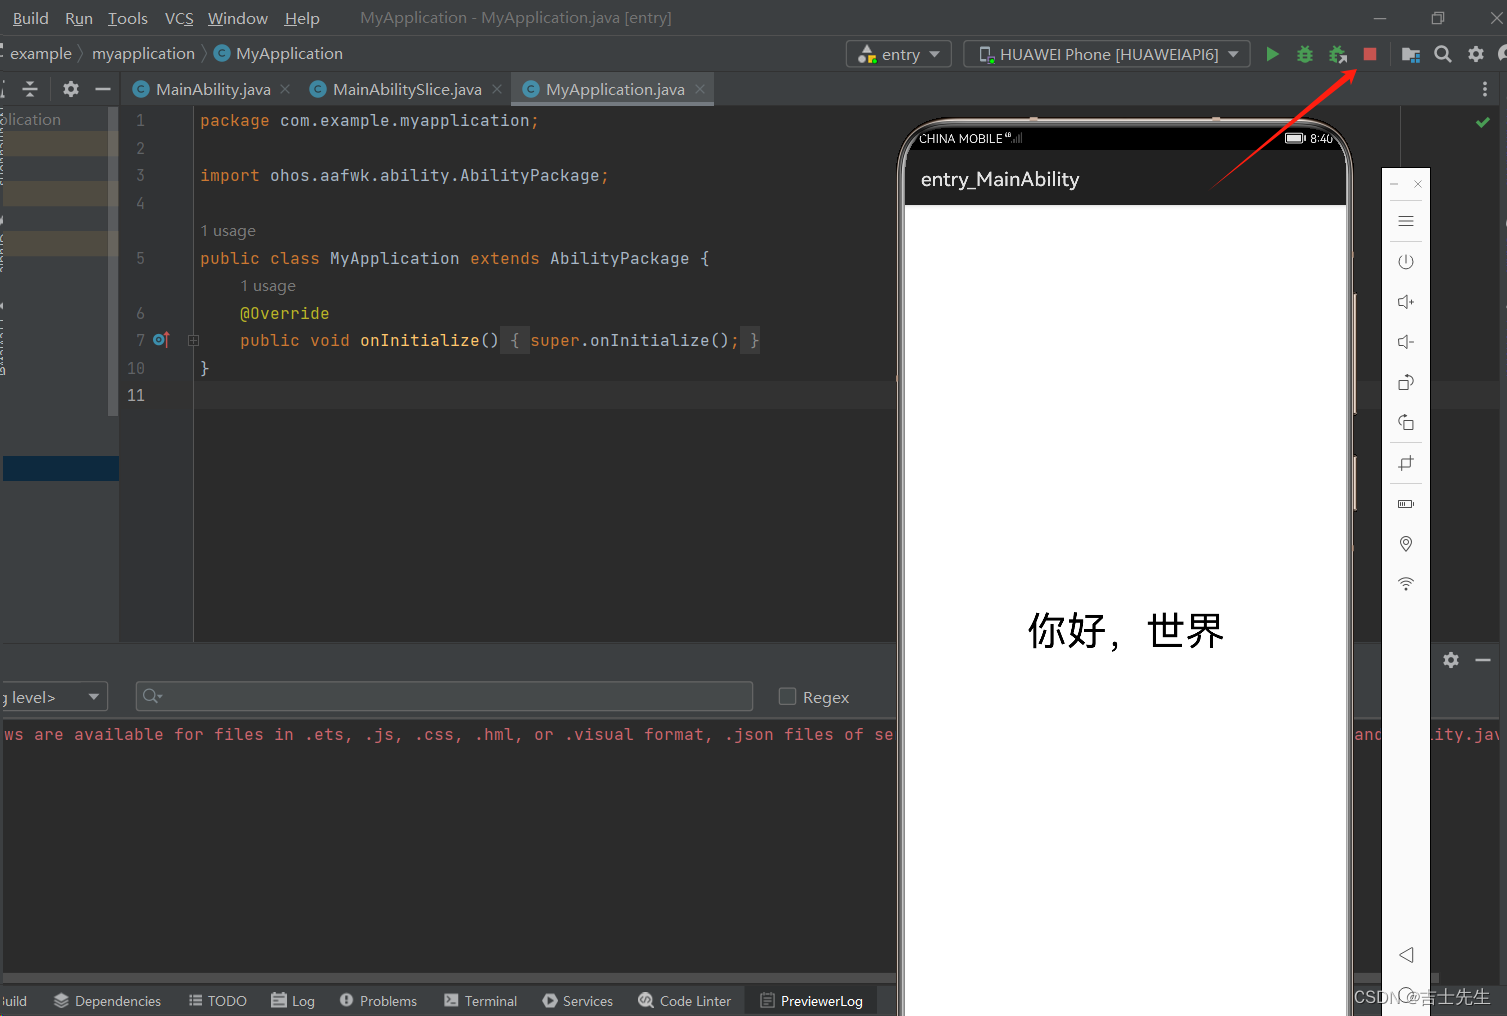
新建项目完成之后,自带HelloWorld,在第一个案列中,我们主要学习以下几点:
- 如何运行项目
- 页面中的包含关系
- 学习项目的配置文件: config.json
- 了解程序的运行过程
(1).如何运行项目
- 登入账号
1.登入我们的华瓣账号:
- 选择并开启模拟器
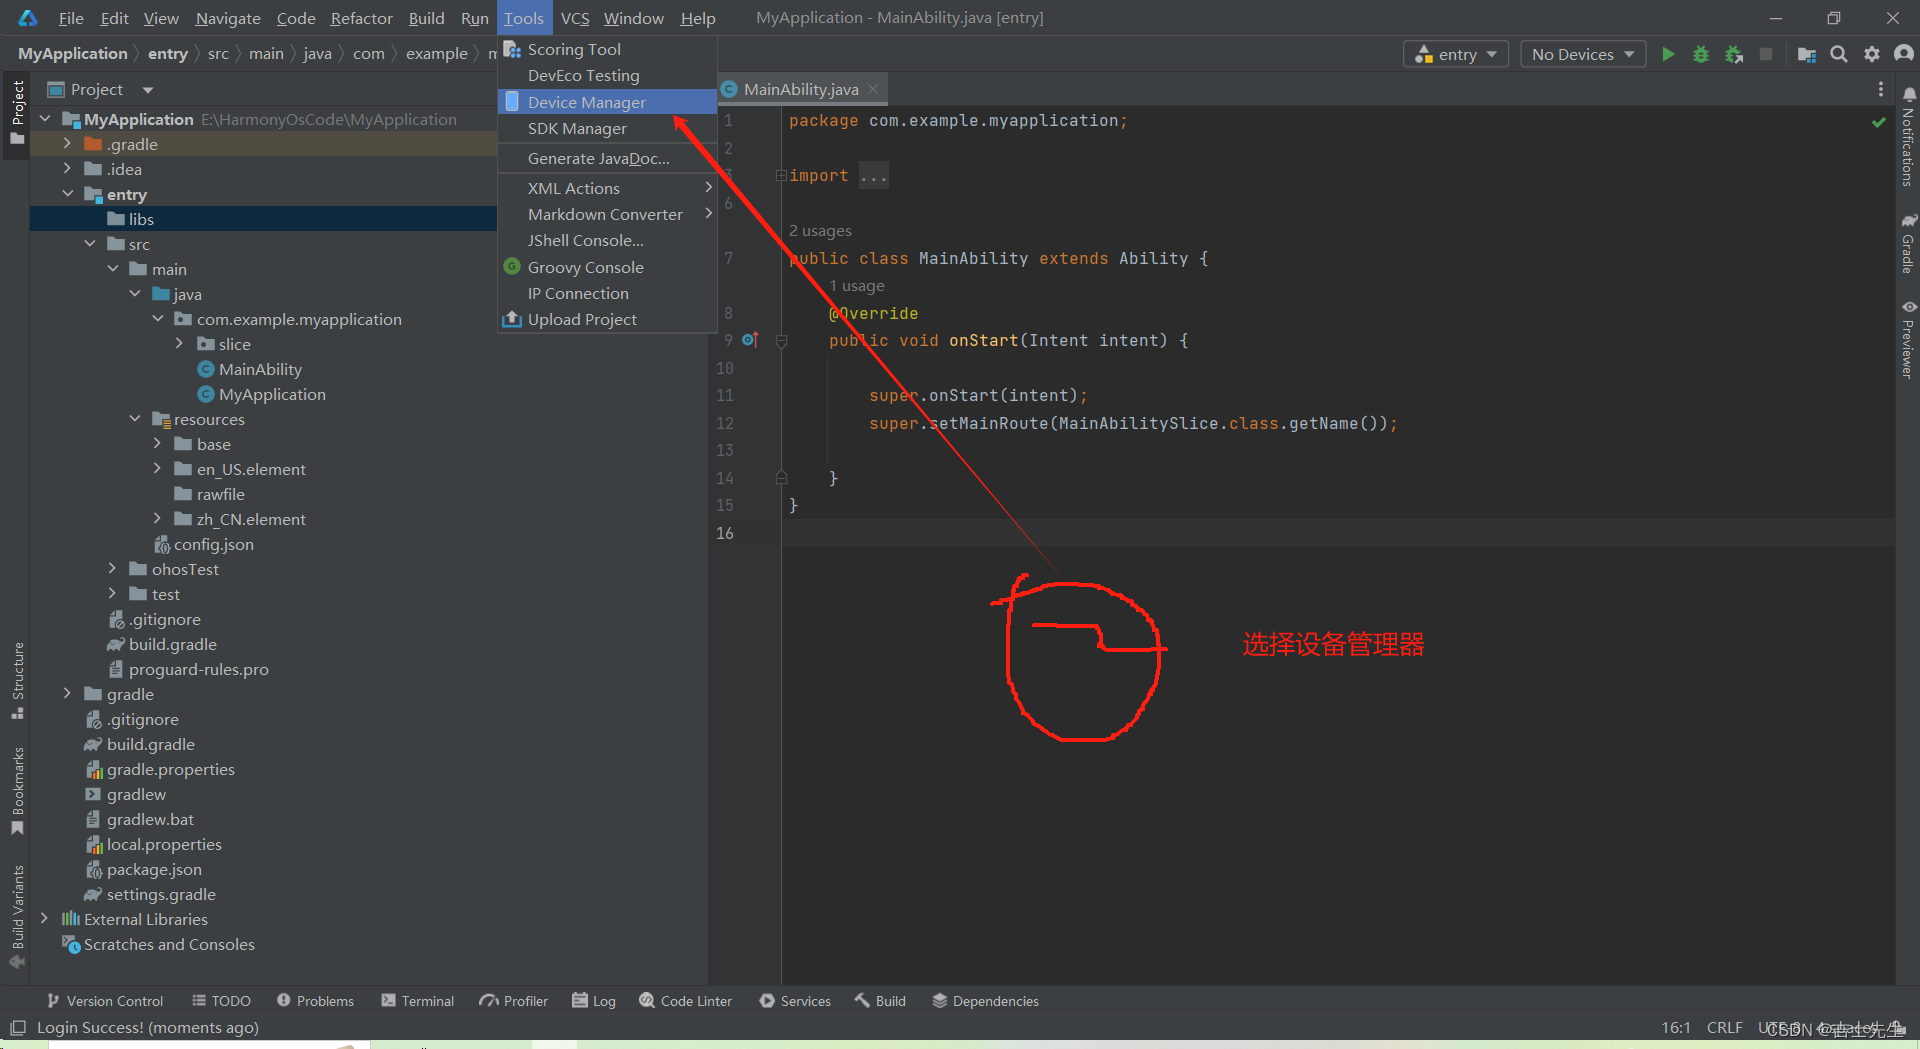
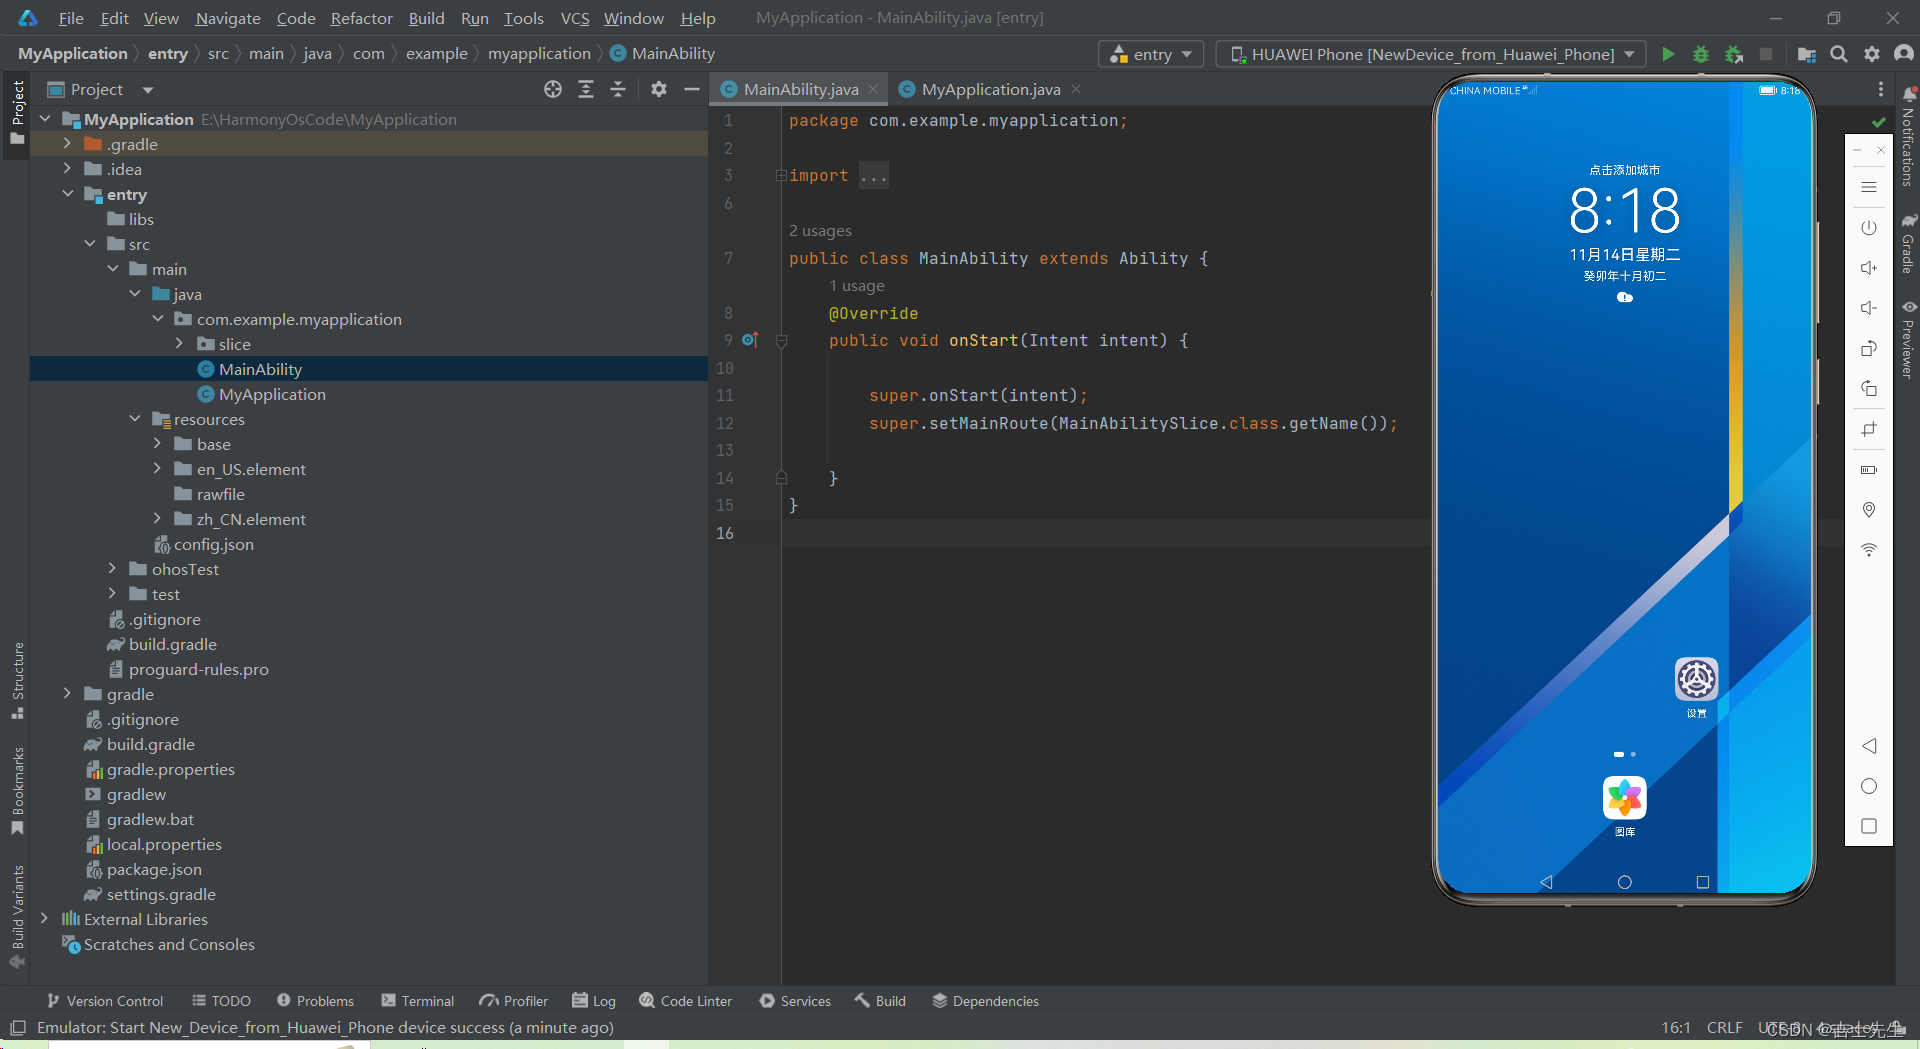
- 运行项目
(2).页面中的包含关系
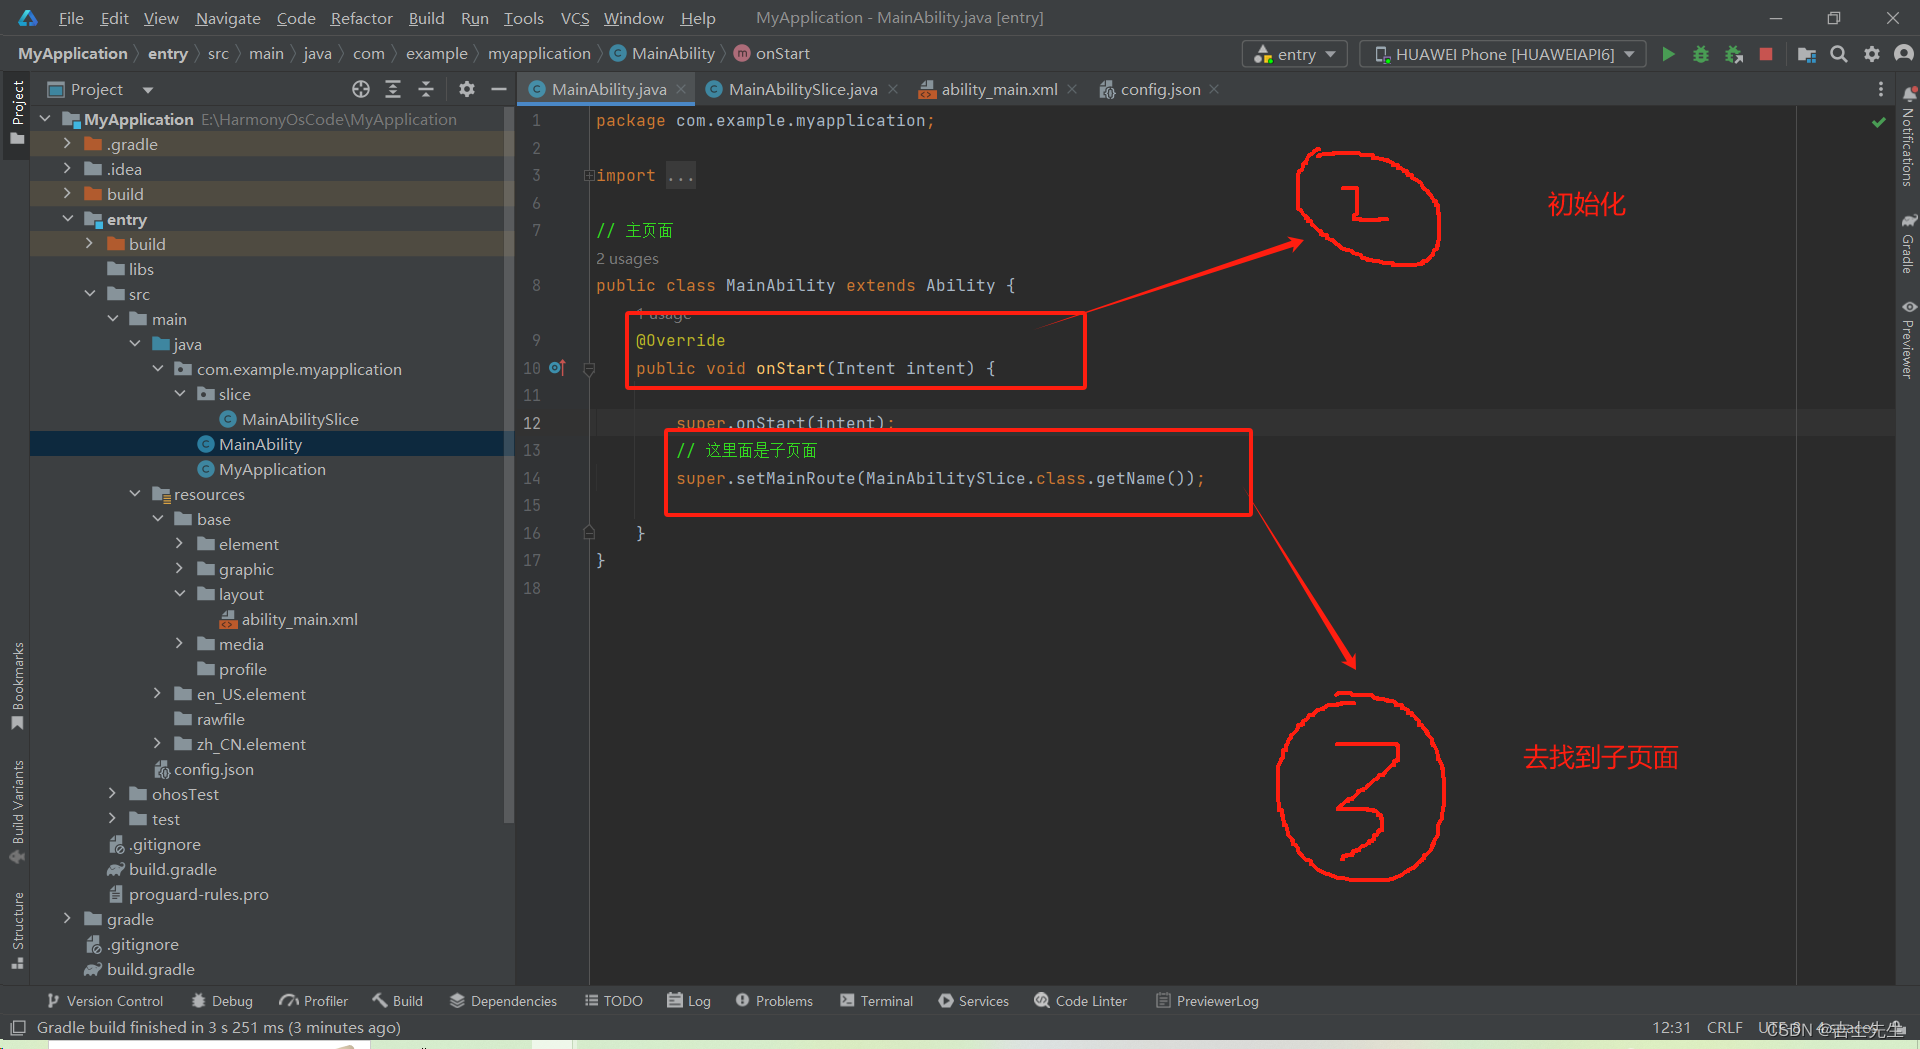
在HarmonyOS中一个页面就是一个 Ability 。在 页面Ability 中成为一个 子页面 AbiltySlice。
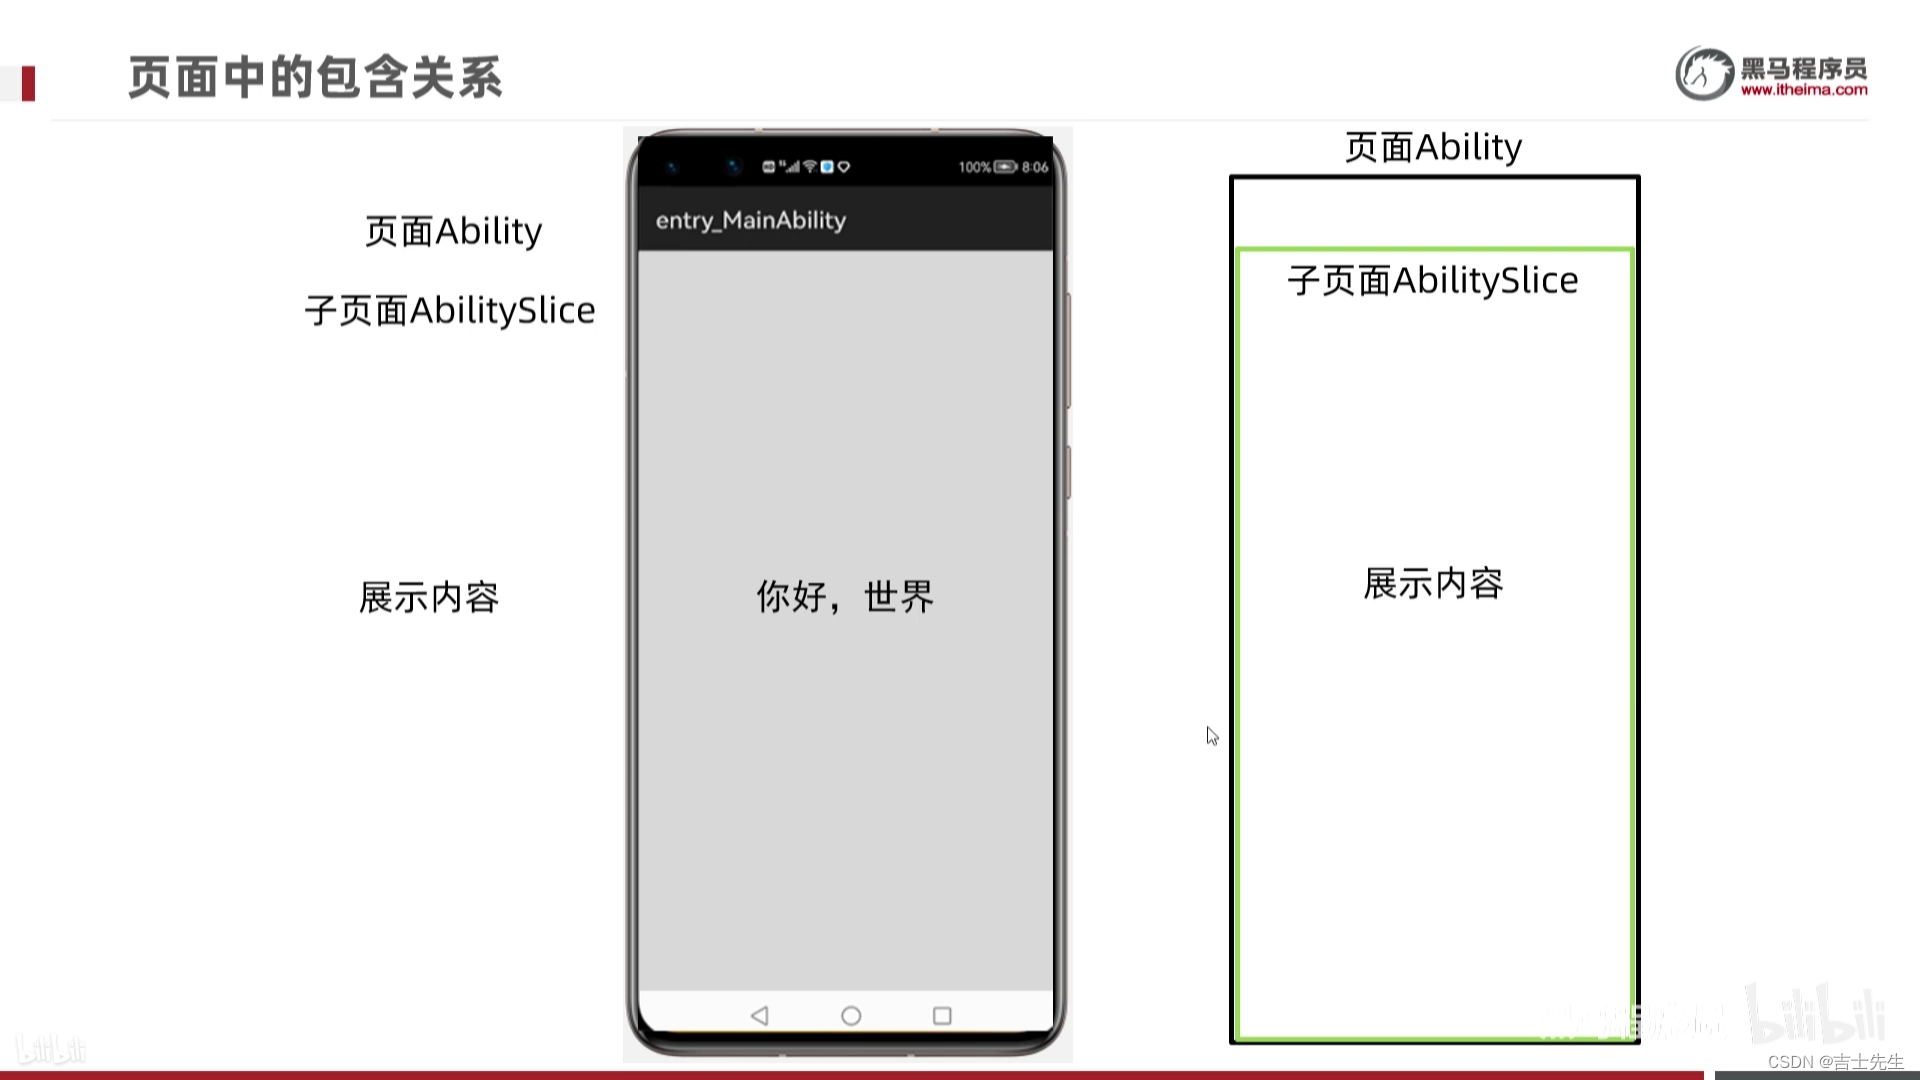
包含关系:
最外面是: Ability,Ability中是一个或多个子页面 AbilitySlice 子页面中有要展示的内容: 图片,文本等信息。
(3).为什么存在子页面呢?
为什么会有子页面的存在呢? 直接在最外面的页面里面添加文本信息不更简单吗?
- 因为华为的鸿蒙系统是一个模块化系统,我们用到什么我们只需要安装对应的栏目即可。这种思想类似于Vue的组件。

所以,在以后开发中,一个单独的功能(能力),对应着一个Ability。如果这个能力中需要进行切换,那么就可以在Ability中,写多个子页面AbilitySlice进行切换。
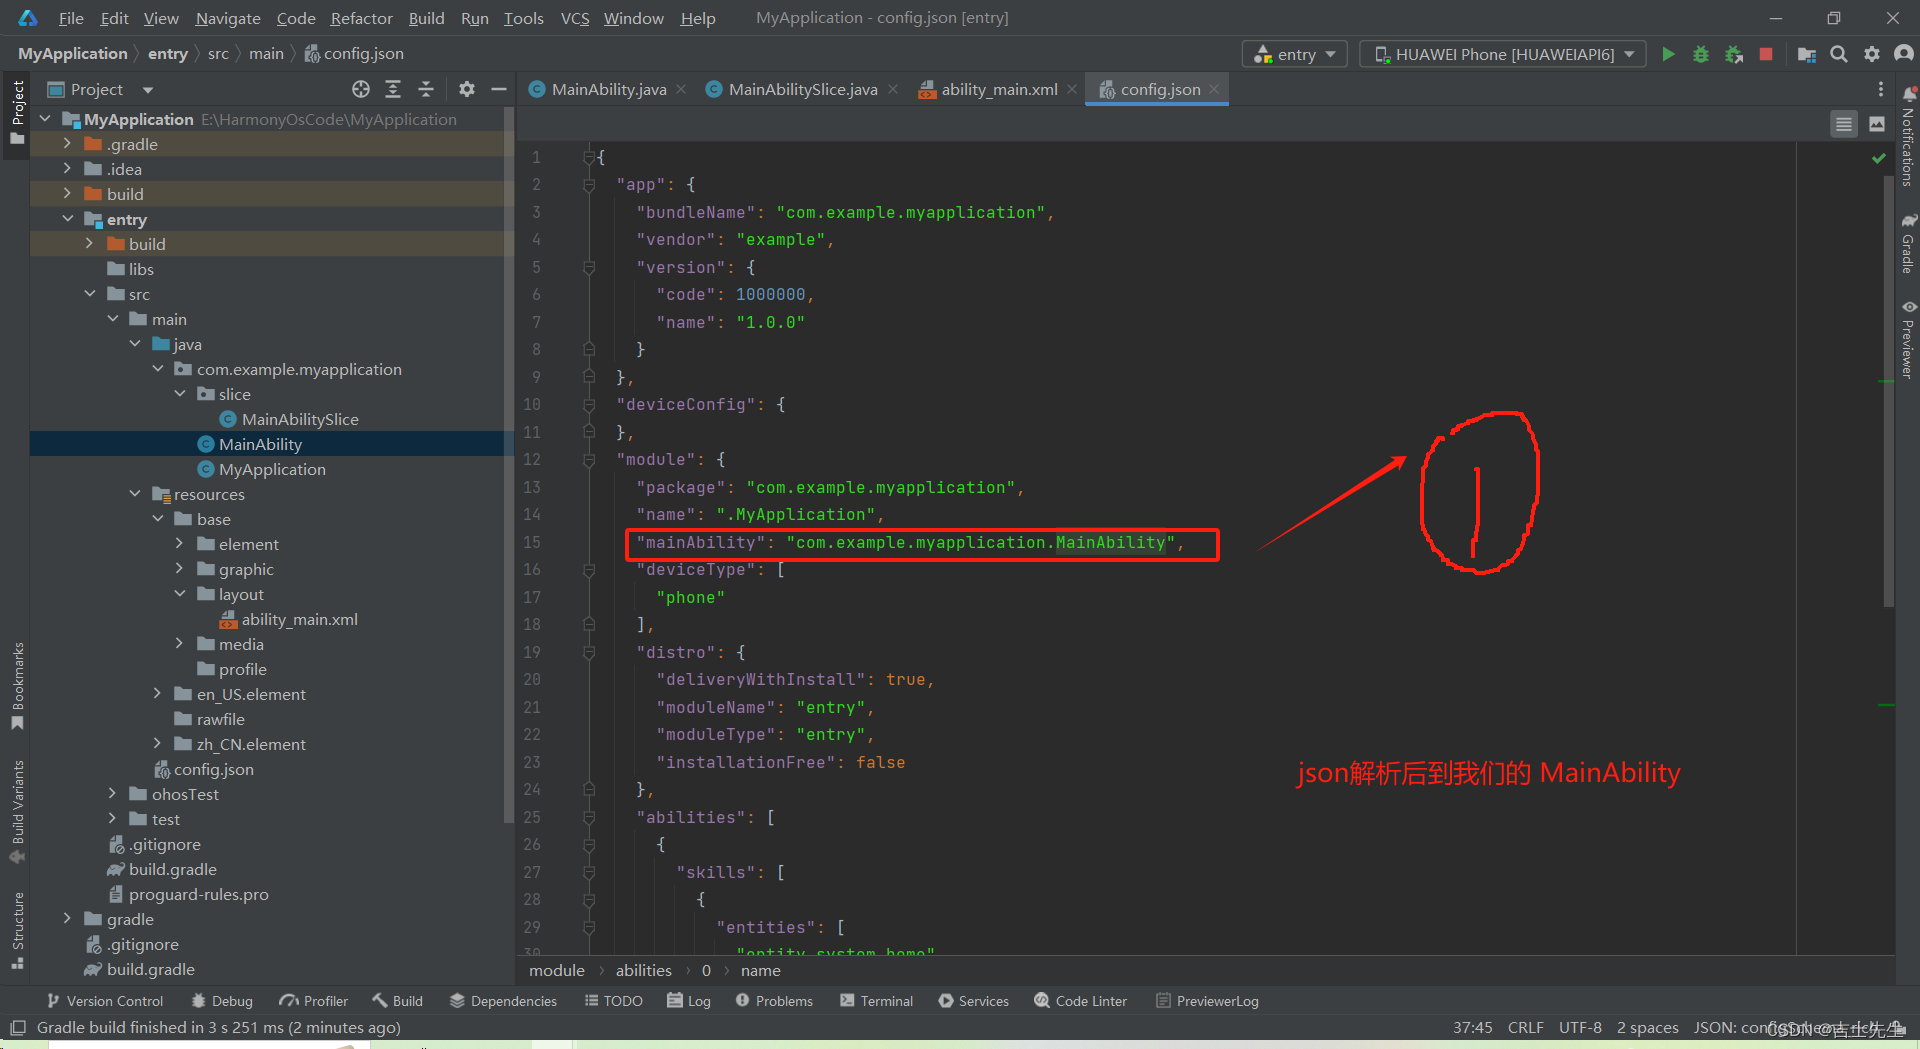
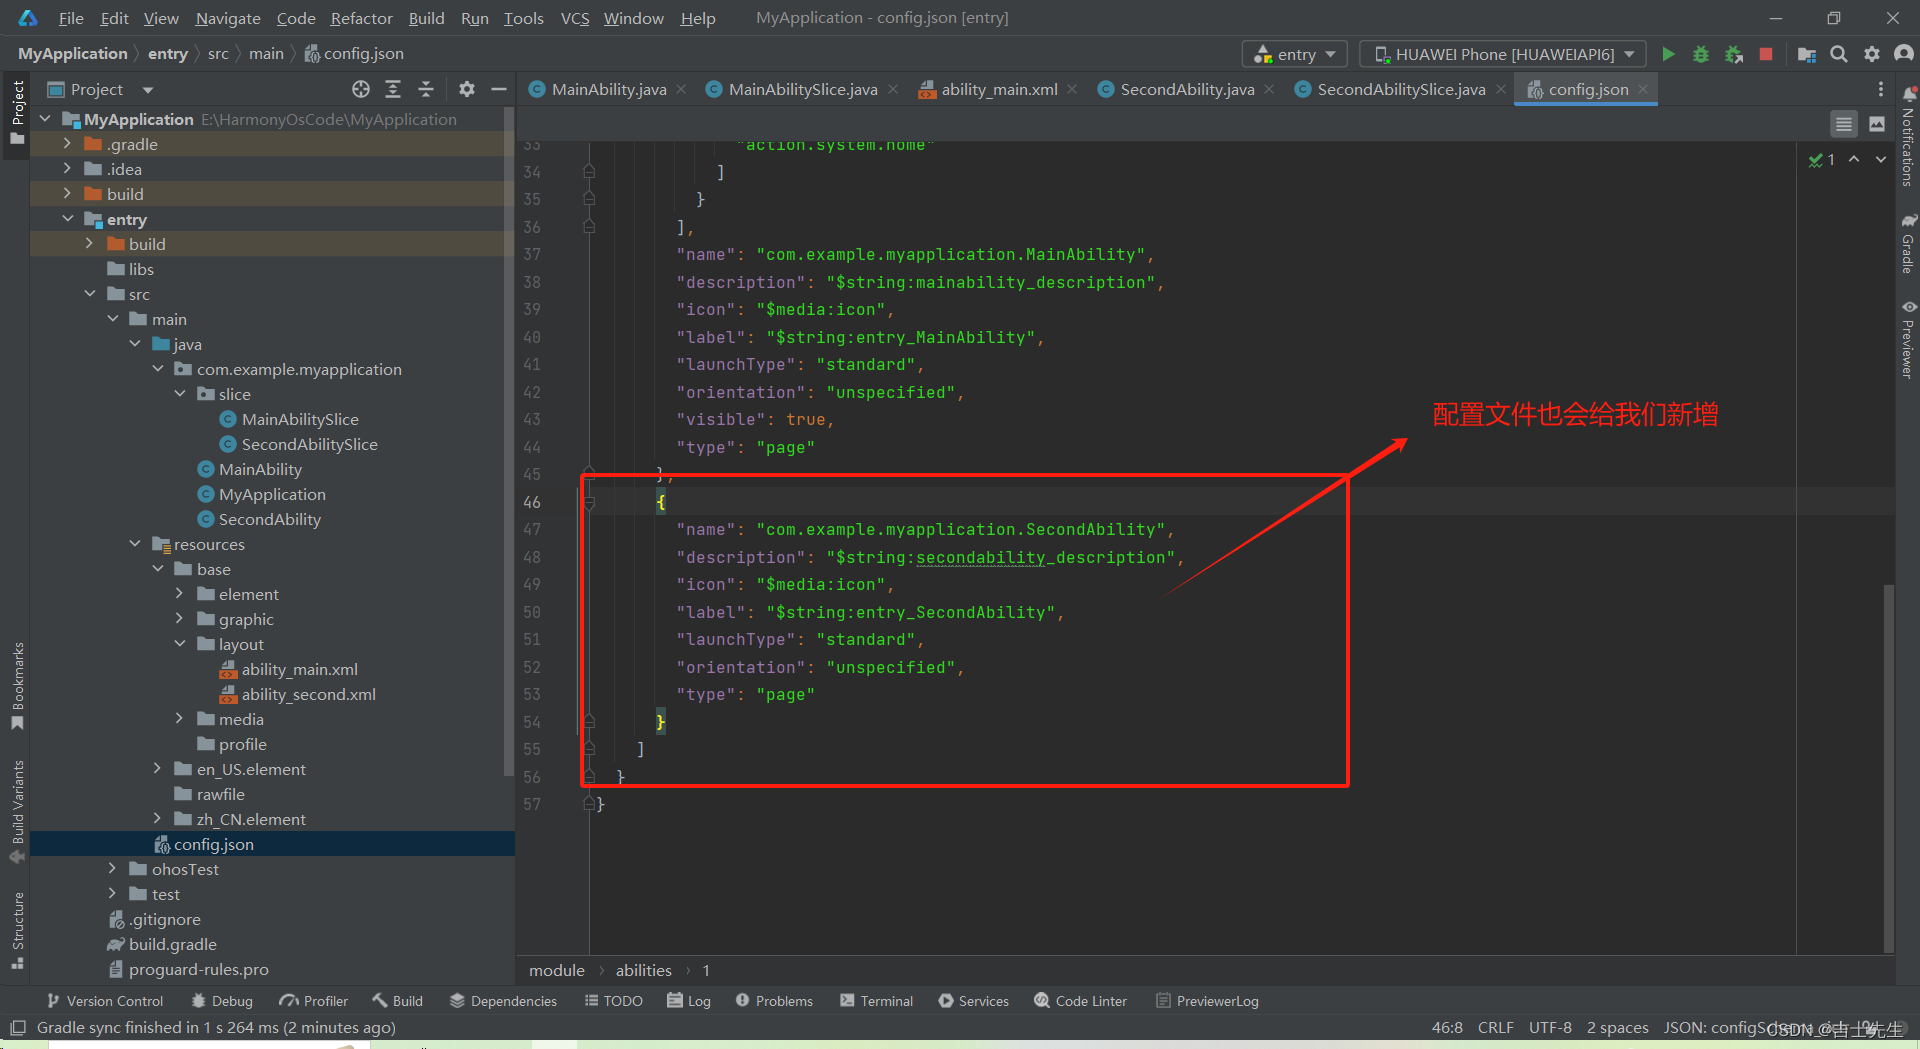
(4).学习项目的配置文件: config.json
跟应用相关的所有信息,都会在这个文件中配置。
-
项目的配置:(app)
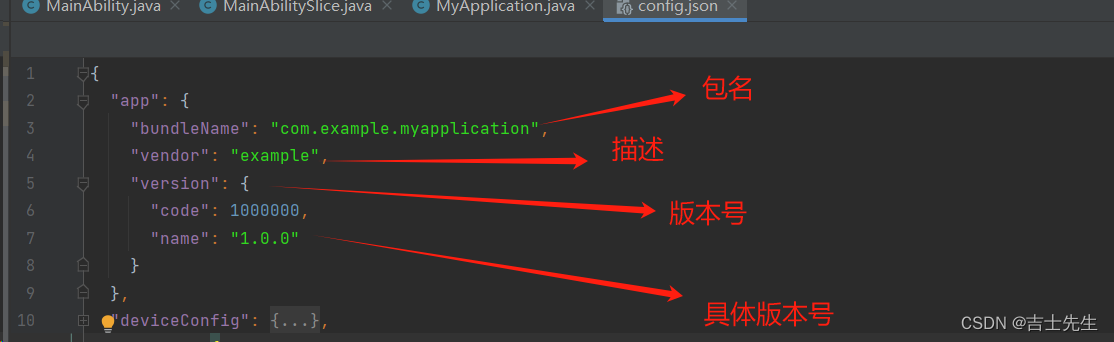
- 厂商信息
- 项目的版本信息
-
应用在设备上的配置信息 (deviceConfig)
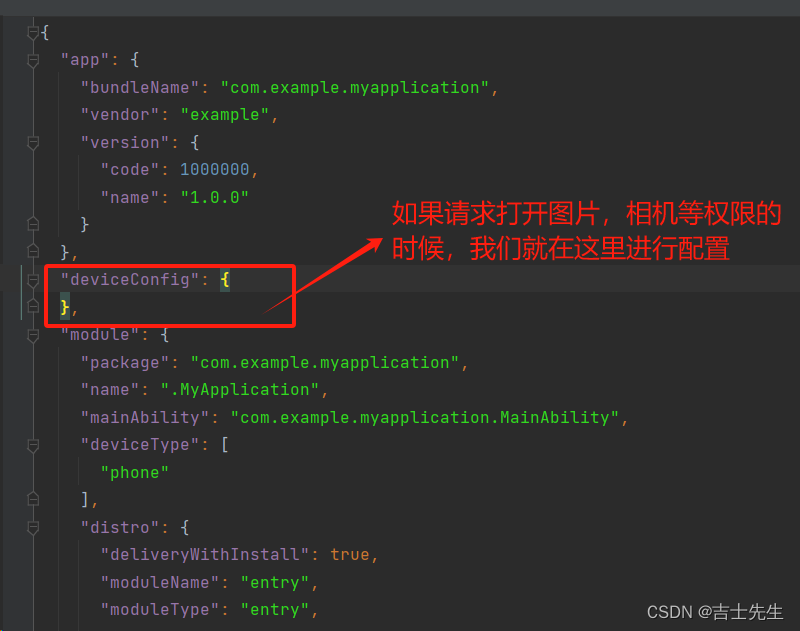
- 应用运行时进程名
- 是否允许使用流量
- 是否支持未解锁时启动
-
代码中的配置 (module)
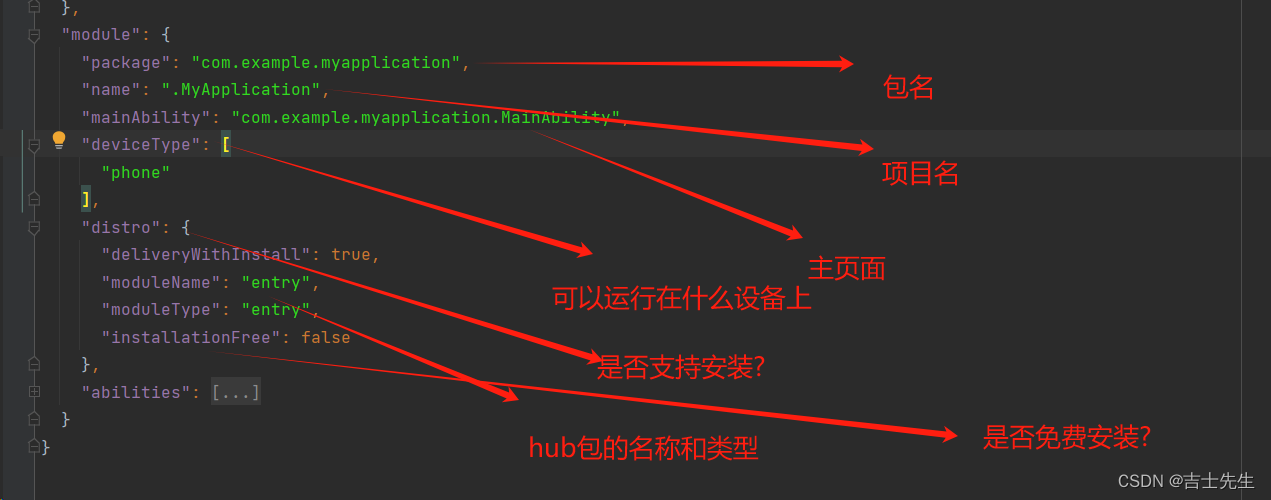
- 所有的Ability
(5).了解程序的运行过程
- 程序的运行过程
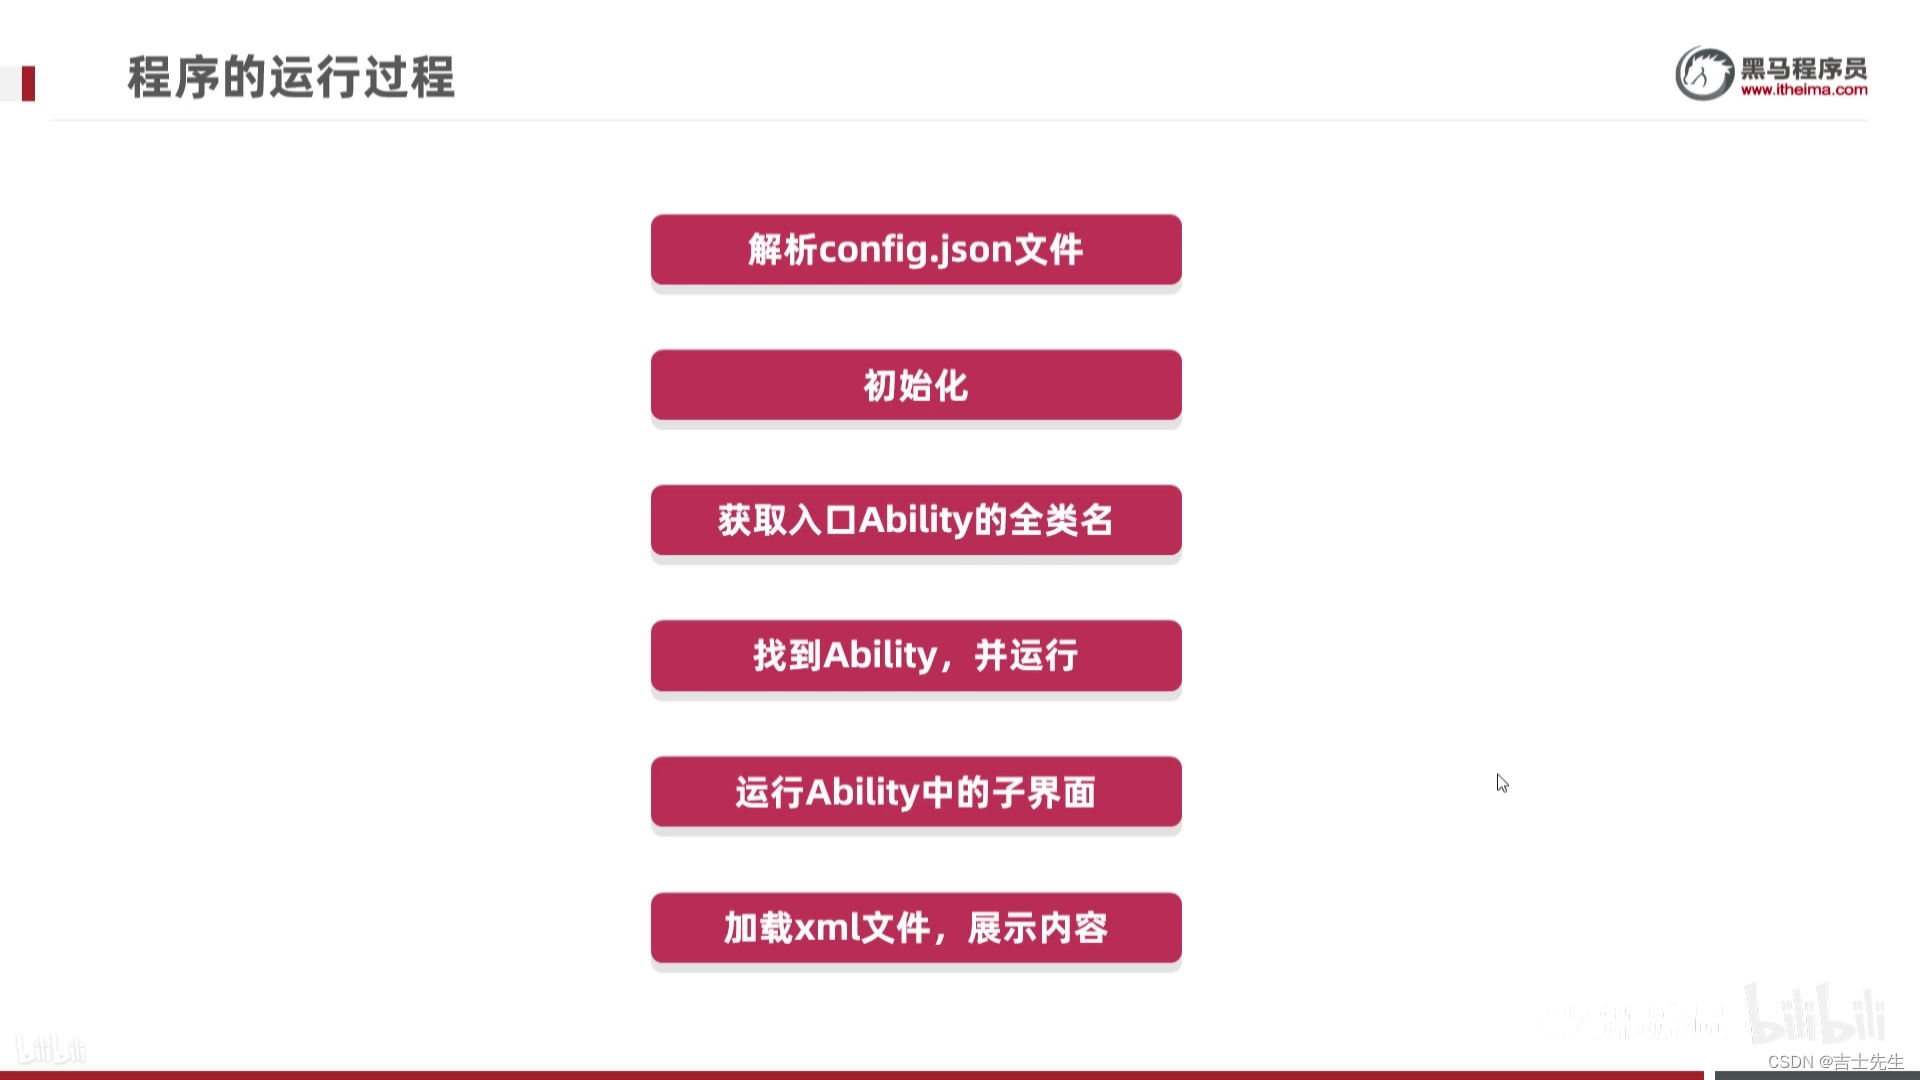
1.json解析后找到主启动类
2.进行初始化,并且去找到子页面
3.在子页面中进行找到xml
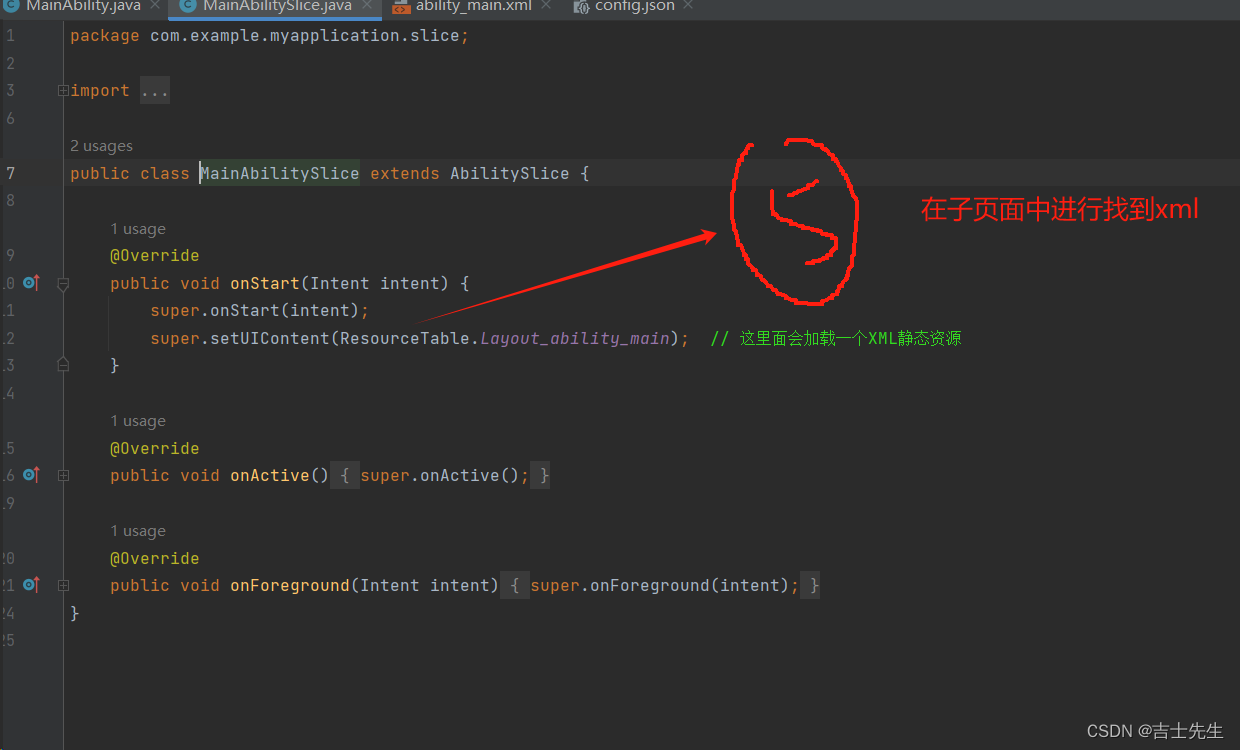
4.解析xml并运行文本
2.第二个应用: 页面跳转
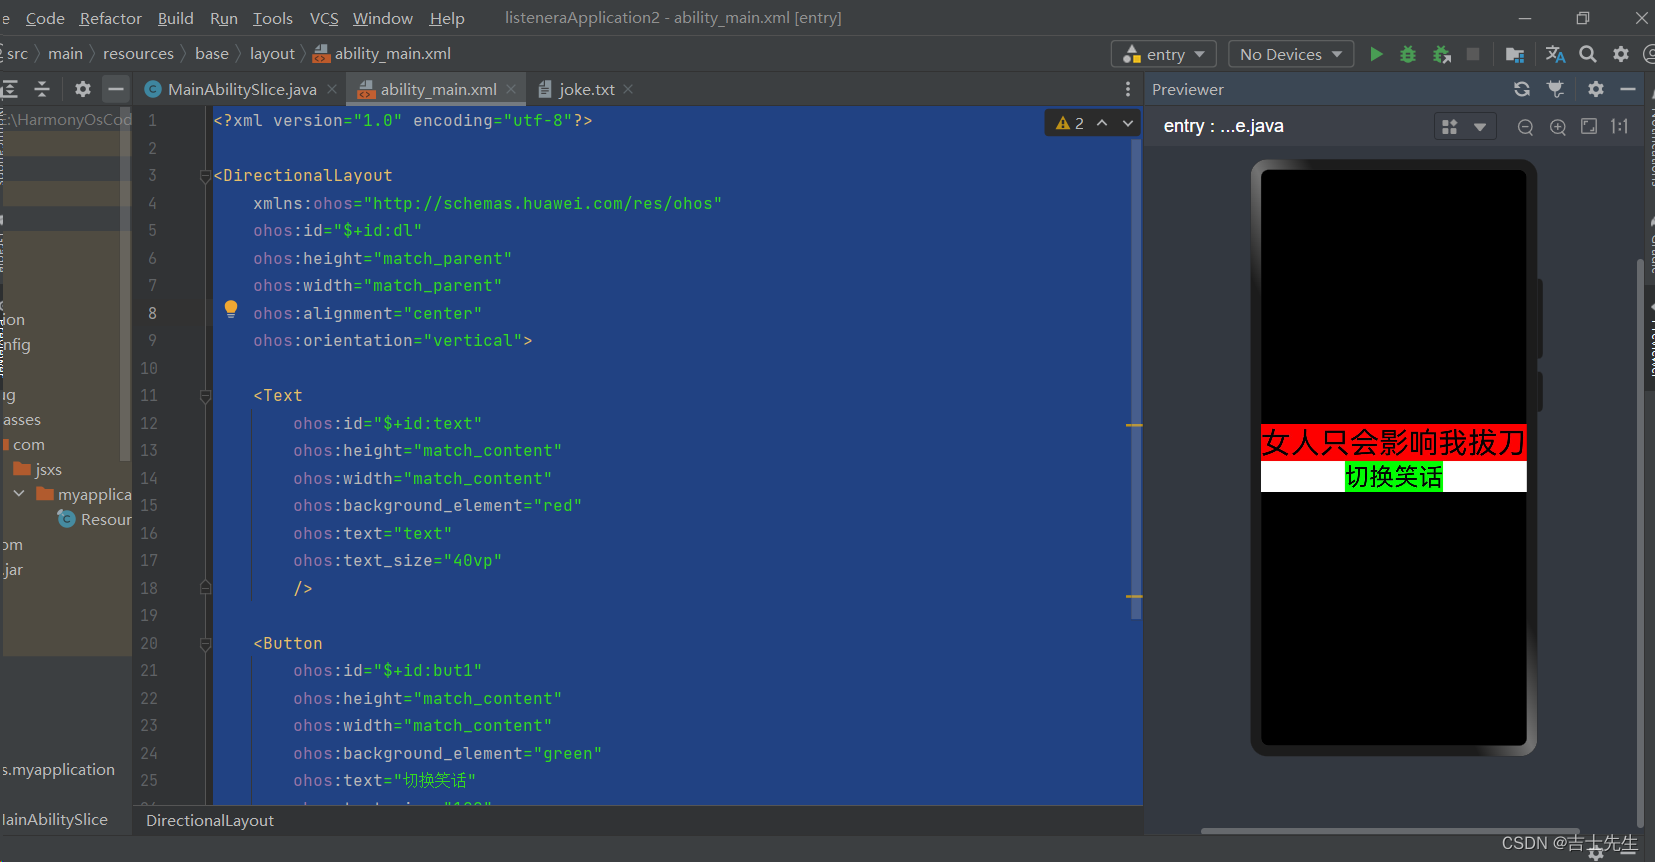
(1).编写第一个页面 (文本+按钮) XML实现
- 鸿蒙UI中,提供了两种编写布局的方式:
- XML文件: 标签标识要展示的不同内容
- < Text> 文本
- < Image> 图片
- < Button> 按钮
- Java代码: 对象标识要展示的不同内容
- Text对象 文本
- Image对象 图片
- Button对象 按钮
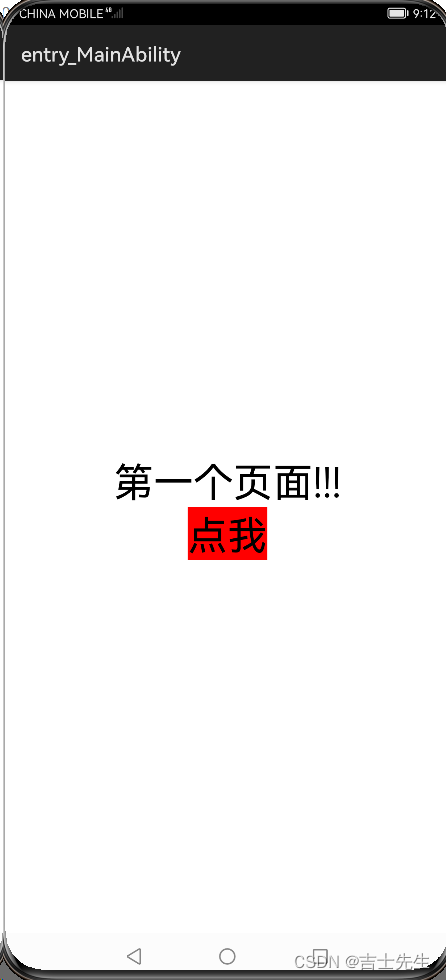
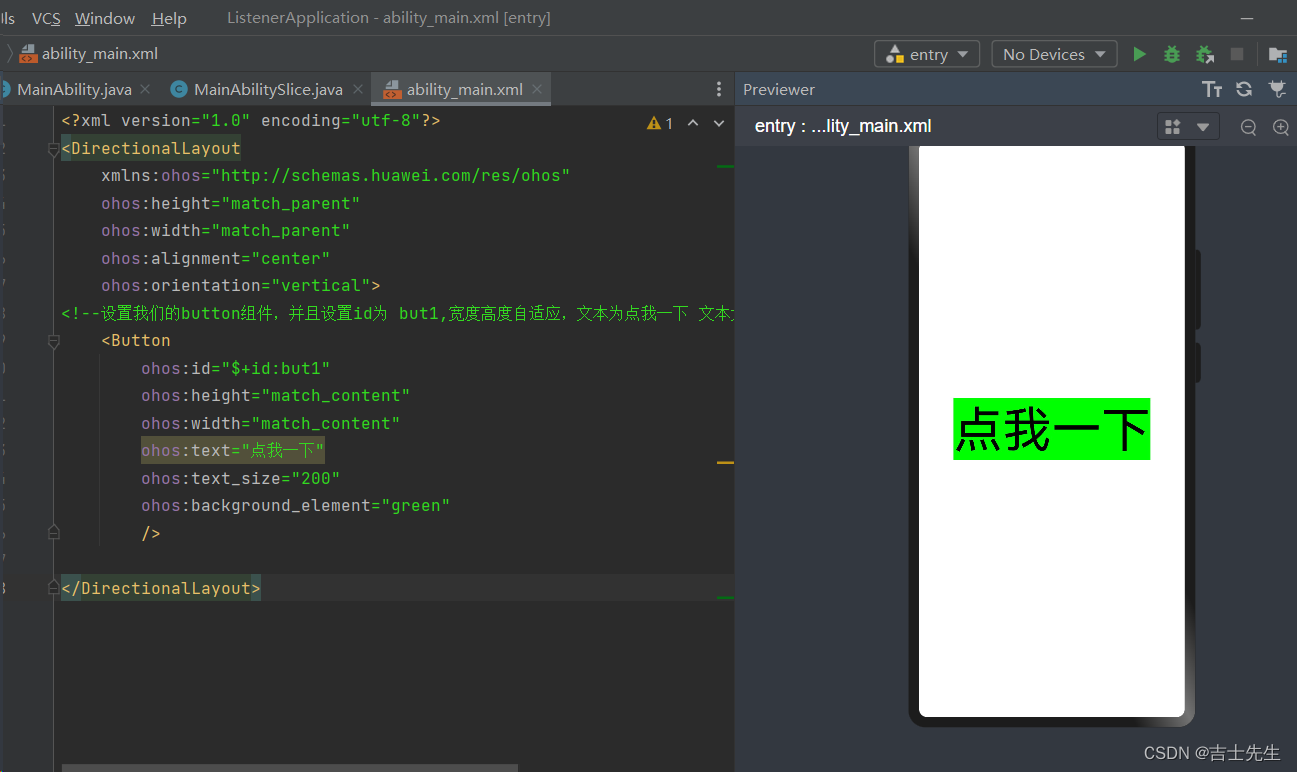
- 第一个页面: (文本+按钮)
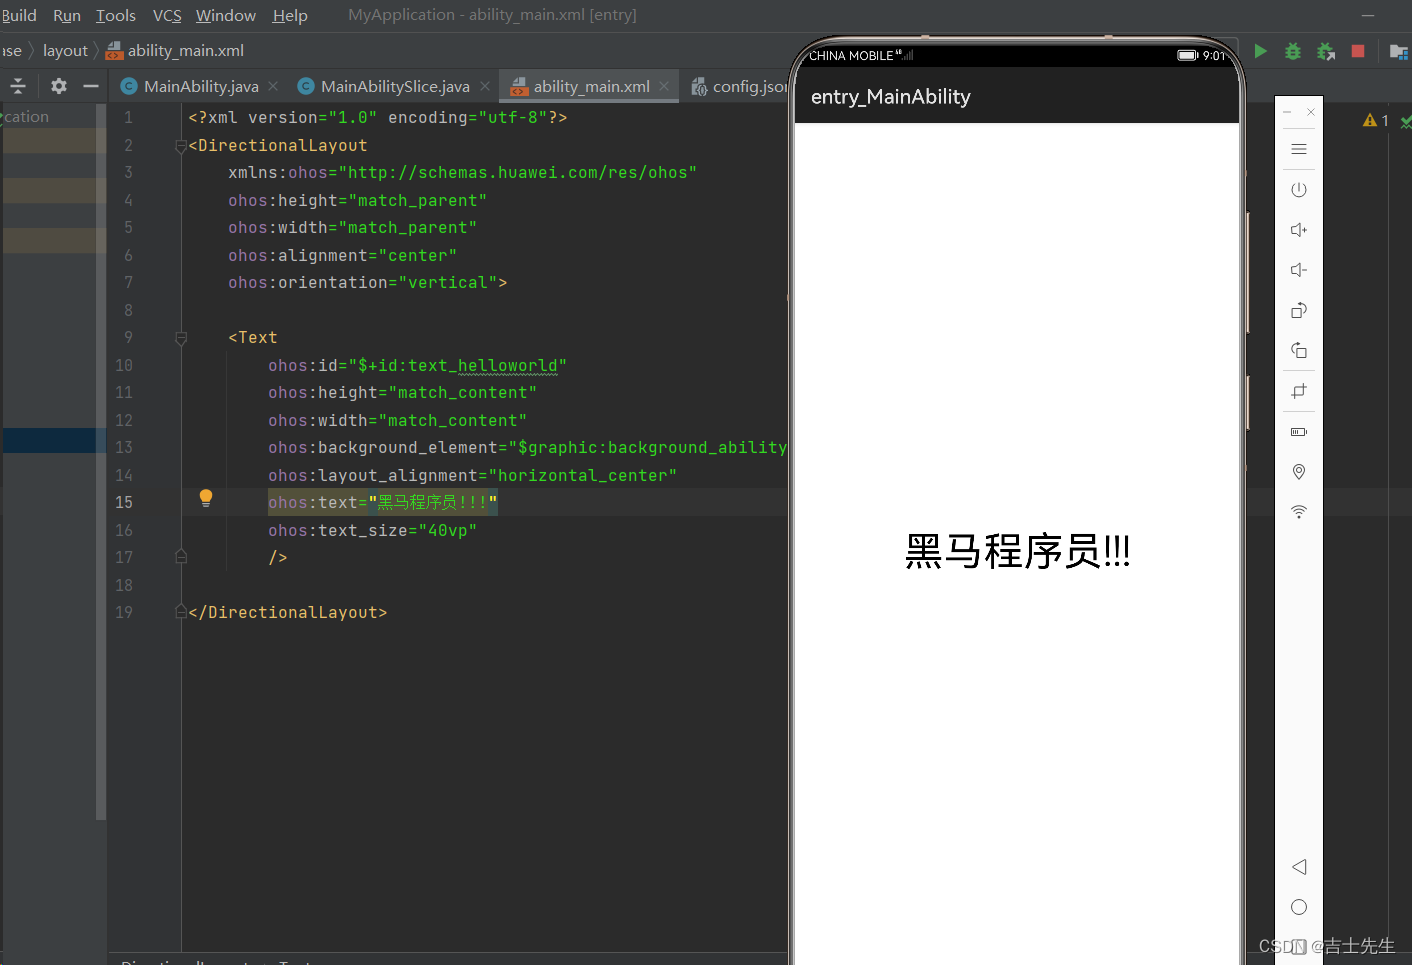
src/main/resources/base/layout/ability_main.xml
<?xml version="1.0" encoding="utf-8"?>
<DirectionalLayout
    xmlns:ohos="http://schemas.huawei.com/res/ohos"
    ohos:height="match_parent"
    ohos:width="match_parent"
    ohos:alignment="center"
    ohos:orientation="vertical">

    <Text
        ohos:id="$+id:text_helloworld"
        ohos:height="match_content"
        ohos:width="match_content"
        ohos:background_element="$graphic:background_ability_main"
        ohos:layout_alignment="horizontal_center"
        ohos:text="第一个页面!!!"
        ohos:text_size="40vp"
        />

    <Button
        ohos:id="$+id:but1"  # 绑定按钮⭐
        ohos:height="match_content" # 长度自适应
        ohos:width="match_content" # 宽度自适应
        ohos:background_element="red" # 背景颜色
        ohos:text="点我" # 按钮的文本
        ohos:text_size="40fp" # 文本的长度
        />
</DirectionalLayout>
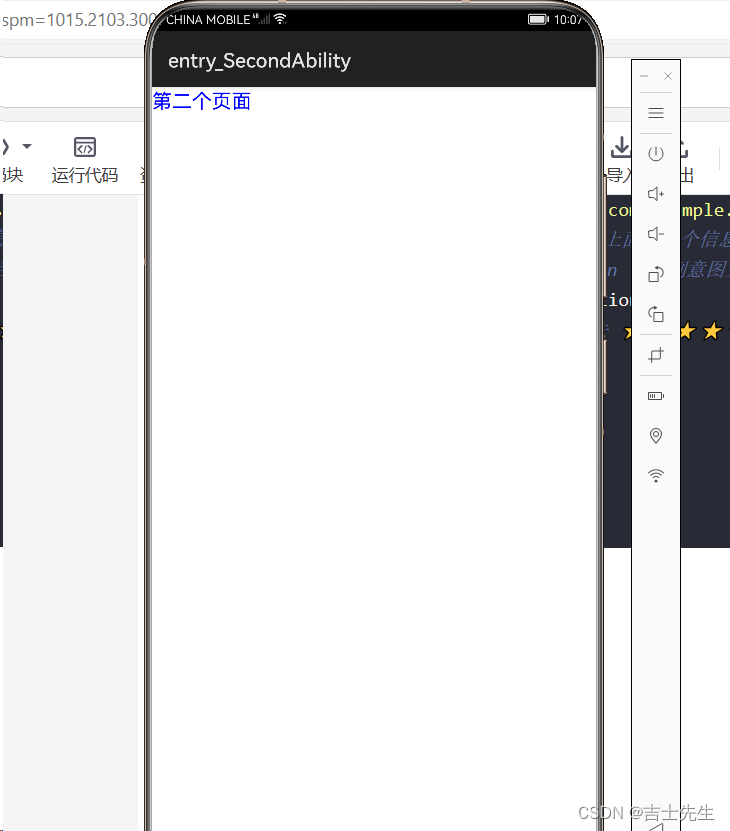
(2).编写第二个页面 (文本) java实现
1.如何创建一个Ability
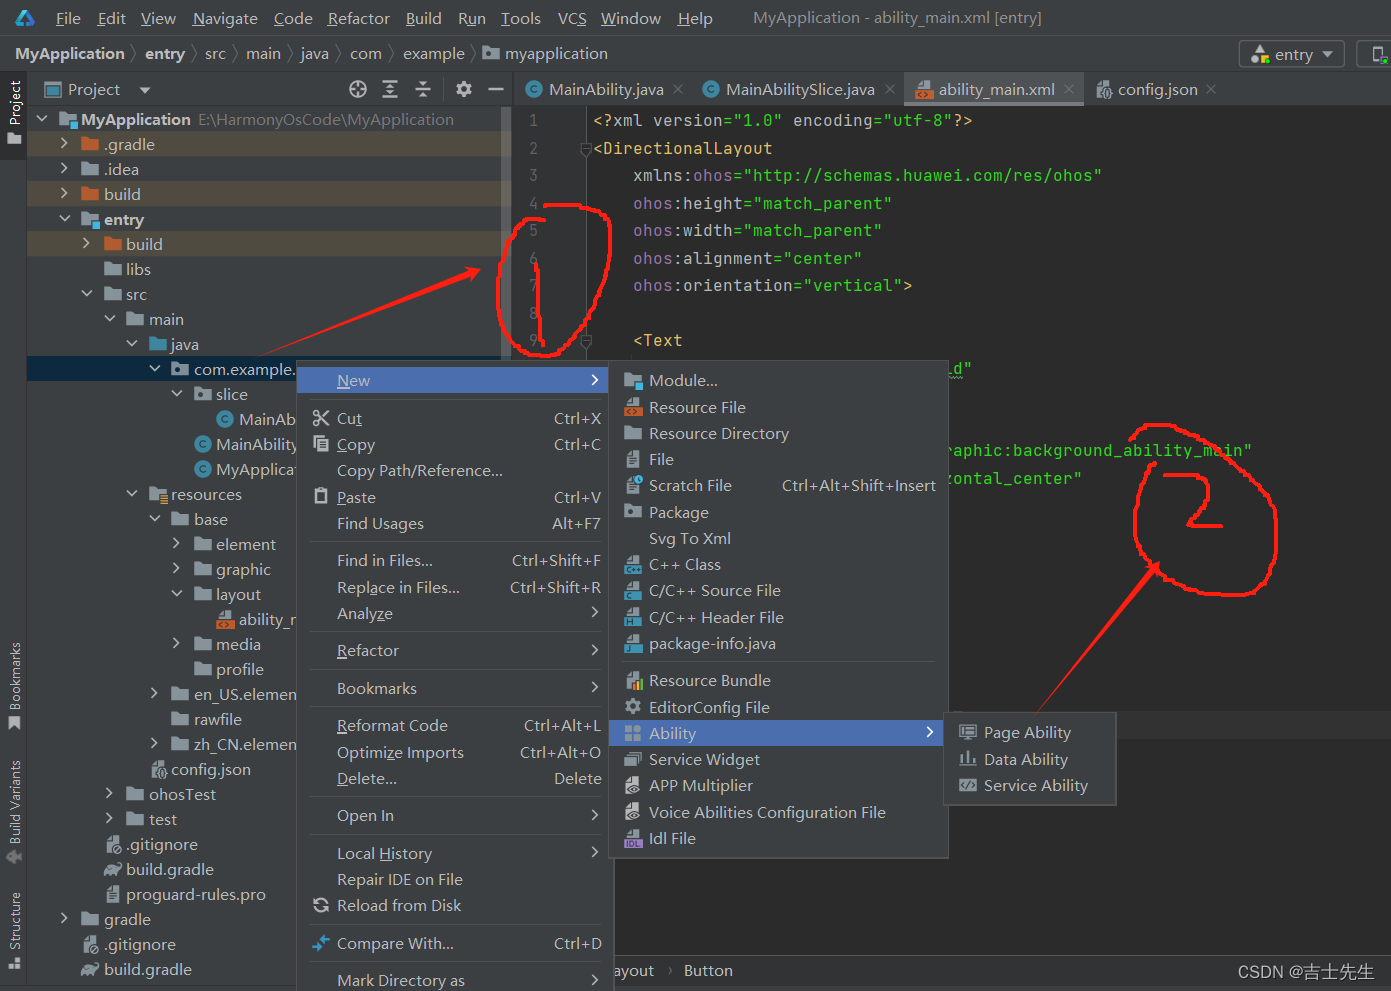
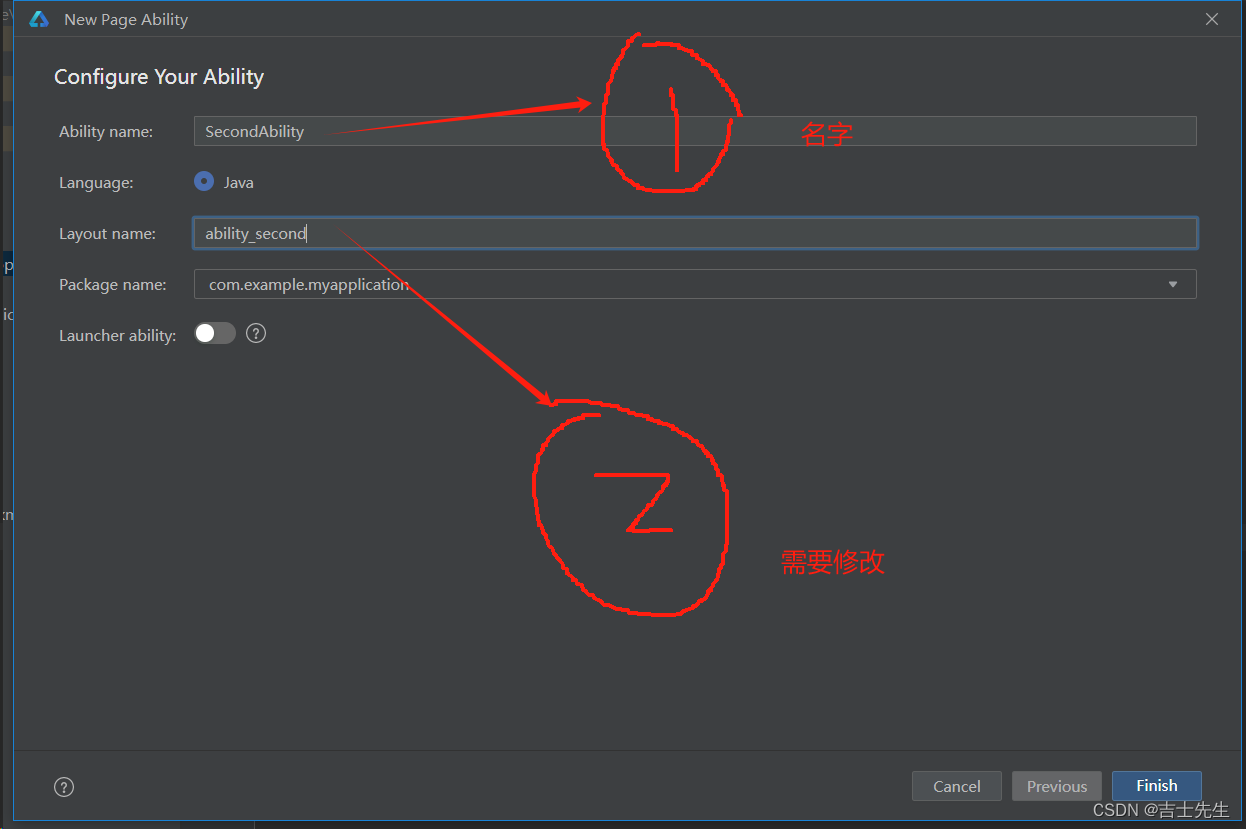
2.我们创建成功后,会自动帮我们生成 xml 子页面 主页面 和 config.json

3.因为我们使用java代码写所以我们把 xml 和 layout给注释或删除
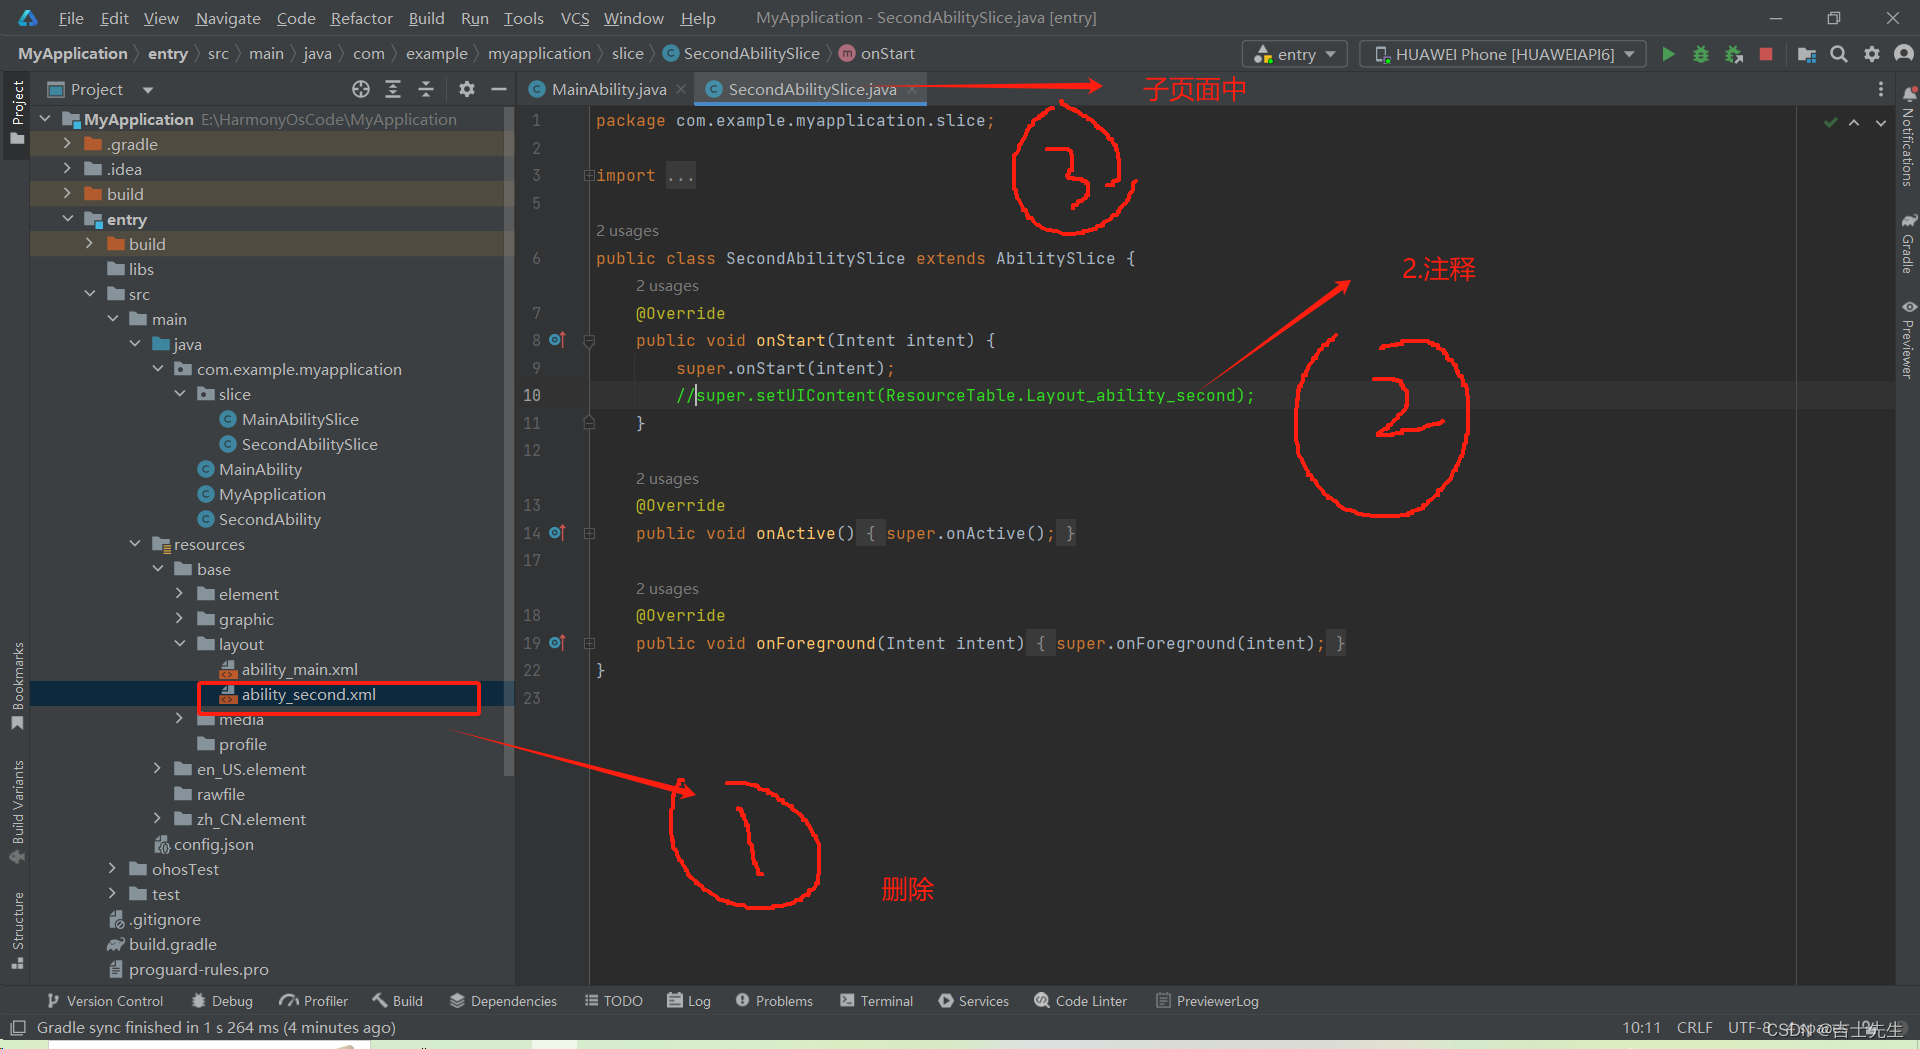
切记是第二个页面的 子页面
src/main/java/com/example/myapplication/slice/SecondAbilitySlice.java
package com.example.myapplication.slice;

import ohos.aafwk.ability.AbilitySlice;
import ohos.aafwk.content.Intent;
import ohos.agp.components.DirectionalLayout;
import ohos.agp.components.Text;
import ohos.agp.utils.Color;

public class SecondAbilitySlice extends AbilitySlice {
    @Override
    public void onStart(Intent intent) {
        super.onStart(intent);
        //super.setUIContent(ResourceTable.Layout_ability_second);

        // 1.创建布局对象: 并将这个布局放在这个子页面中
        DirectionalLayout directionalLayout = new DirectionalLayout(this);
        // 2.创建文本对象
        Text text = new Text(this);
        //文字的内容
        text.setText("第二个页面");
        //文字大小
        text.setTextSize(55);
        //文字颜色
        text.setTextColor(Color.BLUE);
        // 3.文本对象添加到布局中
        directionalLayout.addComponent(text);

        // 4.将布局添加到子页面中
        super.setUIContent(directionalLayout);
    }

    @Override
    public void onActive() {
        super.onActive();
    }

    @Override
    public void onForeground(Intent intent) {
        super.onForeground(intent);
    }
}
(3).给按钮添加一个跳转
切记是第一个页面上的 子页面上进行了修改
src/main/java/com/example/myapplication/slice/MainAbilitySlice.java
package com.example.myapplication.slice;

import com.example.myapplication.ResourceTable;
import ohos.aafwk.ability.AbilitySlice;
import ohos.aafwk.content.Intent;
import ohos.aafwk.content.Operation;
import ohos.agp.components.Button;
import ohos.agp.components.Component;

public class MainAbilitySlice extends AbilitySlice implements Component.ClickedListener { // 这里我们就继承我们的 ClickedListener 接口。⭐

    // 设置一个全局的 button ⭐⭐
    Button button;

    @Override
    public void onStart(Intent intent) {
        super.onStart(intent);
        super.setUIContent(ResourceTable.Layout_ability_main);  // 这里面会加载一个XML静态资源


        // 1.找到我们XML中的按钮 id ⭐⭐⭐
        button = (Button) findComponentById(ResourceTable.Id_but1);

        // 2.给按钮添加一个点击事件 ⭐⭐⭐⭐
        // 如果没有添加点击事件,那么用鼠标点击按钮之后是没有任何反应的。
        // 如果我们给按钮添加了点击事件,那么用戍边点击按钮之后,就可以执行对应的代码
        // 当我们用鼠标点击了btu这个按钮智慧,就可以执行奔雷中的 onClick 方法
        button.setClickedListener(this);
    }

    @Override
    public void onActive() {
        super.onActive();
    }

    @Override
    public void onForeground(Intent intent) {
        super.onForeground(intent);
    }

    // 3.重写这个方法 ⭐⭐⭐⭐⭐
    @Override
    public void onClick(Component component) {
        // 点击按钮只需要执行的代码
        // 3. 跳转到第二个页面中 ⭐⭐⭐⭐⭐⭐
        if (component == button) {
            // 只有点击了but1这个按钮之后,才会跳转

            // 4. 跳转到哪个页面中 (意图) ⭐⭐⭐⭐⭐⭐⭐
            Intent intent = new Intent();
            // 5. 包含了要跳转的页面信息 ⭐⭐⭐⭐⭐⭐⭐⭐
            Operation operation = new Intent.OperationBuilder()
                    .withDeviceId("") // 要跳转到哪个设备上,如果传递一个没有内容的字符串,标识跳转本机
                    .withBundleName("com.example.myapplication") // (项目名)我要跳转到哪个应用上,小括号里面可以写包名
                    .withAbilityName("com.example.myapplication.SecondAbility") // 要跳转的主页面 (跳转的主页名)
                    .build();// 表示将上面的三个信息进行打包
            // 6. 把打包之后的 operation 设置到意图当中 ⭐⭐⭐⭐⭐⭐⭐⭐⭐
            intent.setOperation(operation);
            // 7.跳转页名 将意图移动进去 ⭐⭐⭐⭐⭐⭐⭐⭐⭐⭐
            startAbility(intent);

        }
    }
}
我们点击第一个页面的按钮之后,会出现跳转的操作!!!
(五)、组件、布局、事件
1.组件、布局、事件的关系
(1).组件
定义: 屏幕展示出来的元素,都称之为组件。
- 比如:第一个HelloWorld案例中,我们是在界面最中央,写了一个
Text文本框组件,文本框中的内容为HelloWorld。 - 比如:第二个跳转案例中,我们是在界面最中央,写了一个
Text文本框组件,然后再下面再写了一个Button按钮组件。 - 所以,这里在界面中展示出来了文本,按钮都是组件中的一种,而鸿蒙中除了这两种之外,还提供了很多其他组件,我们今天将一一学习。
(2).布局
定义: 多个组件的摆放方式就是布局。而组件必须添加到布局中才能显示出来。
- 所以,
当一个界面弹出之后,首先是一个布局,布局中有一个或者多个组件。比如说,文本组件,按钮组件等。外层的布局就决定了里面的这些组件如何进行摆放。 - 比如:在第二个跳转案例中,最外层就是
线性布局DirectionalLayout,这种布局方式默认将里面所有的组件从上往下依次摆放。而鸿蒙中,除了这种布局之外,还提供了很多其他的布局,我们也会一一学习。
(3).事件
定义: 事件就是可以被组件识别的操作。有了事件之后,组件就可以跟用户进行交互了。
- 比如:第二个跳转案例中,我们点击了按钮一下,就跳转到第二个界面。这就是单击事件。在鸿蒙中除了单击事件之外,还有很多其他事件,我们也会一一学习。
(六)、三大件之事件
1.什么是事件
事件: 事件就是可以被识别的操作 。
常见的事件有:单击、双击、长按、还有触摸事件 。
我们可以给文本、按钮等添加不同的事件。比如添加了单击事件之后,当我们再次点击文本、按钮,就可以运行对应的代码了。
2.常见的事件
(1).单击事件 ✅
单击事件: 又叫做点击事件。是开发中使用最多的一种事件,没有之一。
1.我们先创建一个空项目:

2.创建好按钮的视图
<?xml version="1.0" encoding="utf-8"?>
<DirectionalLayout
    xmlns:ohos="http://schemas.huawei.com/res/ohos"
    ohos:height="match_parent"
    ohos:width="match_parent"
    ohos:alignment="center"
    ohos:orientation="vertical">
<!--设置我们的button组件,并且设置id为 but1,宽度高度自适应,文本为点我一下 文本大小为200 背景颜色为红色-->
    <Button
        ohos:id="$+id:but1"
        ohos:height="match_content"
        ohos:width="match_content"
        ohos:text="点我一下"
        ohos:text_size="200"
        ohos:background_element="green"
        />

</DirectionalLayout>
(2).事件的四种写法
(2.1).自己编写实现类
this: this去调用方法this是可以省略不写的!!!
package com.jsxs.listenerapplication.slice;

import com.jsxs.listenerapplication.ResourceTable;
import ohos.aafwk.ability.AbilitySlice;
import ohos.aafwk.content.Intent;
import ohos.agp.components.Button;
import ohos.agp.components.Component;

public class MainAbilitySlice extends AbilitySlice {
    @Override
    public void onStart(Intent intent) {
        super.onStart(intent);
        super.setUIContent(ResourceTable.Layout_ability_main);

        // 1.通过我们设置的id找到我们的按钮
        Button button = (Button) this.findComponentById(ResourceTable.Id_but1);

        // 2.给按钮绑定一个点击事件 ⭐
        button.setClickedListener(new MyListener());
    }

    @Override
    public void onActive() {
        super.onActive();
    }

    @Override
    public void onForeground(Intent intent) {
        super.onForeground(intent);
    }

}

// 3.使用内部类实现我们的点击事件监听 ⭐⭐
class MyListener implements Component.ClickedListener {

    // 4. 重写我们这个点击事件
    @Override
    public void onClick(Component component) {  // 5.Component是所有组件的父类,参数是被点击的组件对象
        Button button = (Button) component; // 6.因为我们这个组件是按钮,所以我们进行强转一下
        button.setText("被点击了");
     }
}
(2).当前类实现接口 ⭐
package com.jsxs.listenerapplication.slice;

import com.jsxs.listenerapplication.ResourceTable;
import ohos.aafwk.ability.AbilitySlice;
import ohos.aafwk.content.Intent;
import ohos.agp.components.Button;
import ohos.agp.components.Component;

public class MainAbilitySlice extends AbilitySlice implements Component.ClickedListener {  // ⭐
    @Override
    public void onStart(Intent intent) {
        super.onStart(intent);
        super.setUIContent(ResourceTable.Layout_ability_main);

        // 1.通过我们设置的id找到我们的按钮
        Button button = (Button) findComponentById(ResourceTable.Id_but1);

        // 2.给按钮绑定一个点击事件 ⭐⭐
        button.setClickedListener(this);
    }

    @Override
    public void onActive() {
        super.onActive();
    }

    @Override
    public void onForeground(Intent intent) {
        super.onForeground(intent);
    }

    // 4. 重写我们这个点击事件
    @Override
    public void onClick(Component component) {  // 5.Component是所有组件的父类,参数是被点击的组件对象
        Button button = (Button) component; // 6.因为我们这个组件是按钮,所以我们进行强转一下
        button.setText("被点击了");
    }
}
(2.3).匿名内部类
匿名内部类: 当一个接口有且只有一个方法的时候。
弊端: 有且只有使用一次的时候,我们可以使用匿名内部类
package com.jsxs.listenerapplication.slice;

import com.jsxs.listenerapplication.ResourceTable;
import ohos.aafwk.ability.AbilitySlice;
import ohos.aafwk.content.Intent;
import ohos.agp.components.Button;
import ohos.agp.components.Component;

public class MainAbilitySlice extends AbilitySlice {
    @Override
    public void onStart(Intent intent) {
        super.onStart(intent);
        super.setUIContent(ResourceTable.Layout_ability_main);

        // 1.通过我们设置的id找到我们的按钮
        Button button = (Button) findComponentById(ResourceTable.Id_but1);

        // 2.给按钮绑定一个点击事件 使用匿名内部类
        button.setClickedListener(new Component.ClickedListener() {
            @Override
            public void onClick(Component component) {
                Button button = (Button) component; // 6.因为我们这个组件是按钮,所以我们进行强转一下
                button.setText("被点击了");
            }
        });
    }

    @Override
    public void onActive() {
        super.onActive();
    }

    @Override
    public void onForeground(Intent intent) {
        super.onForeground(intent);
    }
}
(2.4).方法引用 ⭐
我们创建一个方法引用实现与接口类似的方法即可
package com.jsxs.listenerapplication.slice;

import com.jsxs.listenerapplication.ResourceTable;
import ohos.aafwk.ability.AbilitySlice;
import ohos.aafwk.content.Intent;
import ohos.agp.components.Button;
import ohos.agp.components.Component;

public class MainAbilitySlice extends AbilitySlice {  // 这里不继承 ⭐
    @Override
    public void onStart(Intent intent) {
        super.onStart(intent);
        super.setUIContent(ResourceTable.Layout_ability_main);

        // 1.通过我们设置的id找到我们的按钮
        Button button = (Button) findComponentById(ResourceTable.Id_but1);

        // 2.给按钮绑定一个点击事件 ⭐⭐
        button.setClickedListener(this::onclick);
    }

    @Override
    public void onActive() {
        super.onActive();
    }

    @Override
    public void onForeground(Intent intent) {
        super.onForeground(intent);
    }

    // 3. 创造一个与点击监听接口⭐⭐
    public void onclick(Component component) {  // 4.Component是所有组件的父类,参数是被点击的组件对象
        Button button = (Button) component; // 5.因为我们这个组件是按钮,所以我们进行强转一下
        button.setText("被点击了");
    }

}
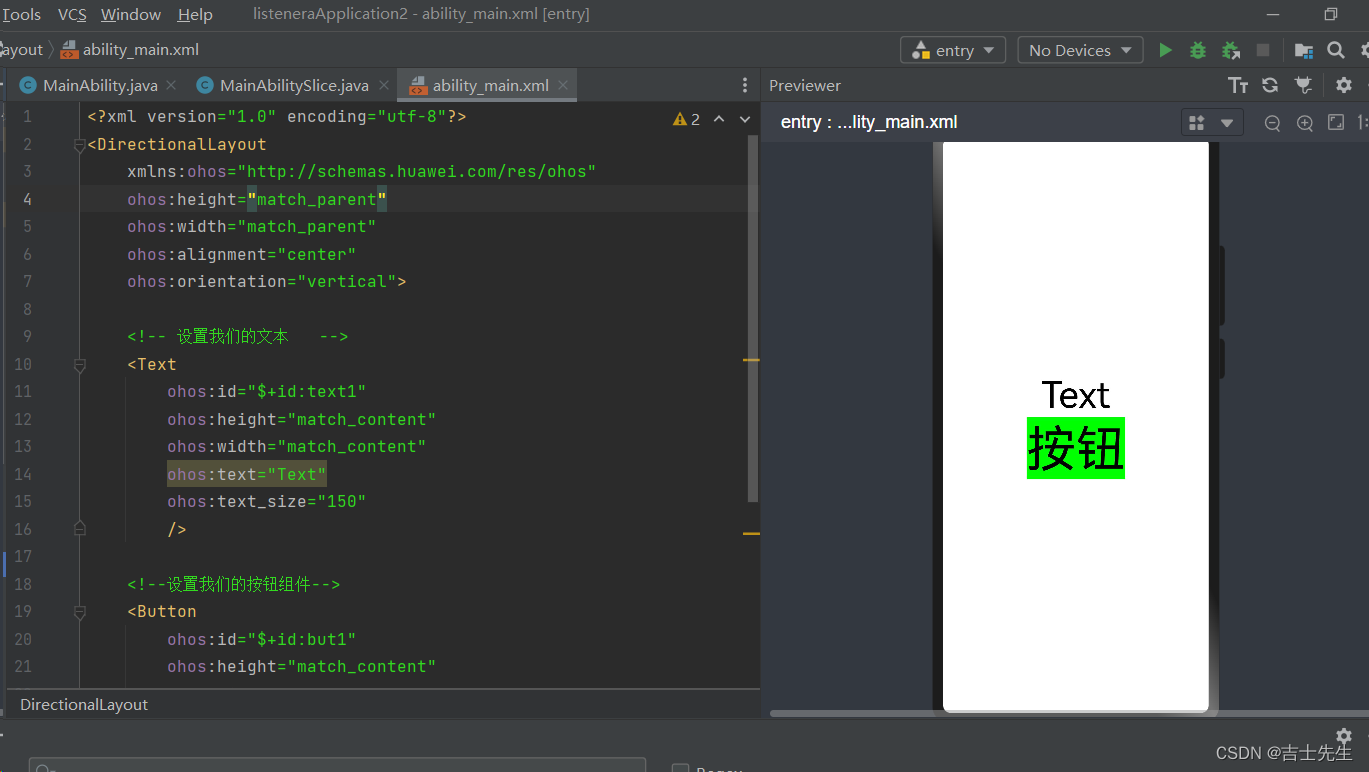
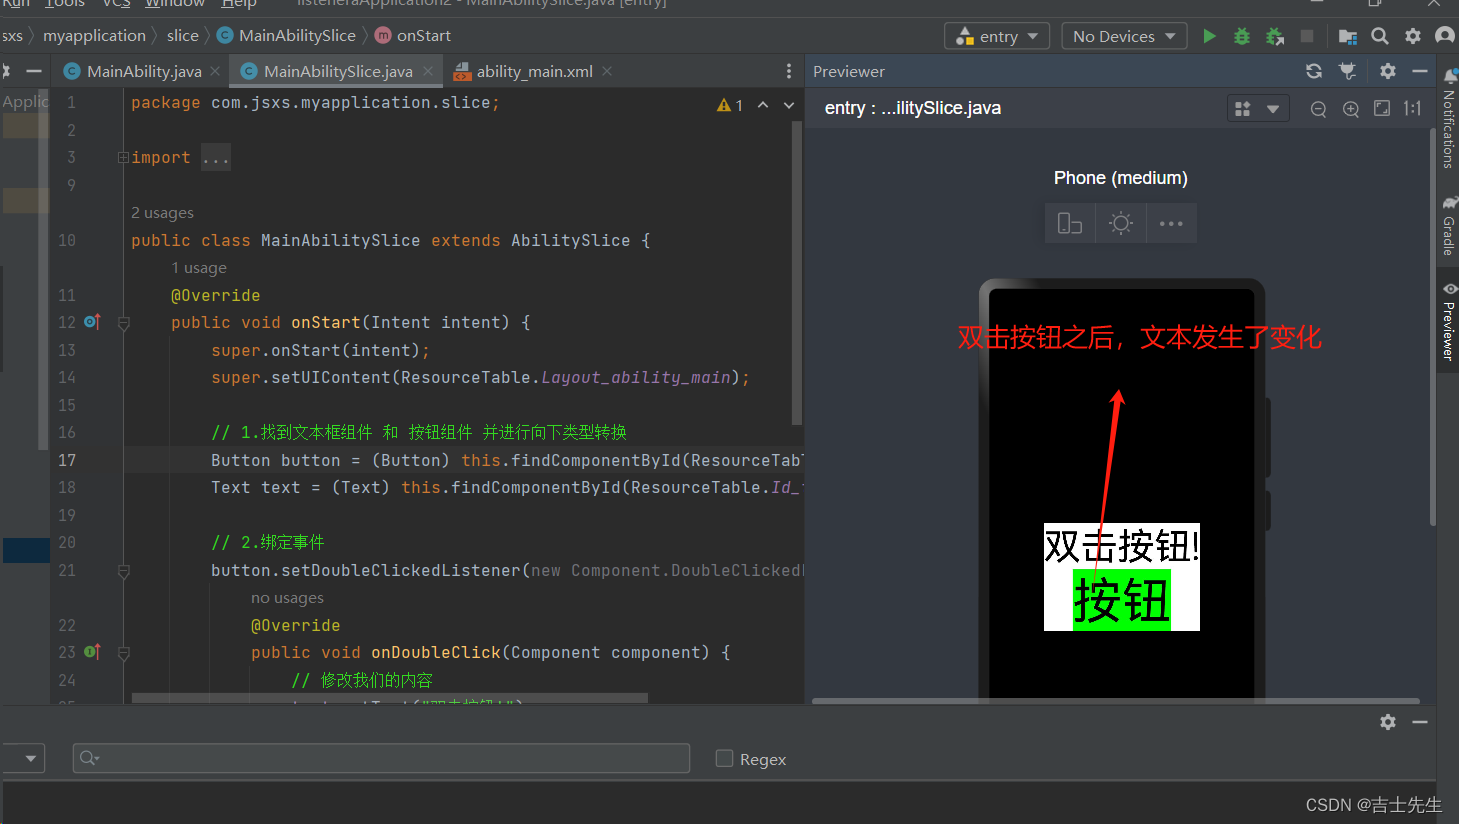
(3).双击事件✅
实现步骤:
- 通过id找到组件。
- 给按钮组件设置双击事件。
- 本类实现 DoubleClickedListener 接口重写。
- 重写 onDoubleClick 方法体。
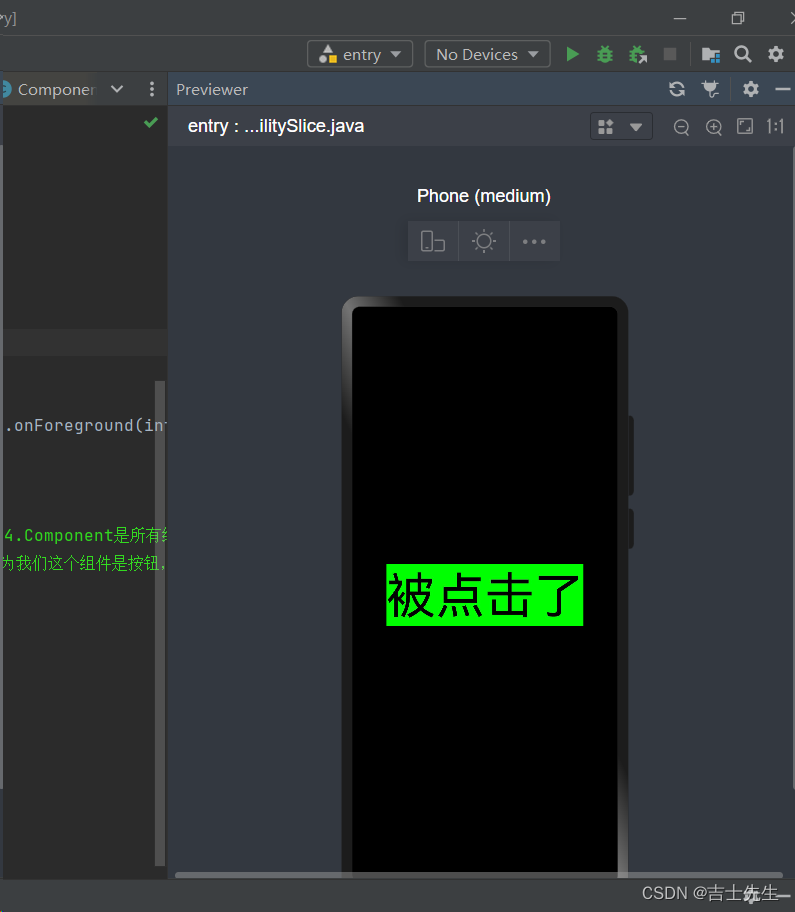
(3.1).双击按钮之后,文本修改成双击字样
1.新建一个项目 双击监听项目

2. ability_main.xml
<?xml version="1.0" encoding="utf-8"?>
<DirectionalLayout
    xmlns:ohos="http://schemas.huawei.com/res/ohos"
    ohos:height="match_parent"
    ohos:width="match_parent"
    ohos:alignment="center"
    ohos:orientation="vertical">

    <!-- 设置我们的文本   -->
    <Text
        ohos:id="$+id:text1"
        ohos:height="match_content"
        ohos:width="match_content"
        ohos:text="Text"
        ohos:text_size="150"
        />

    <!--设置我们的按钮组件-->
    <Button
        ohos:id="$+id:but1"
        ohos:height="match_content"
        ohos:width="match_content"
        ohos:background_element="green"
        ohos:text="按钮"
        ohos:text_size="200"
        />
</DirectionalLayout>
3.MainAbilitySlice
package com.jsxs.myapplication.slice;

import com.jsxs.myapplication.ResourceTable;
import ohos.aafwk.ability.AbilitySlice;
import ohos.aafwk.content.Intent;
import ohos.agp.components.Button;
import ohos.agp.components.Component;
import ohos.agp.components.Text;

public class MainAbilitySlice extends AbilitySlice {
    @Override
    public void onStart(Intent intent) {
        super.onStart(intent);
        super.setUIContent(ResourceTable.Layout_ability_main);

        // 1.找到文本框组件 和 按钮组件 并进行向下类型转换
        Button button = (Button) this.findComponentById(ResourceTable.Id_but1);
        Text text = (Text) this.findComponentById(ResourceTable.Id_text1);

        // 2.绑定双击事件 ⭐⭐
        button.setDoubleClickedListener(new Component.DoubleClickedListener() {
            @Override
            public void onDoubleClick(Component component) {
                // 修改我们的内容
                text.setText("双击按钮!");
            }
        });

    }

    @Override
    public void onActive() {
        super.onActive();
    }

    @Override
    public void onForeground(Intent intent) {
        super.onForeground(intent);
    }
}
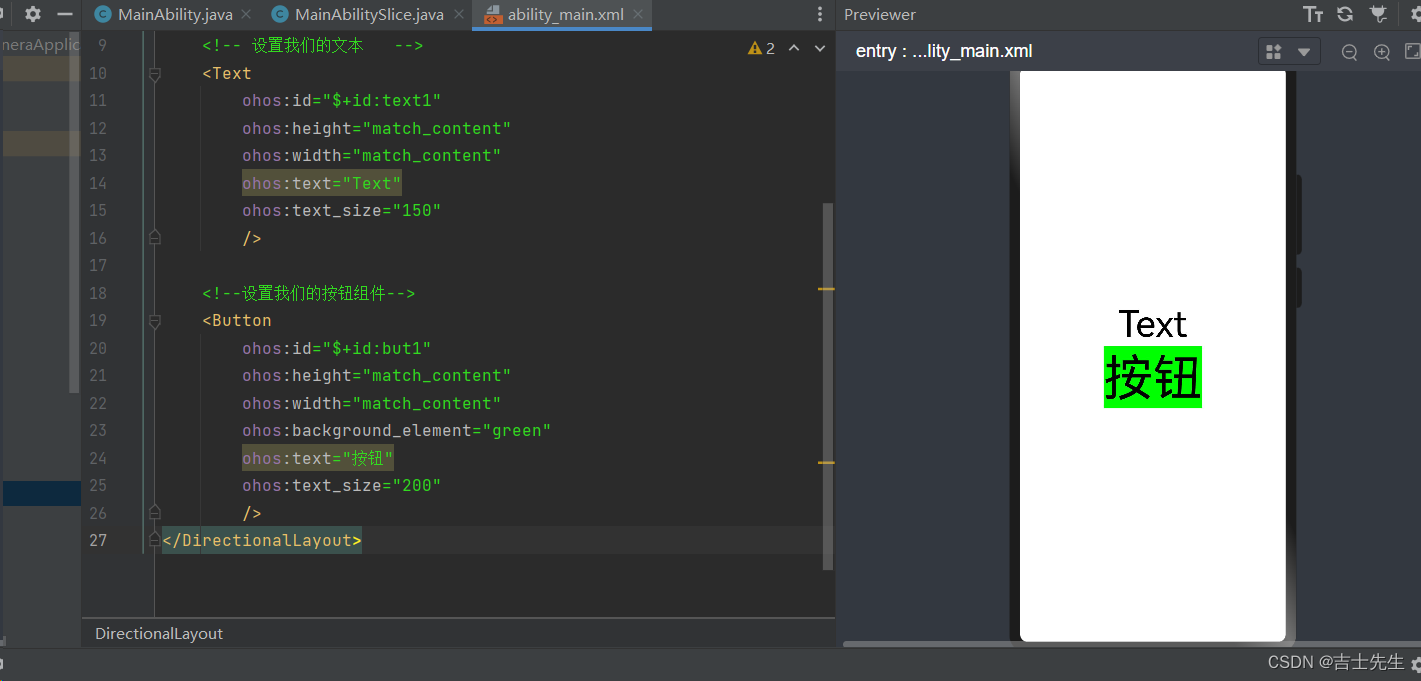
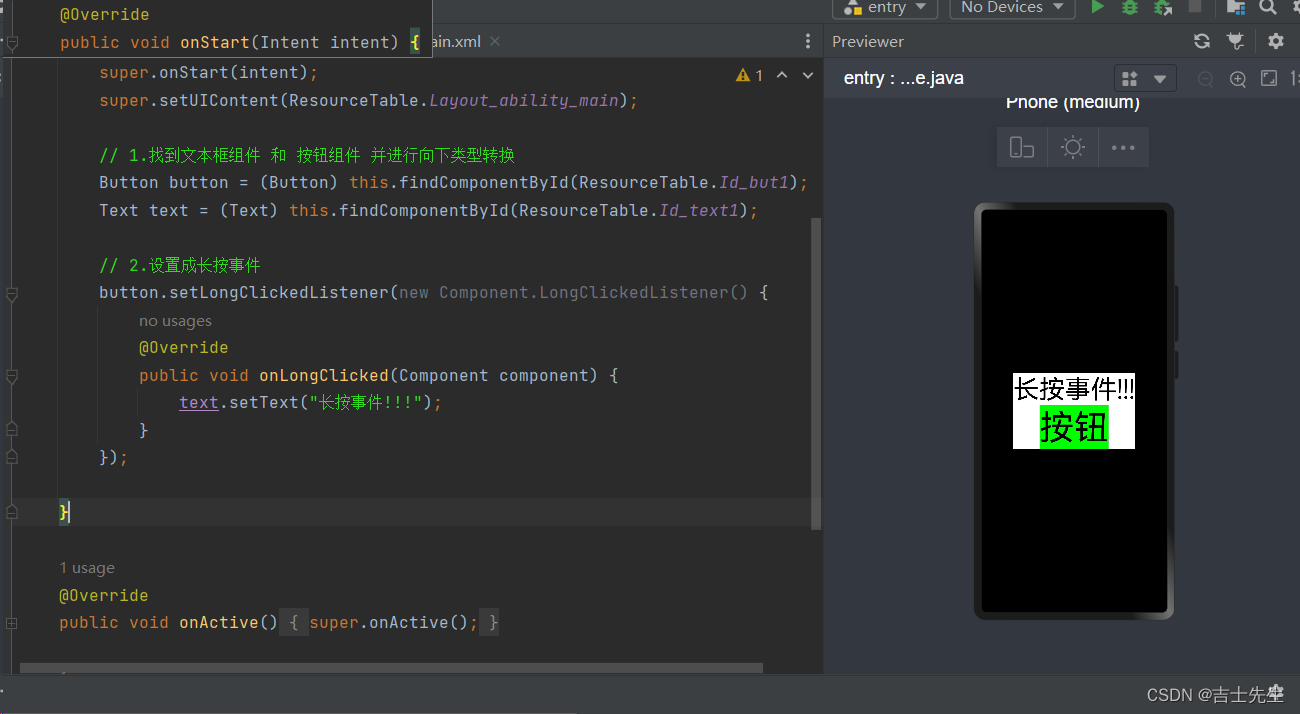
(4).长按事件✅
实现步骤:
- 通过id找到组件。
- 给按钮组件设置长按事件。
- 本类实现LongClickedListener接口。
- 重写onLongClicked方法。
(4.1).长按按钮之后,文本修改成长安字样
ability_main.xml
<?xml version="1.0" encoding="utf-8"?>
<DirectionalLayout
    xmlns:ohos="http://schemas.huawei.com/res/ohos"
    ohos:height="match_parent"
    ohos:width="match_parent"
    ohos:alignment="center"
    ohos:orientation="vertical">

    <!-- 设置我们的文本   -->
    <Text
        ohos:id="$+id:text1"
        ohos:height="match_content"
        ohos:width="match_content"
        ohos:text="Text"
        ohos:text_size="150"
        />

    <!--设置我们的按钮组件-->
    <Button
        ohos:id="$+id:but1"
        ohos:height="match_content"
        ohos:width="match_content"
        ohos:background_element="green"
        ohos:text="按钮"
        ohos:text_size="200"
        />
</DirectionalLayout>
2.设置成长按事件
package com.jsxs.myapplication.slice;

import com.jsxs.myapplication.ResourceTable;
import ohos.aafwk.ability.AbilitySlice;
import ohos.aafwk.content.Intent;
import ohos.agp.components.Button;
import ohos.agp.components.Component;
import ohos.agp.components.Text;

public class MainAbilitySlice extends AbilitySlice {
    @Override
    public void onStart(Intent intent) {
        super.onStart(intent);
        super.setUIContent(ResourceTable.Layout_ability_main);

        // 1.找到文本框组件 和 按钮组件 并进行向下类型转换
        Button button = (Button) this.findComponentById(ResourceTable.Id_but1);
        Text text = (Text) this.findComponentById(ResourceTable.Id_text1);

        // 2.设置成长按事件
        button.setLongClickedListener(new Component.LongClickedListener() {
            @Override
            public void onLongClicked(Component component) {
                text.setText("长按事件!!!");
            }
        });

    }

    @Override
    public void onActive() {
        super.onActive();
    }

    @Override
    public void onForeground(Intent intent) {
        super.onForeground(intent);
    }
}
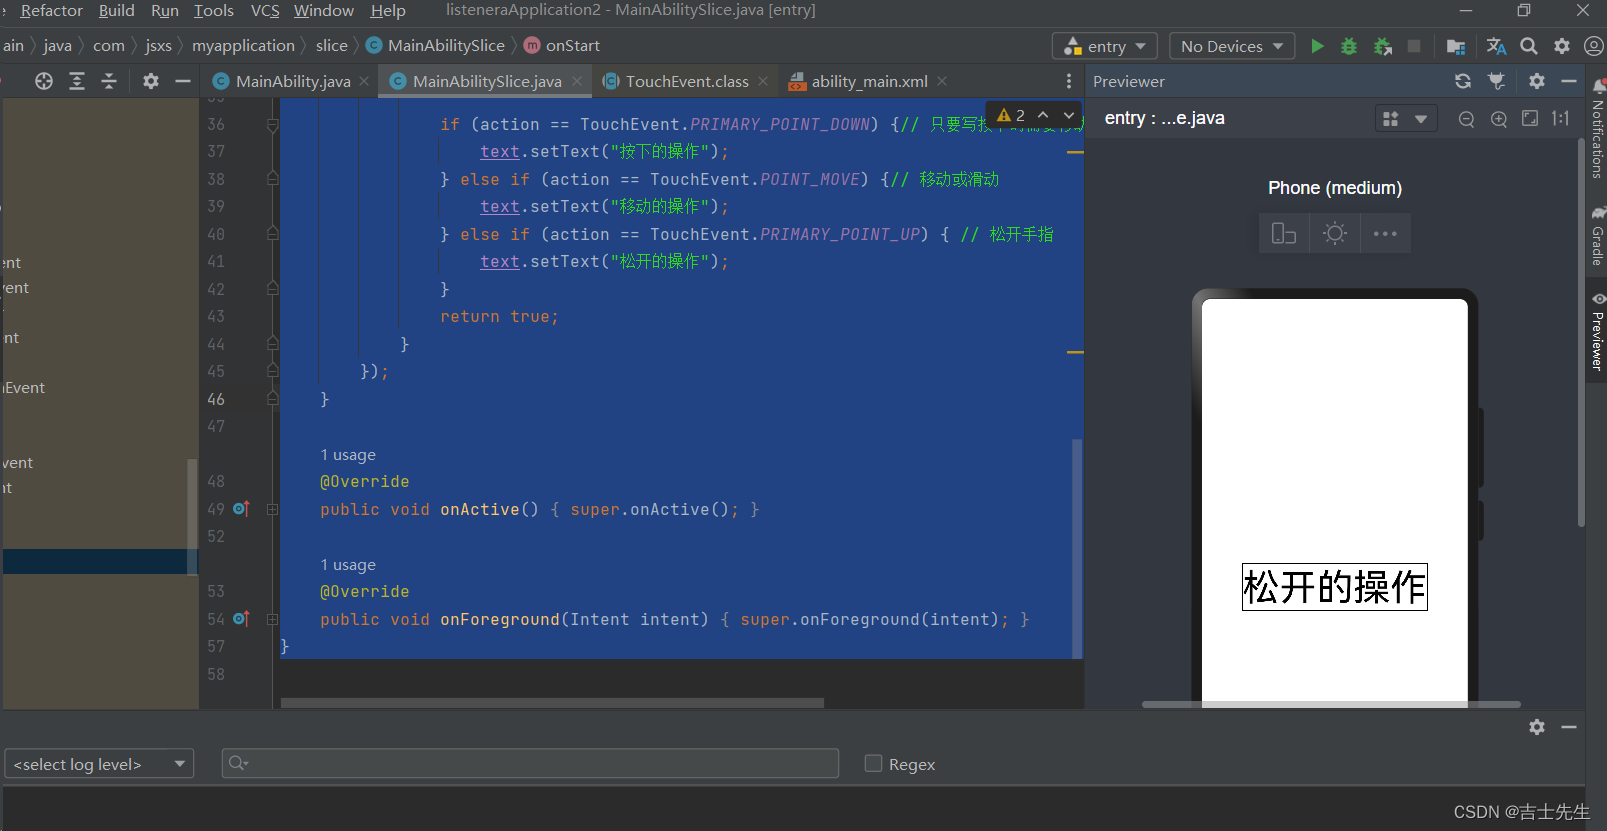
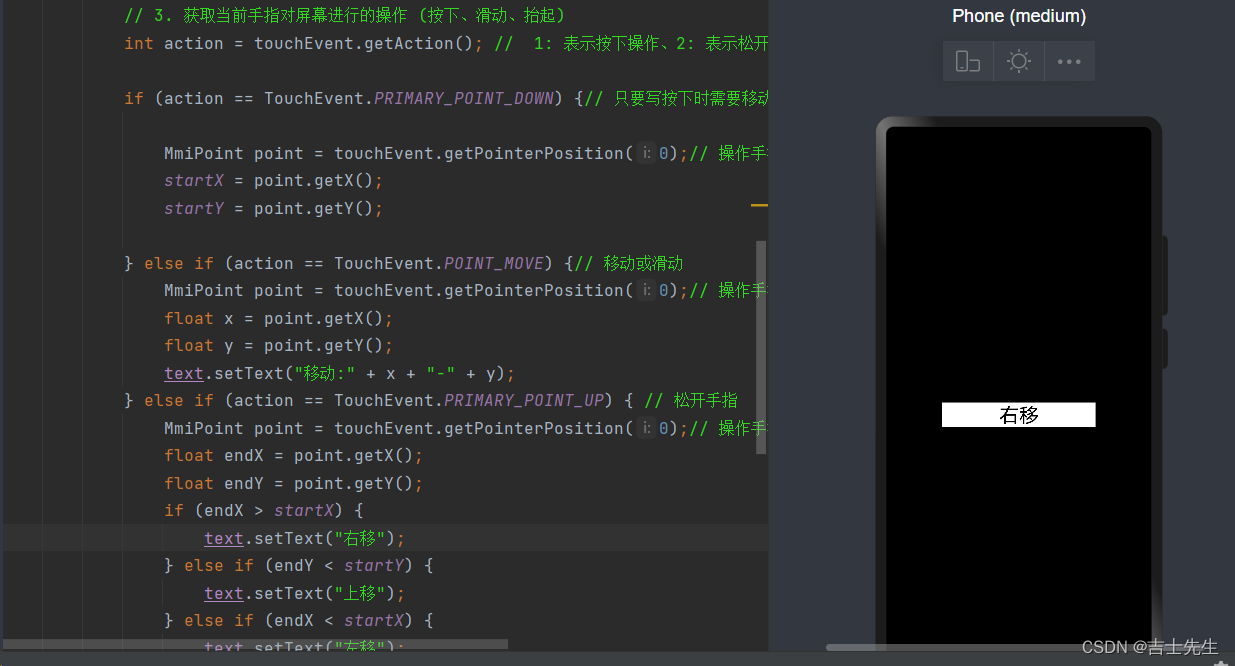
(5).滑动事件
也叫做触摸事件。
接口名:TouchEventListener
包含以下两部分知识点:
-
滑动事件里面分为三个动作:按下不松,移动,抬起。
- PRIMARY_POINT_DOWN:按下不松。
- POINT_MOVE:移动。
- PRIMARY_POINT_UP:抬起。
-
手机坐标:手机左上角的点为原点。
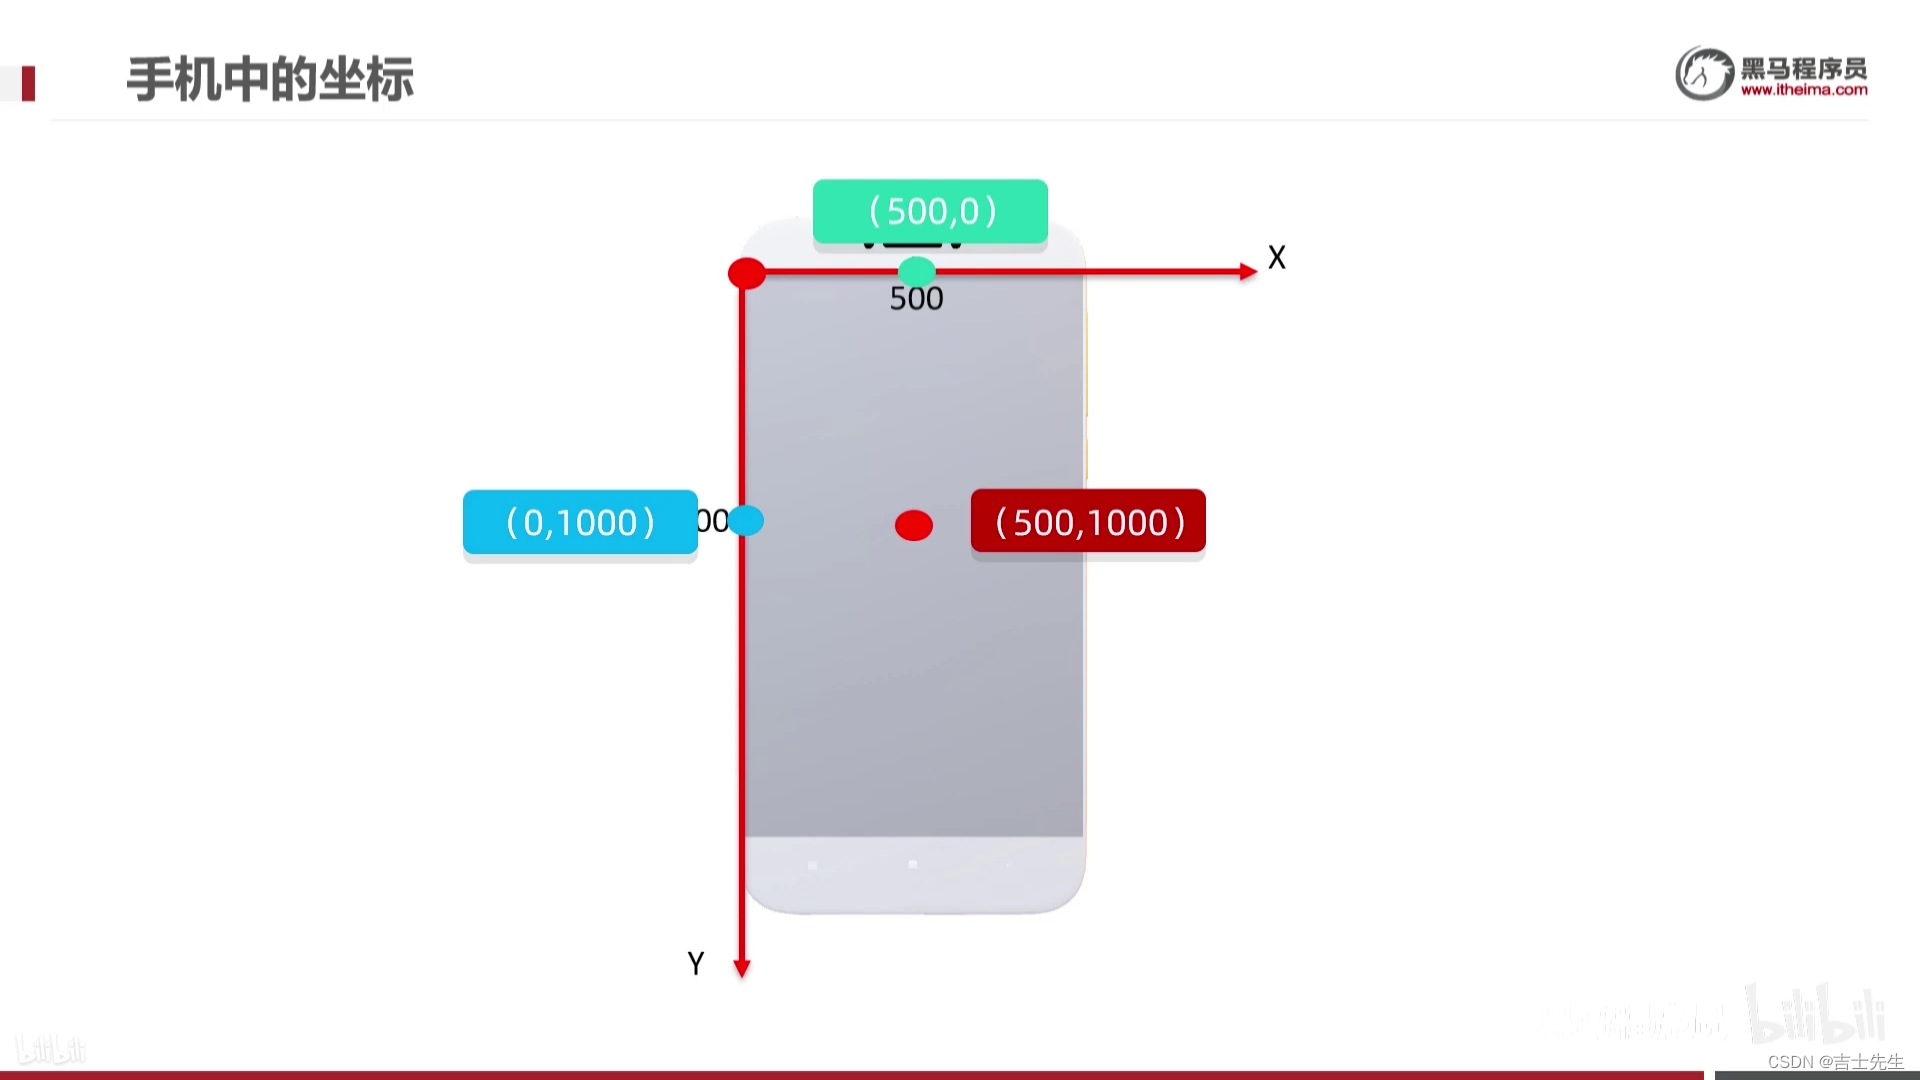
- 向右为X轴
- 向下为Y轴
- 垂直于屏幕向上为Z轴
-
方法返回值:
- true表示继续执行后面的动作。
- false表示不会继续执行后面的动作。
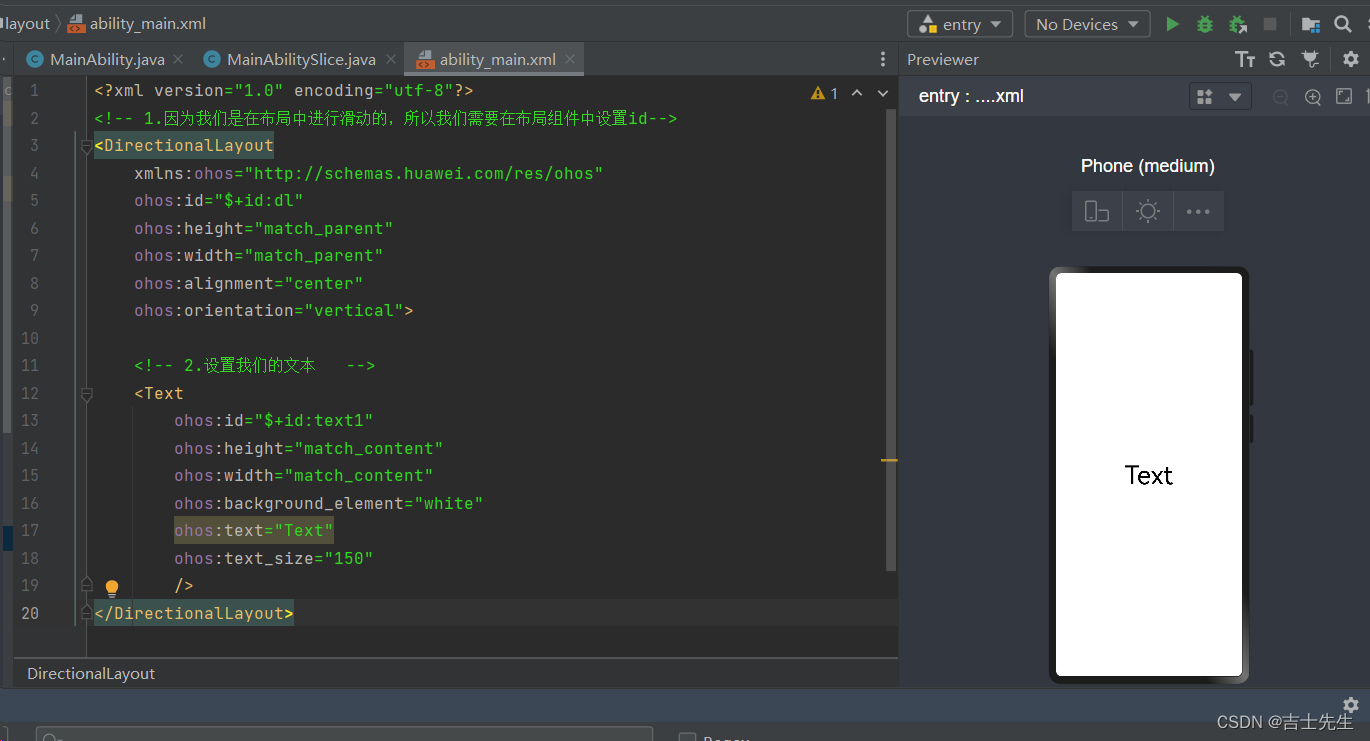
(5.1).按下、松开、移动测试
ability_main.xml: 给布局组件和文本组件设置ID
<?xml version="1.0" encoding="utf-8"?>
<!-- 1.因为我们是在布局中进行滑动的,所以我们需要在布局组件中设置id-->
<DirectionalLayout
    xmlns:ohos="http://schemas.huawei.com/res/ohos"
    ohos:id="$+id:dl"
    ohos:height="match_parent"
    ohos:width="match_parent"
    ohos:alignment="center"
    ohos:orientation="vertical">

    <!-- 2.设置我们的文本   -->
    <Text
        ohos:id="$+id:text1"
        ohos:height="match_content"
        ohos:width="match_content"
        ohos:background_element="white"
        ohos:text="Text"
        ohos:text_size="150"
        />
</DirectionalLayout>
package com.jsxs.myapplication.slice;

import com.jsxs.myapplication.ResourceTable;
import ohos.aafwk.ability.AbilitySlice;
import ohos.aafwk.content.Intent;
import ohos.agp.components.Button;
import ohos.agp.components.Component;
import ohos.agp.components.DirectionalLayout;
import ohos.agp.components.Text;
import ohos.multimodalinput.event.TouchEvent;

public class MainAbilitySlice extends AbilitySlice {
    @Override
    public void onStart(Intent intent) {
        super.onStart(intent);
        super.setUIContent(ResourceTable.Layout_ability_main);

        // 1.通过我们的布局ID获取我们的组件
        DirectionalLayout directionalLayout = (DirectionalLayout) this.findComponentById(ResourceTable.Id_dl);
        Text text = (Text) this.findComponentById(ResourceTable.Id_text1);

        // 2.给整个布局添加滑动事件
        directionalLayout.setTouchEventListener(new Component.TouchEventListener() {
            /**
             *
             * @param component 表示滑动的组件,(布局也是一个组件) directionalLayout
             * @param touchEvent 表示一个动作对象 (按下、滑动、抬起)
             * @return
             */
            @Override
            public boolean onTouchEvent(Component component, TouchEvent touchEvent) {

                // 3. 获取当前手指对屏幕进行的操作 (按下、滑动、抬起)
                int action = touchEvent.getAction(); //  1: 表示按下操作、2: 表示松开的操作、3.表示滑动/移动手指的操作

                if (action == TouchEvent.PRIMARY_POINT_DOWN) {// 只要写按下时需要移动的代码即可
                    text.setText("按下的操作");
                } else if (action == TouchEvent.POINT_MOVE) {// 移动或滑动
                    text.setText("移动的操作");
                } else if (action == TouchEvent.PRIMARY_POINT_UP) { // 松开手指
                    text.setText("松开的操作");
                }
                 // 如果返回值为true,表示所有的动作都会触发这个onTouchEvent方法
                // 如果为false,表示只有一个动作会触发当前方法并执行对应代码。
                return true;
            }
        });
    }

    @Override
    public void onActive() {
        super.onActive();
    }

    @Override
    public void onForeground(Intent intent) {
        super.onForeground(intent);
    }
}
(5.2).上下左右移动 (起始位置)
package com.jsxs.myapplication.slice;

import com.jsxs.myapplication.ResourceTable;
import ohos.aafwk.ability.AbilitySlice;
import ohos.aafwk.content.Intent;
import ohos.agp.components.Button;
import ohos.agp.components.Component;
import ohos.agp.components.DirectionalLayout;
import ohos.agp.components.Text;
import ohos.multimodalinput.event.MmiPoint;
import ohos.multimodalinput.event.TouchEvent;

public class MainAbilitySlice extends AbilitySlice {

    // 2.定义我们按下时的手指位置
    static float startX = 0;
    static float startY = 0;

    @Override
    public void onStart(Intent intent) {
        super.onStart(intent);
        super.setUIContent(ResourceTable.Layout_ability_main);

        // 1.通过我们的布局ID获取我们的组件
        DirectionalLayout directionalLayout = (DirectionalLayout) this.findComponentById(ResourceTable.Id_dl);
        Text text = (Text) this.findComponentById(ResourceTable.Id_text1);


        // 2.给整个布局添加滑动事件
        directionalLayout.setTouchEventListener(new Component.TouchEventListener() {
            /**
             *
             * @param component 表示滑动的组件,(布局也是一个组件) directionalLayout
             * @param touchEvent 表示一个动作对象 (按下、滑动、抬起)
             * @return
             */
            @Override
            public boolean onTouchEvent(Component component, TouchEvent touchEvent) {


                // 3. 获取当前手指对屏幕进行的操作 (按下、滑动、抬起)
                int action = touchEvent.getAction(); //  1: 表示按下操作、2: 表示松开的操作、3.表示滑动/移动手指的操作

                if (action == TouchEvent.PRIMARY_POINT_DOWN) {// 只要写按下时需要移动的代码即可

                    MmiPoint point = touchEvent.getPointerPosition(0);// 操作手指的个数
                    startX = point.getX();
                    startY = point.getY();

                } else if (action == TouchEvent.POINT_MOVE) {// 移动或滑动
                    MmiPoint point = touchEvent.getPointerPosition(0);// 操作手指的个数
                    float x = point.getX();
                    float y = point.getY();
                    text.setText("移动:" + x + "-" + y);
                } else if (action == TouchEvent.PRIMARY_POINT_UP) { // 松开手指
                    MmiPoint point = touchEvent.getPointerPosition(0);// 操作手指的个数
                    float endX = point.getX();
                    float endY = point.getY();
                    if (endX > startX && endY>startY) {
                        text.setText("右下移");
                    } else if (endX < startX && endY>startY) {
                        text.setText("左下移");
                    } else if (endX > startX&& endY<startY) {
                        text.setText("右上移");
                    } else if (endX<startX && endY<startY) {
                        text.setText("左上移");
                    }
                }
                // 如果返回值为true,表示所有的动作都会触发这个onTouchEvent方法
                // 如果为false,表示只有一个动作会触发当前方法并执行对应代码。
                return true;
            }
        });
    }

    @Override
    public void onActive() {
        super.onActive();
    }

    @Override
    public void onForeground(Intent intent) {
        super.onForeground(intent);
    }
}
3.案列
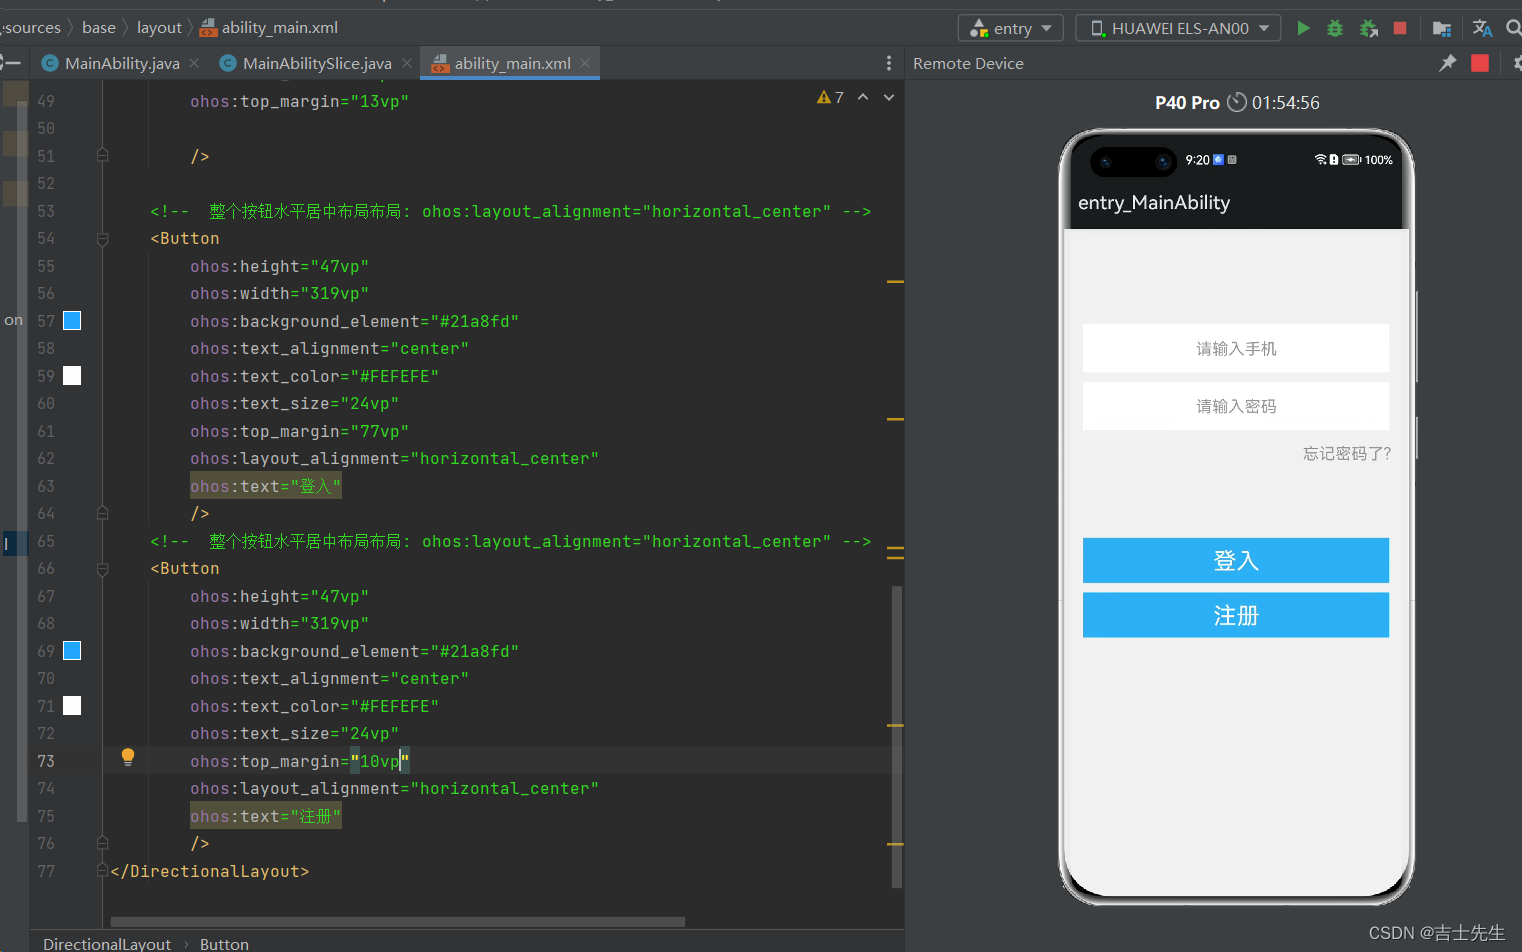
(1).多按钮被点击
1.ability_main.xml: 两个按钮一个文本
<?xml version="1.0" encoding="utf-8"?>
<!-- 1.因为我们是在布局中进行滑动的,所以我们需要在布局组件中设置id-->
<DirectionalLayout
    xmlns:ohos="http://schemas.huawei.com/res/ohos"
    ohos:id="$+id:dl"
    ohos:height="match_parent"
    ohos:width="match_parent"
    ohos:alignment="center"
    ohos:orientation="vertical">

    <!-- 2.设置我们的文本   -->
    <Text
        ohos:id="$+id:text1"
        ohos:height="match_content"
        ohos:width="match_content"
        ohos:background_element="white"
        ohos:text="Text"
        ohos:text_size="100"
        />
    <!--  登入按钮  -->
    <Button
        ohos:id="$+id:login"
        ohos:height="match_content"
        ohos:width="match_content"
        ohos:background_element="green"
        ohos:text="登入"
        ohos:text_size="100"
        />
    <!-- 注册按钮-->
    <Button
        ohos:id="$+id:registry"
        ohos:height="match_content"
        ohos:width="match_content"
        ohos:background_element="red"
        ohos:text="注册"
        ohos:text_size="100"
        />
</DirectionalLayout>
- 匿名内部类的方式实现
2.匿名内部类实现基础逻辑业务
package com.jsxs.myapplication.slice;
import com.jsxs.myapplication.ResourceTable;
import ohos.aafwk.ability.AbilitySlice;
import ohos.aafwk.content.Intent;
import ohos.agp.components.Button;
import ohos.agp.components.Component;
import ohos.agp.components.DirectionalLayout;
import ohos.agp.components.Text;
import ohos.multimodalinput.event.MmiPoint;
import ohos.multimodalinput.event.TouchEvent;
public class MainAbilitySlice extends AbilitySlice {
@Override
public void onStart(Intent intent) {
super.onStart(intent);
super.setUIContent(ResourceTable.Layout_ability_main);
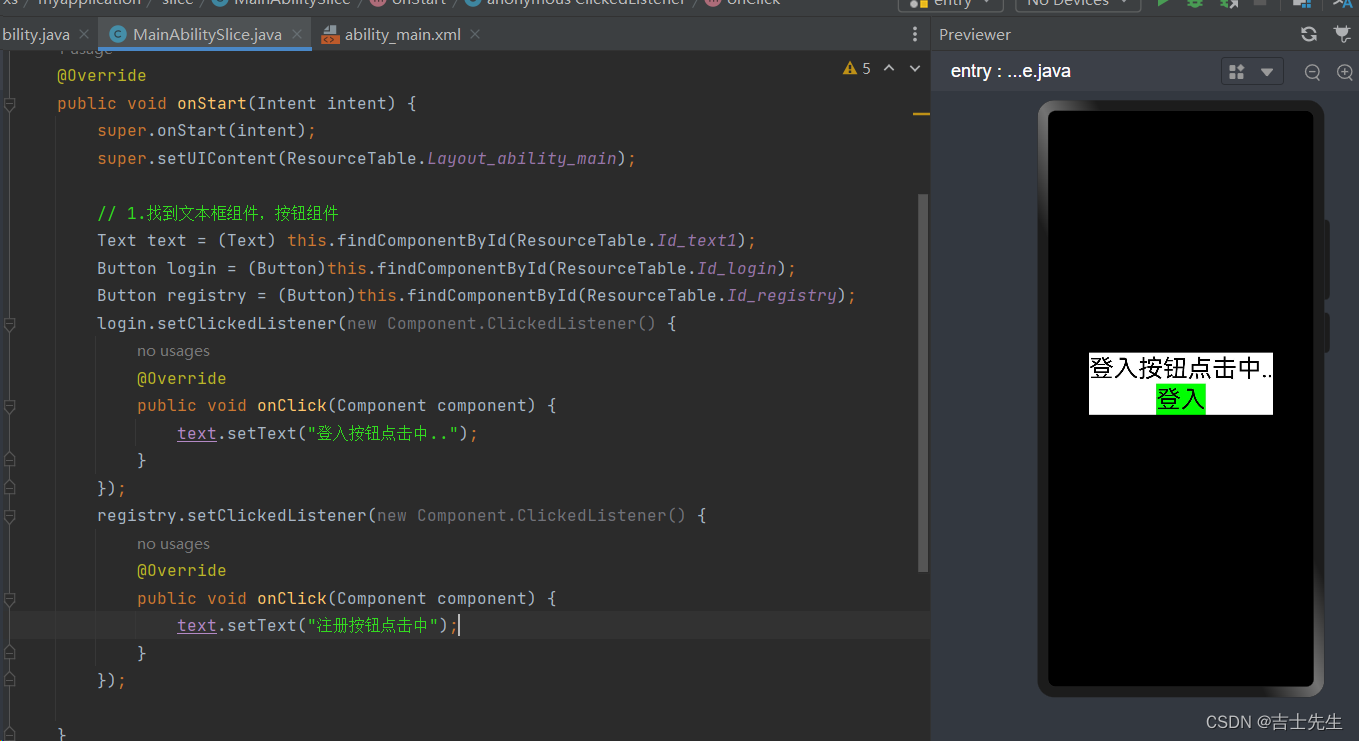
// 1.找到文本框组件,按钮组件
Text text = (Text) this.findComponentById(ResourceTable.Id_text1);
Button login = (Button)this.findComponentById(ResourceTable.Id_login);
Button registry = (Button)this.findComponentById(ResourceTable.Id_registry);
login.setClickedListener(new Component.ClickedListener() {
@Override
public void onClick(Component component) {
text.setText("登入按钮点击中..");
}
});
registry.setClickedListener(new Component.ClickedListener() {
@Override
public void onClick(Component component) {
text.setText("注册按钮点击中");
}
});
}
@Override
public void onActive() {
super.onActive();
}
@Override
public void onForeground(Intent intent) {
super.onForeground(intent);
}
}
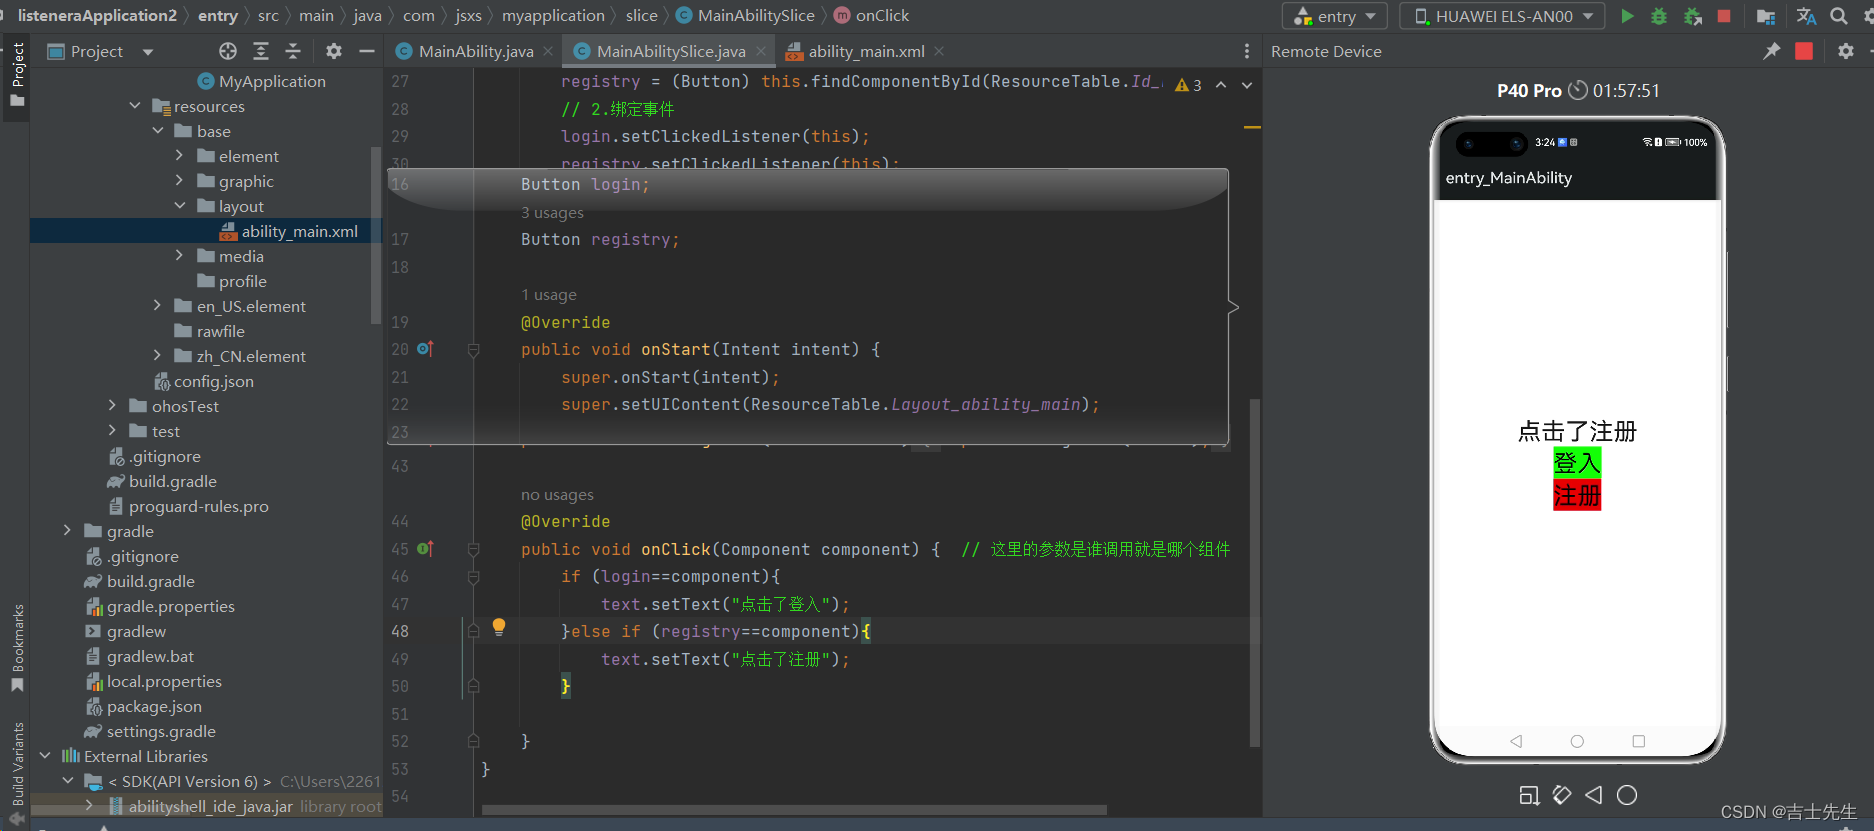
- 使用当前类实现接口
使用当前类实现接口,因为有两个组件共同被监听。所以我们在重写方法的时候首先要判断是哪个按钮在调用,或者哪个按钮被监听到了。
package com.jsxs.myapplication.slice;

import com.jsxs.myapplication.ResourceTable;
import ohos.aafwk.ability.AbilitySlice;
import ohos.aafwk.content.Intent;
import ohos.agp.components.Button;
import ohos.agp.components.Component;
import ohos.agp.components.DirectionalLayout;
import ohos.agp.components.Text;
import ohos.multimodalinput.event.MmiPoint;
import ohos.multimodalinput.event.TouchEvent;

public class MainAbilitySlice extends AbilitySlice implements Component.ClickedListener {

    Text text;
    Button login;
    Button registry;

    @Override
    public void onStart(Intent intent) {
        super.onStart(intent);
        super.setUIContent(ResourceTable.Layout_ability_main);

        // 1.找到文本框组件,按钮组件
        text = (Text) this.findComponentById(ResourceTable.Id_text1);
        login = (Button) this.findComponentById(ResourceTable.Id_login);
        registry = (Button) this.findComponentById(ResourceTable.Id_registry);
        // 2.绑定事件
        login.setClickedListener(this);
        registry.setClickedListener(this);

    }

    @Override
    public void onActive() {
        super.onActive();
    }

    @Override
    public void onForeground(Intent intent) {
        super.onForeground(intent);
    }

    @Override
    public void onClick(Component component) {  // 这里的参数是谁调用就是哪个组件
        if (login==component){
            text.setText("点击了登入");
        }else if (registry==component){
            text.setText("点击了注册");
        }

    }
}
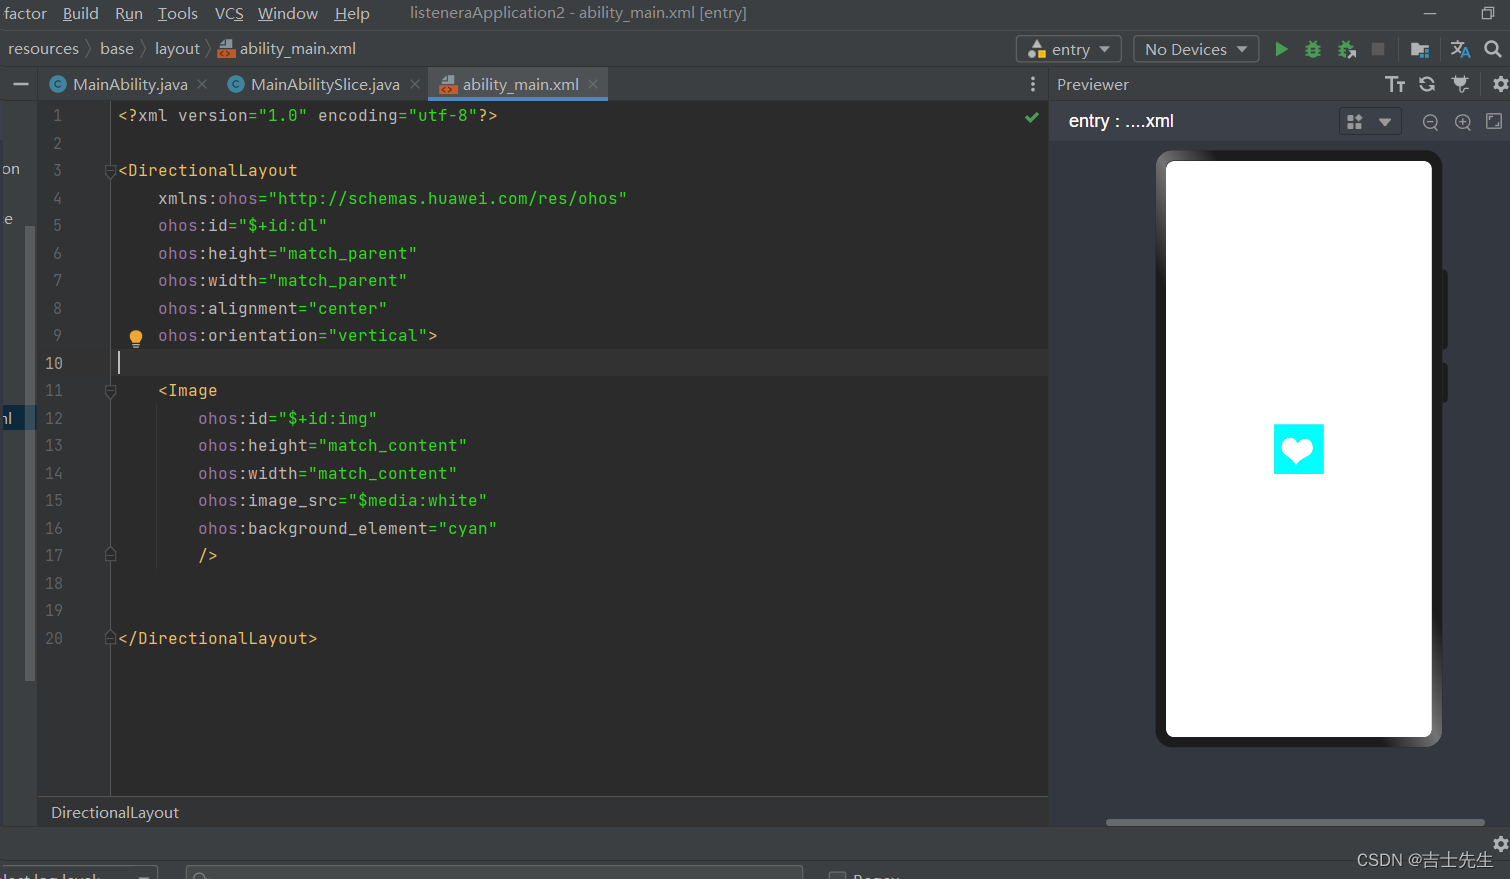
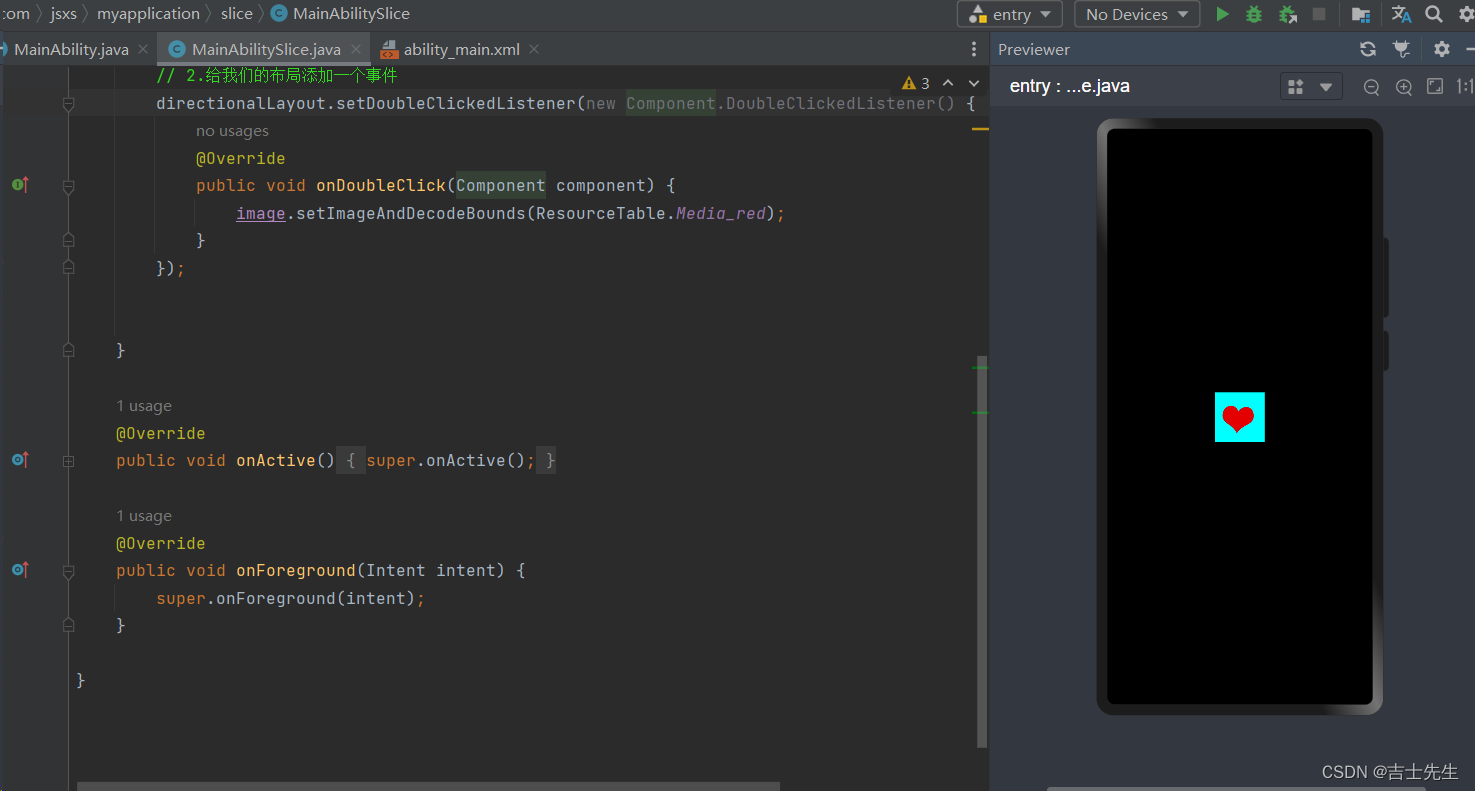
(2).双击点赞
- 双击点赞 (但不能取消点赞)
1. ability_main.xml
<?xml version="1.0" encoding="utf-8"?>

<DirectionalLayout
    xmlns:ohos="http://schemas.huawei.com/res/ohos"
    ohos:id="$+id:dl"
    ohos:height="match_parent"
    ohos:width="match_parent"
    ohos:alignment="center"
    ohos:orientation="vertical">

    <Image
        ohos:id="$+id:img"
        ohos:height="match_content"
        ohos:width="match_content"
        ohos:image_src="$media:white"  # 导入的图片在media文件夹下的 white.jpg
        ohos:background_element="cyan" #图片的背景颜色
        />

</DirectionalLayout>
2.MainAbilitySlice
package com.jsxs.myapplication.slice;

import com.jsxs.myapplication.ResourceTable;
import ohos.aafwk.ability.AbilitySlice;
import ohos.aafwk.content.Intent;
import ohos.agp.components.*;
import ohos.multimodalinput.event.MmiPoint;
import ohos.multimodalinput.event.TouchEvent;

public class MainAbilitySlice extends AbilitySlice {

    @Override
    public void onStart(Intent intent) {
        super.onStart(intent);
        super.setUIContent(ResourceTable.Layout_ability_main);

        //  1.通过id获取我们的图片组件 和 布局
        Image image = (Image) this.findComponentById(ResourceTable.Id_img);
        DirectionalLayout directionalLayout = (DirectionalLayout) this.findComponentById(ResourceTable.Id_dl);

        // 2.给我们的布局添加一个事件
        directionalLayout.setDoubleClickedListener(new Component.DoubleClickedListener() {
            @Override
            public void onDoubleClick(Component component) {
                image.setImageAndDecodeBounds(ResourceTable.Media_red);
            }
        });


    }

    @Override
    public void onActive() {
        super.onActive();
    }

    @Override
    public void onForeground(Intent intent) {
        super.onForeground(intent);
    }

}
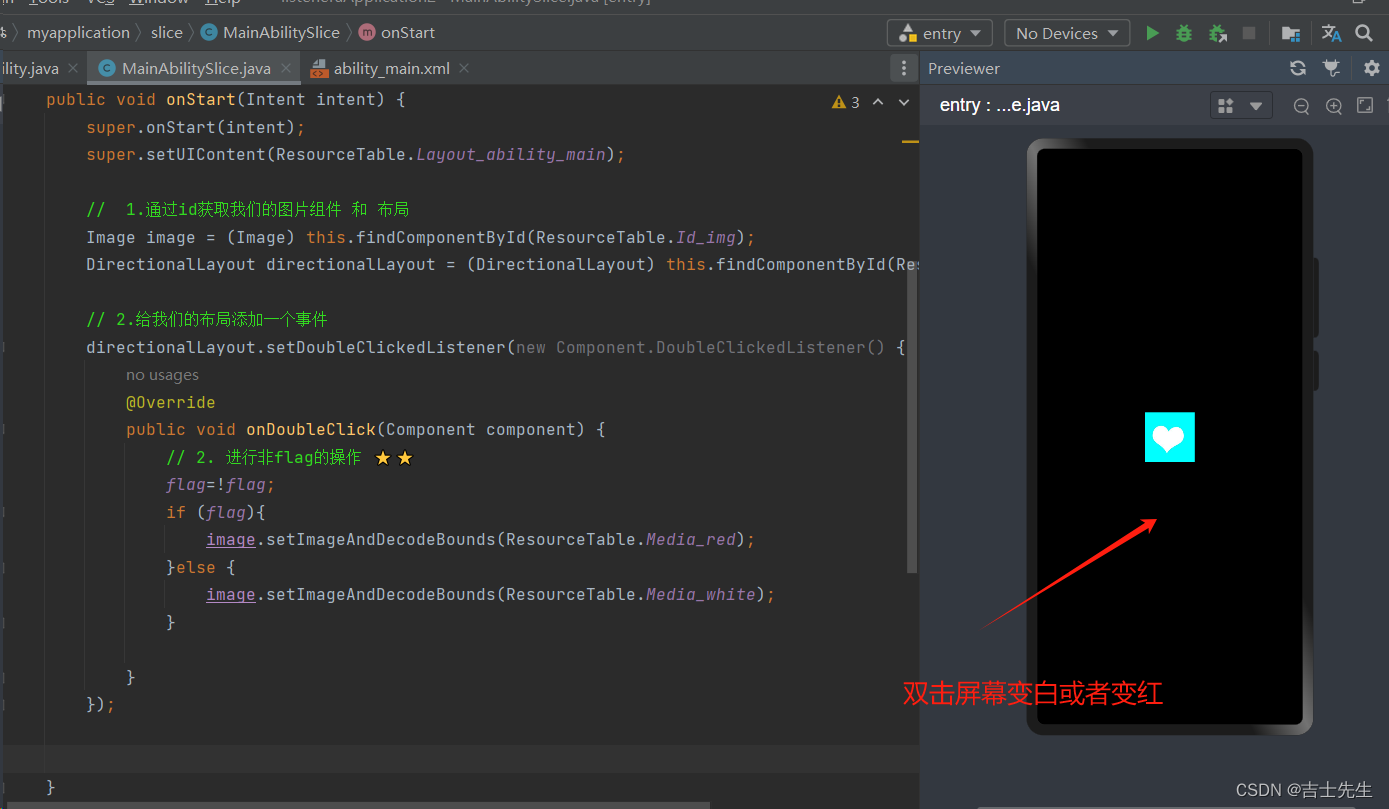
- 双击取消
package com.jsxs.myapplication.slice;

import com.jsxs.myapplication.ResourceTable;
import ohos.aafwk.ability.AbilitySlice;
import ohos.aafwk.content.Intent;
import ohos.agp.components.*;
import ohos.multimodalinput.event.MmiPoint;
import ohos.multimodalinput.event.TouchEvent;

public class MainAbilitySlice extends AbilitySlice {
    // 1. 设置全局的flag ⭐
    static boolean flag=false;

    @Override
    public void onStart(Intent intent) {
        super.onStart(intent);
        super.setUIContent(ResourceTable.Layout_ability_main);

        //  1.通过id获取我们的图片组件 和 布局
        Image image = (Image) this.findComponentById(ResourceTable.Id_img);
        DirectionalLayout directionalLayout = (DirectionalLayout) this.findComponentById(ResourceTable.Id_dl);

        // 2.给我们的布局添加一个事件
        directionalLayout.setDoubleClickedListener(new Component.DoubleClickedListener() {
            @Override
            public void onDoubleClick(Component component) {
                // 2. 进行非flag的操作 ⭐⭐
                flag=!flag;
                if (flag){
                    image.setImageAndDecodeBounds(ResourceTable.Media_red);
                }else {
                    image.setImageAndDecodeBounds(ResourceTable.Media_white);
                }

            }
        });


    }

    @Override
    public void onActive() {
        super.onActive();
    }

    @Override
    public void onForeground(Intent intent) {
        super.onForeground(intent);
    }

}
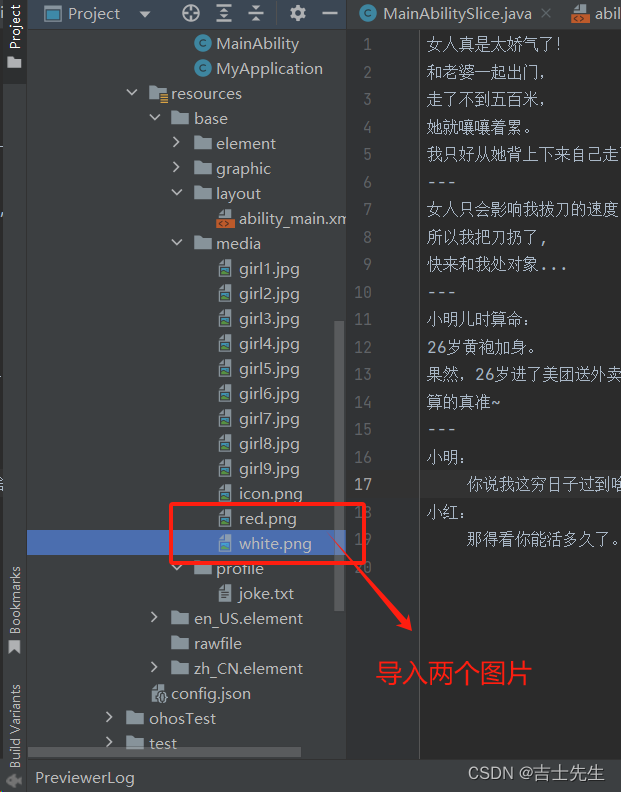
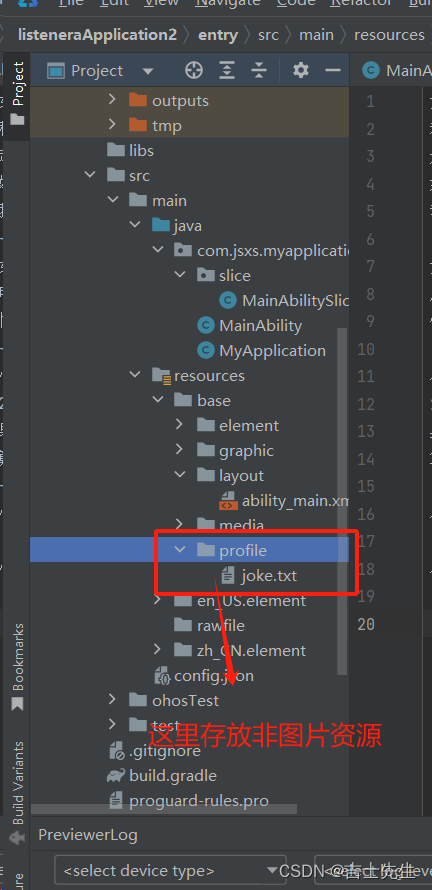
(3).随机更换段子
导入资源为: joke.txt
女人真是太娇气了!
和老婆一起出门,
走了不到五百米,
她就嚷嚷着累。
我只好从她背上下来自己走了。
---
女人只会影响我拔刀的速度,
所以我把刀扔了,
快来和我处对象...
---
小明儿时算命:
26岁黄袍加身。
果然,26岁进了美团送外卖。
算的真准~
---
小明:
    你说我这穷日子过到啥时侯是个头啊?
小红:
    那得看你能活多久了。
1.视图的操作
<?xml version="1.0" encoding="utf-8"?>

<DirectionalLayout
    xmlns:ohos="http://schemas.huawei.com/res/ohos"
    ohos:id="$+id:dl"
    ohos:height="match_parent"
    ohos:width="match_parent"
    ohos:alignment="center"
    ohos:orientation="vertical">

    <Text
        ohos:id="$+id:text"
        ohos:height="match_content"
        ohos:width="match_content"
        ohos:background_element="red"
        ohos:text="text"
        ohos:text_size="40vp"
        ohos:multiple_lines="true"
        />

    <Button
        ohos:id="$+id:but1"
        ohos:height="match_content"
        ohos:width="match_content"
        ohos:background_element="green"
        ohos:text="切换笑话"
        ohos:text_size="100"
        />


</DirectionalLayout>
2.逻辑代码
package com.jsxs.myapplication.slice;

import com.jsxs.myapplication.ResourceTable;
import ohos.aafwk.ability.AbilitySlice;
import ohos.aafwk.content.Intent;
import ohos.agp.components.*;
import ohos.global.resource.NotExistException;
import ohos.global.resource.Resource;
import ohos.multimodalinput.event.MmiPoint;
import ohos.multimodalinput.event.TouchEvent;

import java.io.BufferedReader;
import java.io.IOException;
import java.io.InputStreamReader;
import java.util.Random;

public class MainAbilitySlice extends AbilitySlice {

    @Override
    public void onStart(Intent intent) {
        super.onStart(intent);
        super.setUIContent(ResourceTable.Layout_ability_main);

        try {
            // 0. 用来拼接所有读取到的所有数据 ⭐
            StringBuilder stringBuilder = new StringBuilder();
            // 1.鸿蒙系统中有一个 资源管理器 (管理着所有的资源)
            Resource resource = this.getResourceManager().getResource(ResourceTable.Profile_joke);
            // 2.因为resource是一个字节流,利用字节流可以读取文件的内容⭐⭐
            BufferedReader reader = new BufferedReader(new InputStreamReader(resource));
            String line;
            while ((line = reader.readLine()) != null) {
                stringBuilder.append(line);
            }
            // 3.释放io流资源⭐⭐⭐
            reader.close();

            // 4.利用 --- 将所有的数据进行分割,分成四个段子 (数组)⭐⭐⭐⭐
            String[] jokes = stringBuilder.toString().split("---");

            // 5.当我们点击了按钮之后,就会给文本框设置一个随机的笑话⭐⭐⭐⭐⭐

            //6. 找到我们的两个组件⭐⭐⭐⭐⭐⭐
            Text text = (Text) this.findComponentById(ResourceTable.Id_text);
            Button button = (Button) this.findComponentById(ResourceTable.Id_but1);

            // 7.绑定我们的事件⭐⭐⭐⭐⭐⭐⭐
            button.setClickedListener(new Component.ClickedListener() {
                @Override
                public void onClick(Component component) {
                    // 8.进行随机种子的操作⭐⭐⭐⭐⭐⭐⭐⭐
                    Random random = new Random();
                    int nextInt = random.nextInt(jokes.length);
                    text.setText(jokes[nextInt].toString());
                }
            });

        } catch (IOException e) {
            throw new RuntimeException(e);
        } catch (NotExistException e) {
            throw new RuntimeException(e);
        }

    }

    @Override
    public void onActive() {
        super.onActive();
    }

    @Override
    public void onForeground(Intent intent) {
        super.onForeground(intent);
    }

}
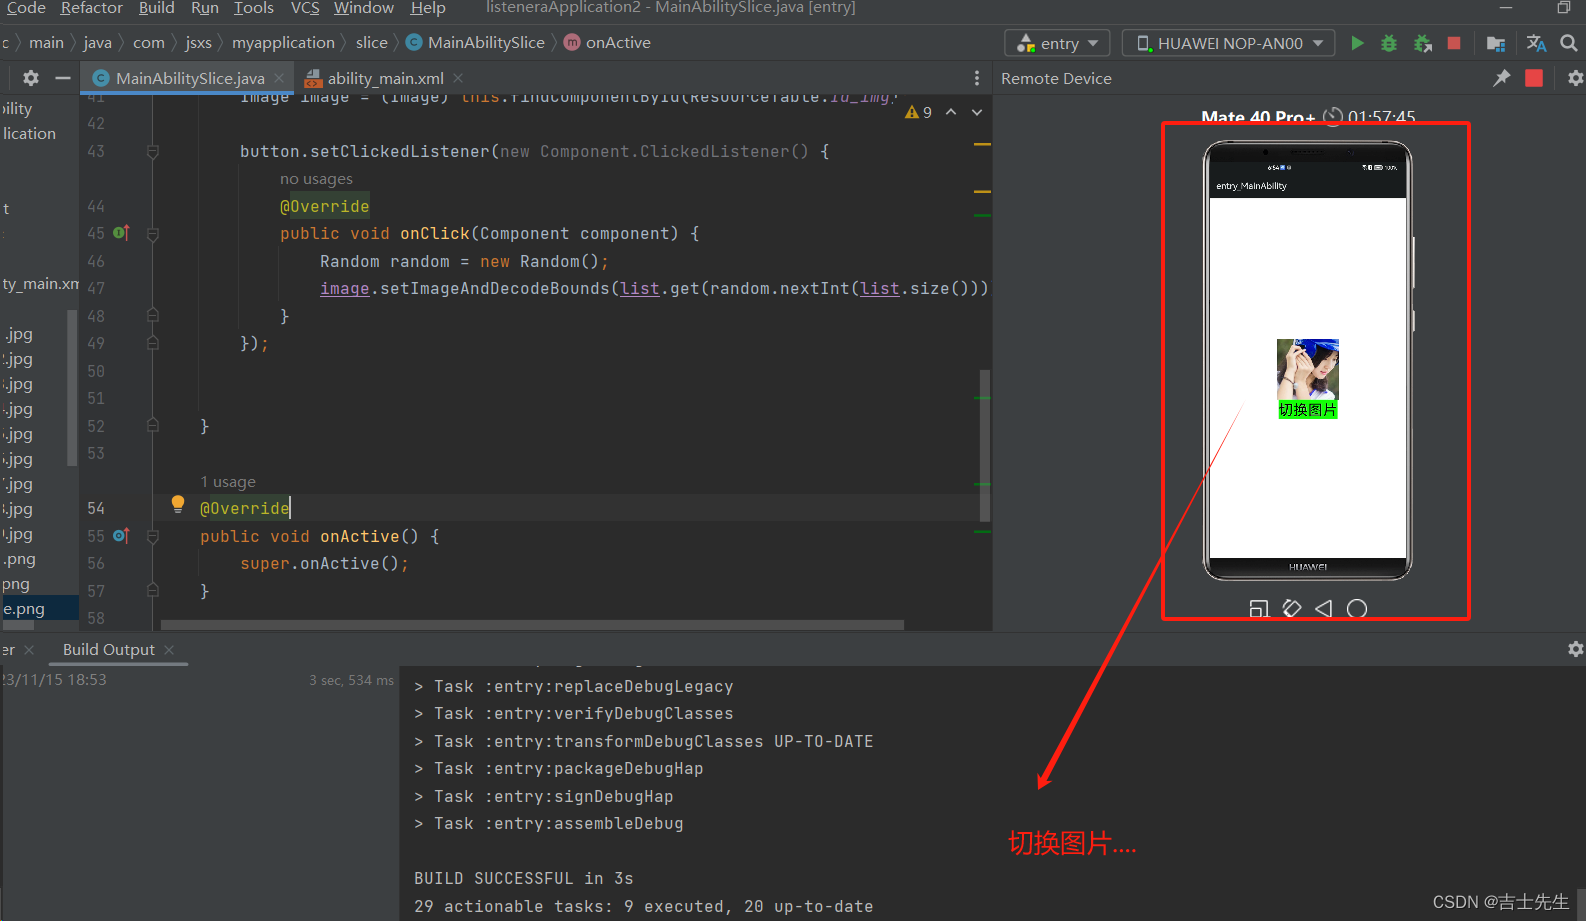
(4).单机随机图片
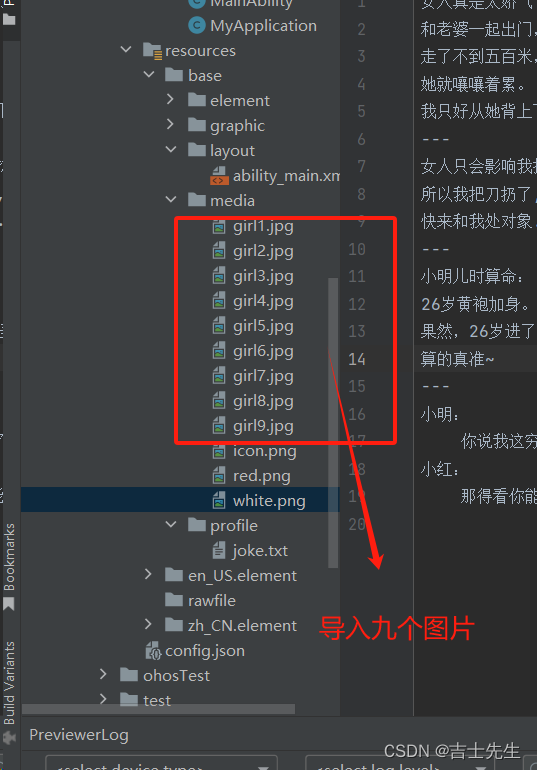
1.基本视图
<?xml version="1.0" encoding="utf-8"?>

<DirectionalLayout
    xmlns:ohos="http://schemas.huawei.com/res/ohos"
    ohos:id="$+id:dl"
    ohos:height="match_parent"
    ohos:width="match_parent"
    ohos:alignment="center"
    ohos:orientation="vertical">

    <Image
        ohos:id="$+id:img"
        ohos:width="match_content"
        ohos:height="match_content"
        ohos:image_src="$media:girl1" # 初始化为第一张图片
        />


    <Button
        ohos:id="$+id:but1"
        ohos:height="match_content"
        ohos:width="match_content"
        ohos:background_element="green"
        ohos:text="切换图片"
        ohos:text_size="100"
        />


</DirectionalLayout>
2.逻辑代码
package com.jsxs.myapplication.slice;

import com.jsxs.myapplication.ResourceTable;
import ohos.aafwk.ability.AbilitySlice;
import ohos.aafwk.content.Intent;
import ohos.agp.components.*;
import ohos.global.resource.NotExistException;
import ohos.global.resource.Resource;
import ohos.multimodalinput.event.MmiPoint;
import ohos.multimodalinput.event.TouchEvent;

import java.io.BufferedReader;
import java.io.IOException;
import java.io.InputStreamReader;
import java.util.ArrayList;
import java.util.Random;

public class MainAbilitySlice extends AbilitySlice {
    // 1. 设置全局的flag ⭐
    static boolean flag = false;

    @Override
    public void onStart(Intent intent) {
        super.onStart(intent);
        super.setUIContent(ResourceTable.Layout_ability_main);

        // 定义一个数组或者集合用来存储所有的图片
        ArrayList<Integer> list = new ArrayList<>();
        list.add(ResourceTable.Media_girl1);
        list.add(ResourceTable.Media_girl2);
        list.add(ResourceTable.Media_girl3);
        list.add(ResourceTable.Media_girl4);
        list.add(ResourceTable.Media_girl5);
        list.add(ResourceTable.Media_girl6);
        list.add(ResourceTable.Media_girl7);
        list.add(ResourceTable.Media_girl8);
        list.add(ResourceTable.Media_girl9);

        // 找到固定的组件
        Button button = (Button) this.findComponentById(ResourceTable.Id_but1);
        Image image = (Image) this.findComponentById(ResourceTable.Id_img);

        button.setClickedListener(new Component.ClickedListener() {
            @Override
            public void onClick(Component component) {
                Random random = new Random();
                image.setImageAndDecodeBounds(list.get(random.nextInt(list.size())));
            }
        });


    }

    @Override
    public void onActive() {
        super.onActive();
    }

    @Override
    public void onForeground(Intent intent) {
        super.onForeground(intent);
    }

}
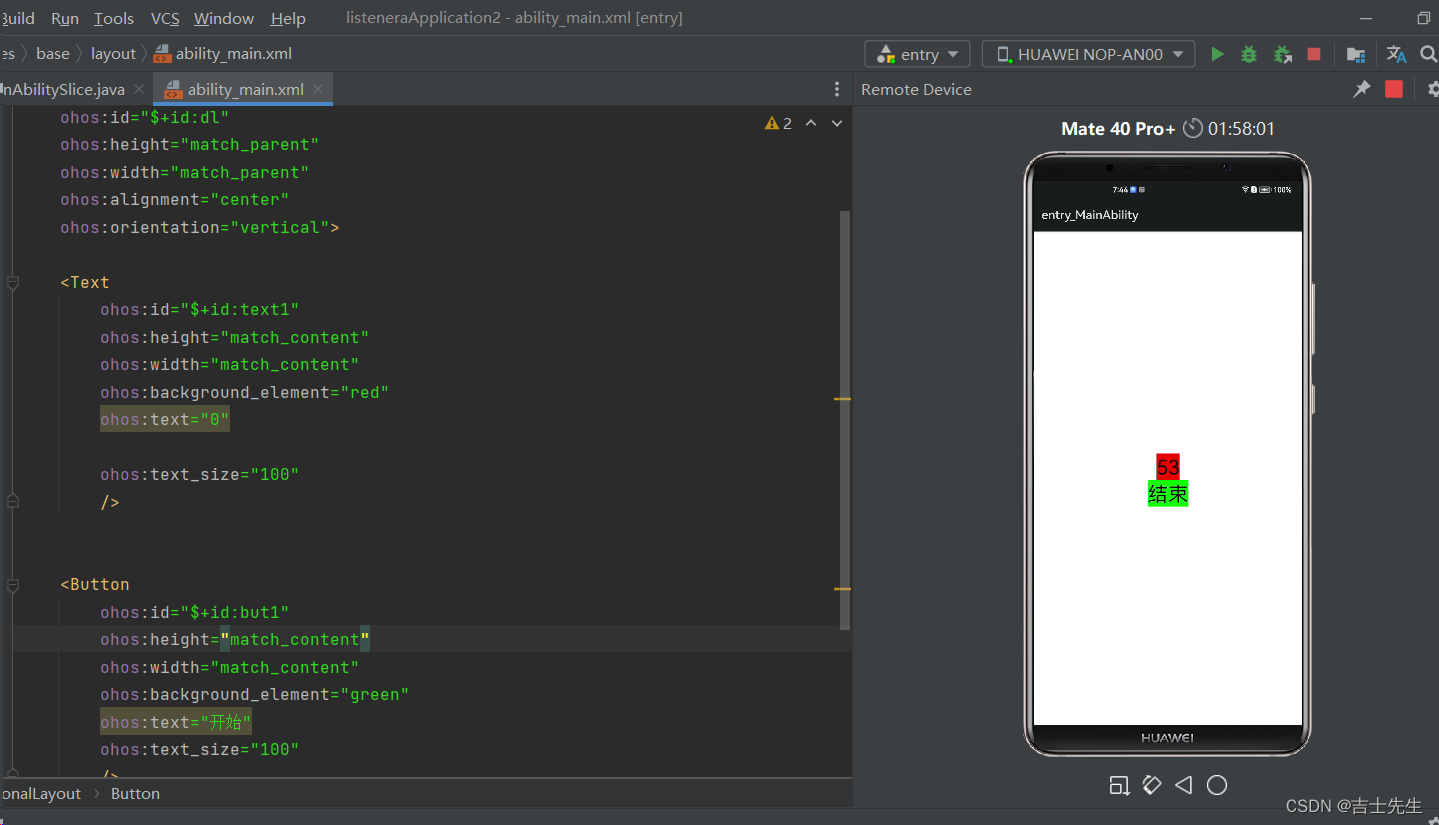
(5).统计点击次数
1.基础视图搭建
<?xml version="1.0" encoding="utf-8"?>

<DirectionalLayout
    xmlns:ohos="http://schemas.huawei.com/res/ohos"
    ohos:id="$+id:dl"
    ohos:height="match_parent"
    ohos:width="match_parent"
    ohos:alignment="center"
    ohos:orientation="vertical">

    <Text
        ohos:id="$+id:text1"
        ohos:height="match_content"
        ohos:width="match_content"
        ohos:background_element="red"
        ohos:text="0"

        ohos:text_size="100"
        />


    <Button
        ohos:id="$+id:but1"
        ohos:height="match_content"
        ohos:width="match_content"
        ohos:background_element="green"
        ohos:text="开始"
        ohos:text_size="100"
        />


</DirectionalLayout>
2.逻辑代码
package com.jsxs.myapplication.slice;

import com.jsxs.myapplication.ResourceTable;
import ohos.aafwk.ability.AbilitySlice;
import ohos.aafwk.content.Intent;
import ohos.agp.components.*;
import ohos.global.resource.NotExistException;
import ohos.global.resource.Resource;
import ohos.multimodalinput.event.MmiPoint;
import ohos.multimodalinput.event.TouchEvent;

import java.io.BufferedReader;
import java.io.IOException;
import java.io.InputStreamReader;
import java.util.ArrayList;
import java.util.Random;
import java.util.concurrent.ScheduledThreadPoolExecutor;
import java.util.concurrent.TimeUnit;

public class MainAbilitySlice extends AbilitySlice {
    // 1. 设置全局的flag ⭐
    static int count = 0;
    static boolean flag = true;
    static long start = 0;

    @Override
    public void onStart(Intent intent) {
        super.onStart(intent);
        super.setUIContent(ResourceTable.Layout_ability_main);

        // 找到固定的组件
        Button button = (Button) this.findComponentById(ResourceTable.Id_but1);
        Text text = (Text) this.findComponentById(ResourceTable.Id_text1);

        button.setClickedListener(new Component.ClickedListener() {
            @Override
            public void onClick(Component component) {
                // 1.假如说是第一次点击
                if (flag) {
                    // 开始点击的时间
                    start = System.currentTimeMillis();
                    button.setText("点我+1");

                    text.setText(count + "");
                    flag = false;
                } else {  // 2.假如说不是第一次点击
                    count++;
                    text.setText(count + "");
                    if (System.currentTimeMillis() - start >= 10000) {
                        button.setText("结束");
                        button.setClickable(false);
                    }
                }


            }
        });


    }

    @Override
    public void onActive() {
        super.onActive();
    }

    @Override
    public void onForeground(Intent intent) {
        super.onForeground(intent);
    }

}
(七)、三大件之组件
1.组件的概述
(1).什么是组件
组件: 屏幕展示出来的元素,都称之为组件。比如华为已经提供的:文本,图片,进度条,输入框等。
顶级父类:Component。
注意点: 组件在为被添加到布局时,既无法显示也无法进行交互,因此一个用户界面至少包含一个布局。
(2).组件分类
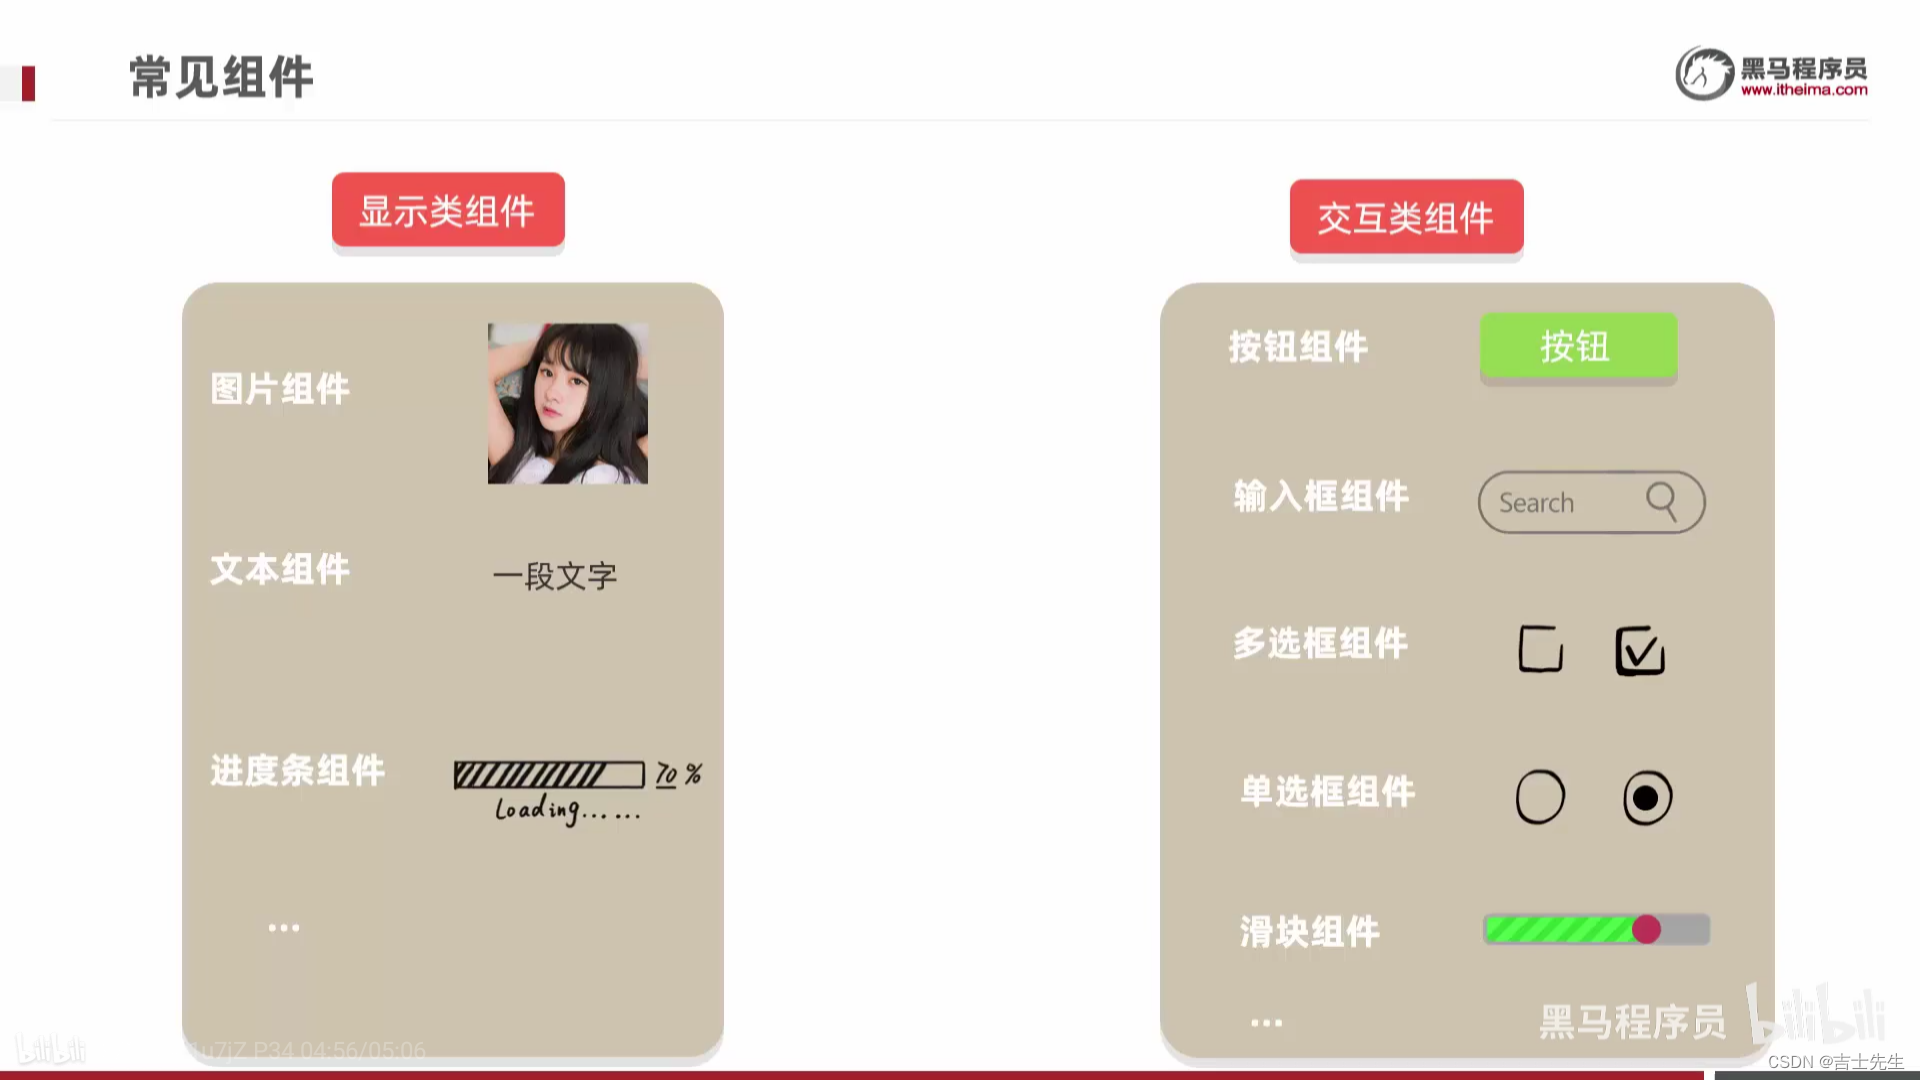
- 显示类组件
- 只负责数据展示的,无法跟用户交互,比如展示文本的组件,展示图片的组件。
- 交互类组件
- 可以跟用户交互的,比如用户可以点击的按钮组件,用户可以输入的文本框组件。
- 布局类组件
- 刚刚讲解的布局其实也是一种比较特殊的组件。
2.显示类组件
文本Text、图片Image、CommonDialog普通弹框组件、ToastDialog信息提示组件、时钟Clock、定时器TickTimer、进度条ProgressBar。
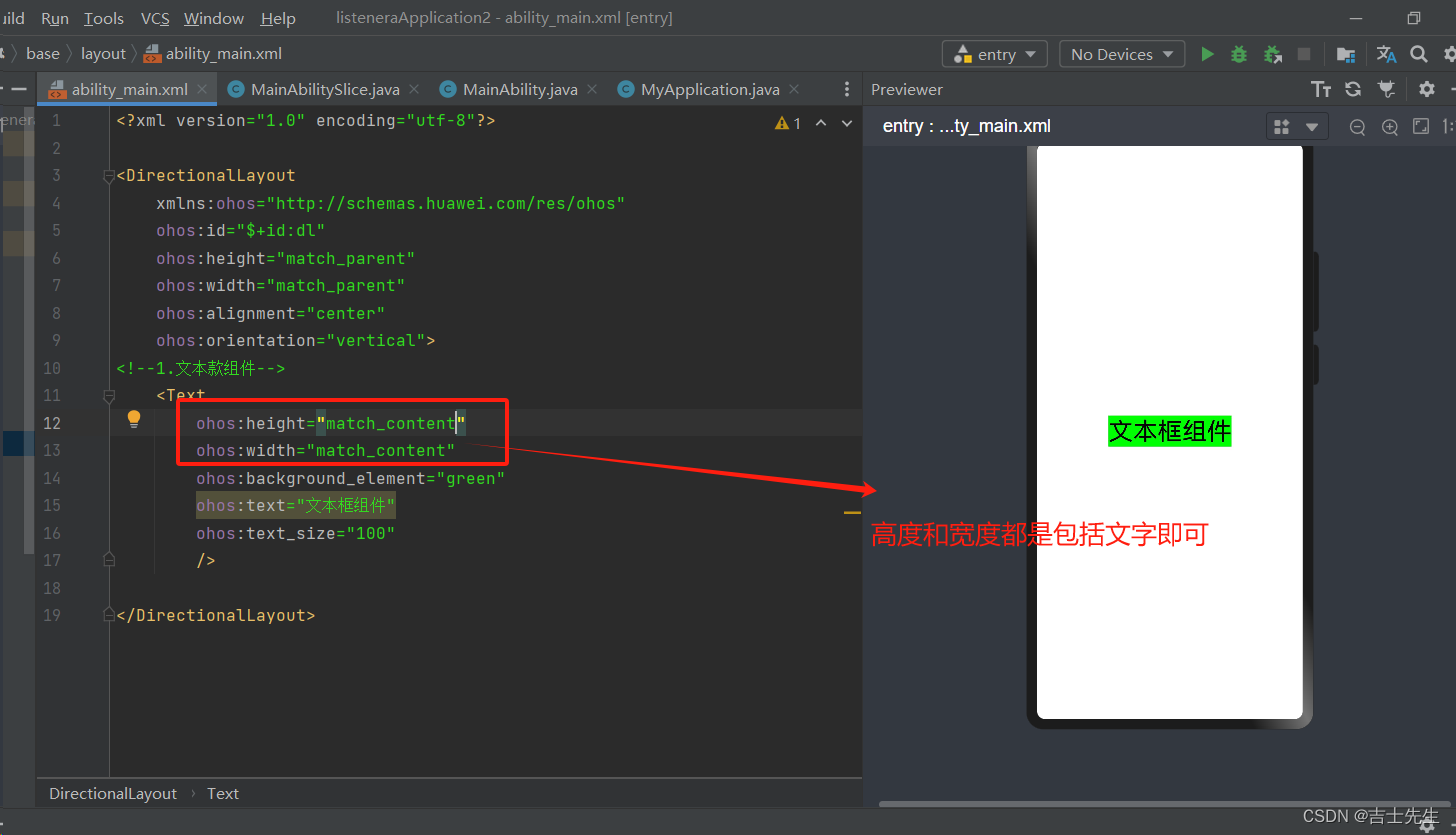
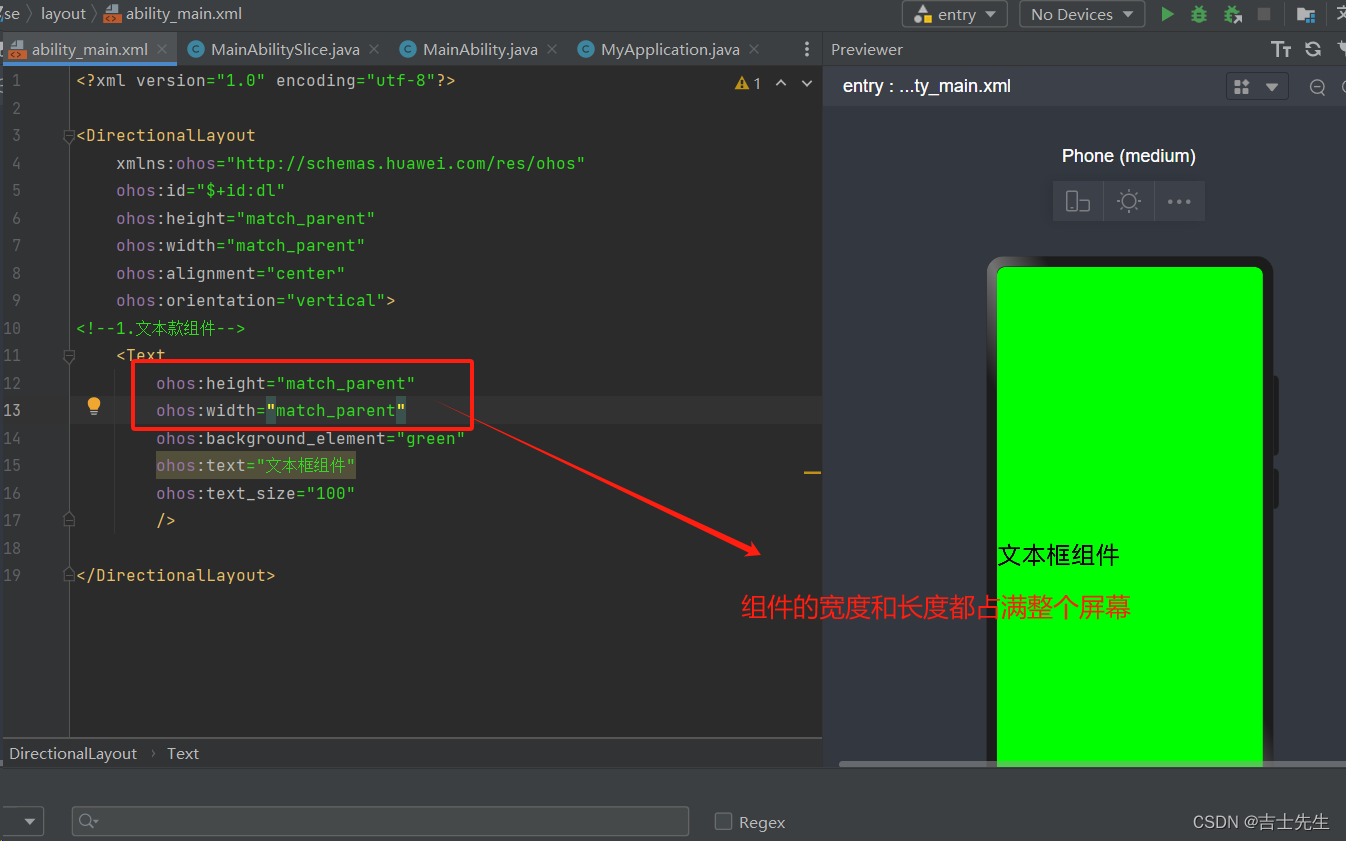
(1).Text组件 (文本)
文本(Text)是用来显示字符串的组件,在界面上显示为一块文本区域。仅仅作为展示数据使用,用户不能在App中修改文本组件中的内容。
Text组件是最基本的组件,后面还会学习他的子类组件,比如Button,TextField都是从这个类衍生而来的。
1.常见的属性:
这些属性不用去背,用着用着就熟了,想要对文本进行一个设置,如果忘记属性,可以直接到笔记中找,或者到华为开发者文档中找。
https://developer.harmonyos.com/cn/docs/
如果不写单位,默认单位是px
- 宽高属性
- match_content :文本有多大,文本框就有多大
- matvh_parent : 填充父元素。(就是铺满全屏)
- 具体数值:
- 具体的长度单位:px (写死),vp(灵活),fp。
- dp(安卓里面的单位,跟鸿蒙中的vp是一样的)
- vp(虚拟像素)长度单位。
- fp 字体大小单位。不缩放的情况下fp=vp
- 具体的长度单位:px (写死),vp(灵活),fp。
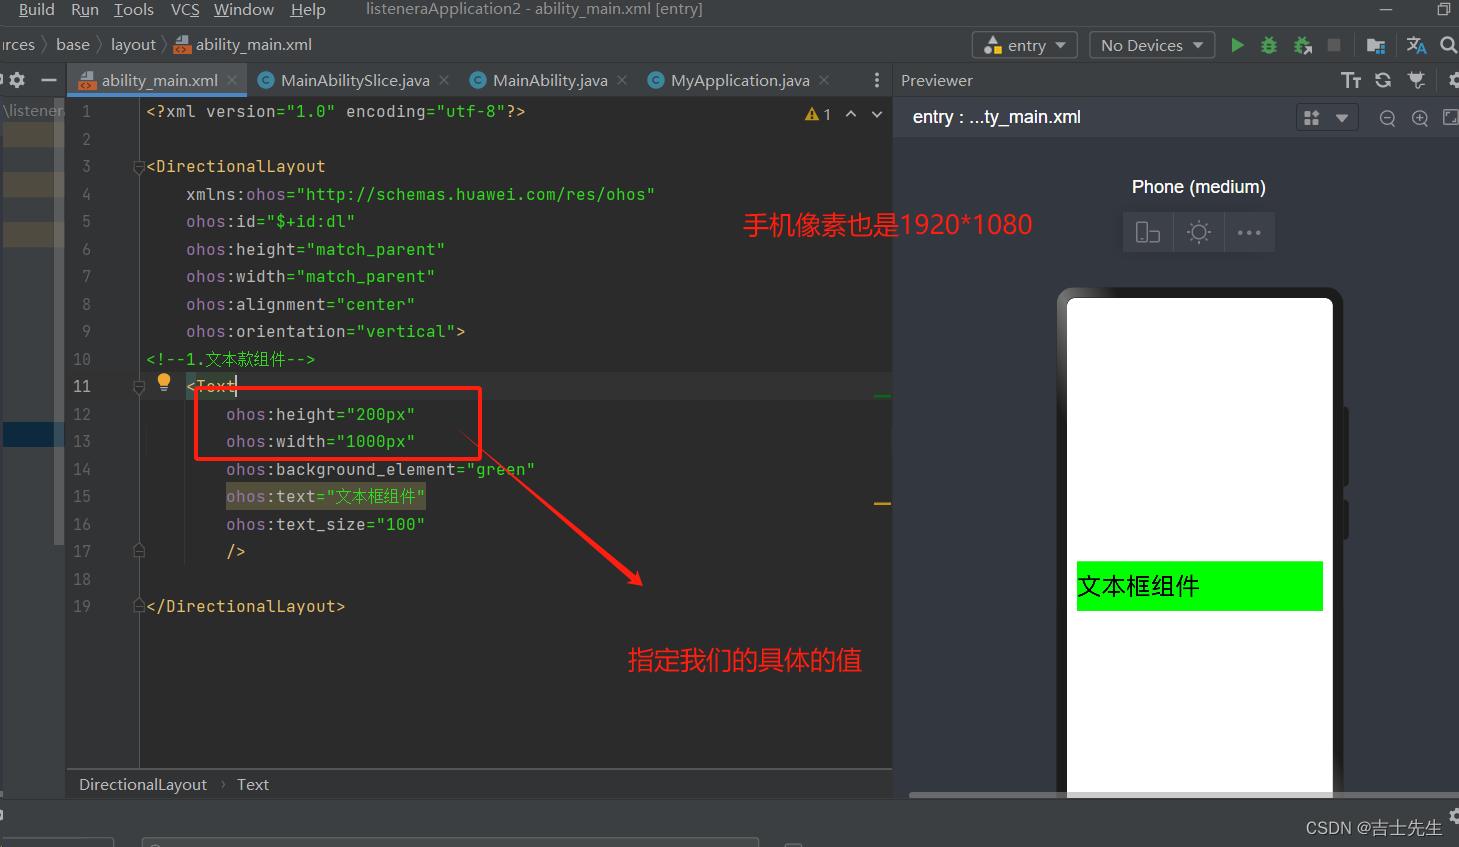
1920*1080像素也就是说: 长度由1920个正方形小格子组成,宽由1080个正方形小格子组成。 1px等于一个正方形小格子。
在1920*1080的像素下: 1vp=3px。
1.match_content: 包括整个文本
2.match_parent: 充满整个父元素,因为我们的父元素时布局,所以占满屏幕
3.具体的单位: 手机的像素也是 1920*1080
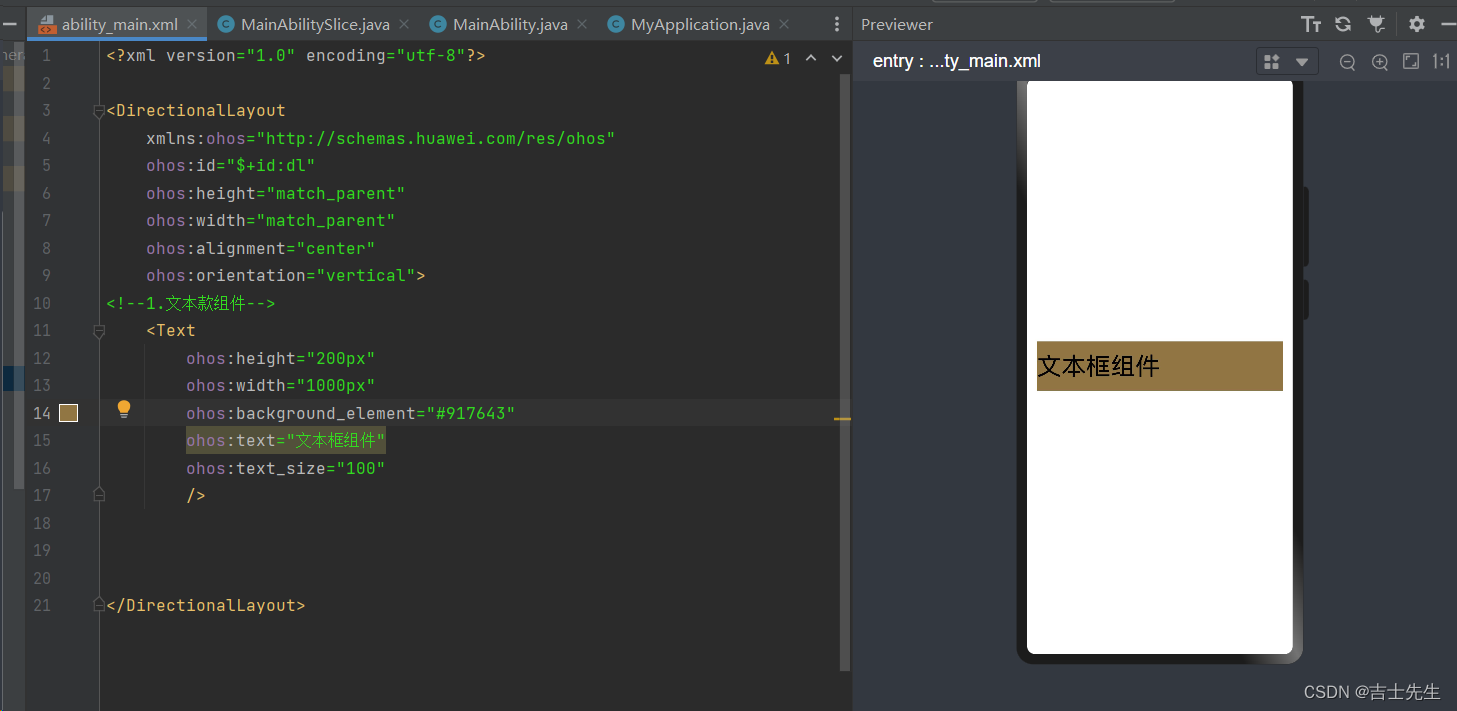
- 颜色属性: RGB光学三原色
- background_element
- 书写形式:可以直接写单词。red
- 可以写十六进制的三原色。 #FFFFFF
- 可以写十进制的三原色。 (255,255,255)
- 可以写透明度。 #00FFFFFF (前面写00~16的数控制透明度)
- 十六进制可以写简写 #F112233 -> #123(简写的时候不能加透明度)
- 其他写法(不利于阅读): #5901(前面补0,满足6位,不利于阅读)
- background_element
- 外边距: 边框外侧到边框外侧的距离
-
margin: 单独一个maring同时设置上下左右。
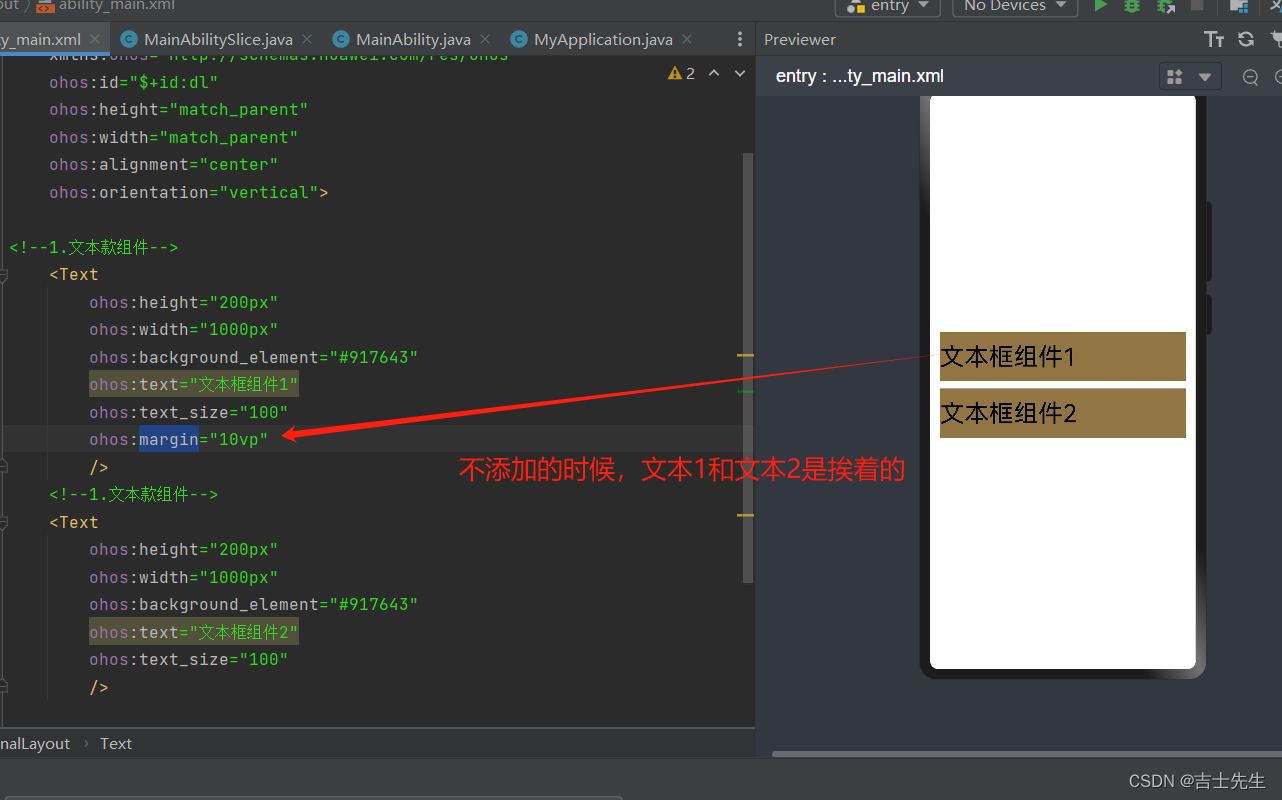
-
bottom_margin: 底部的长度
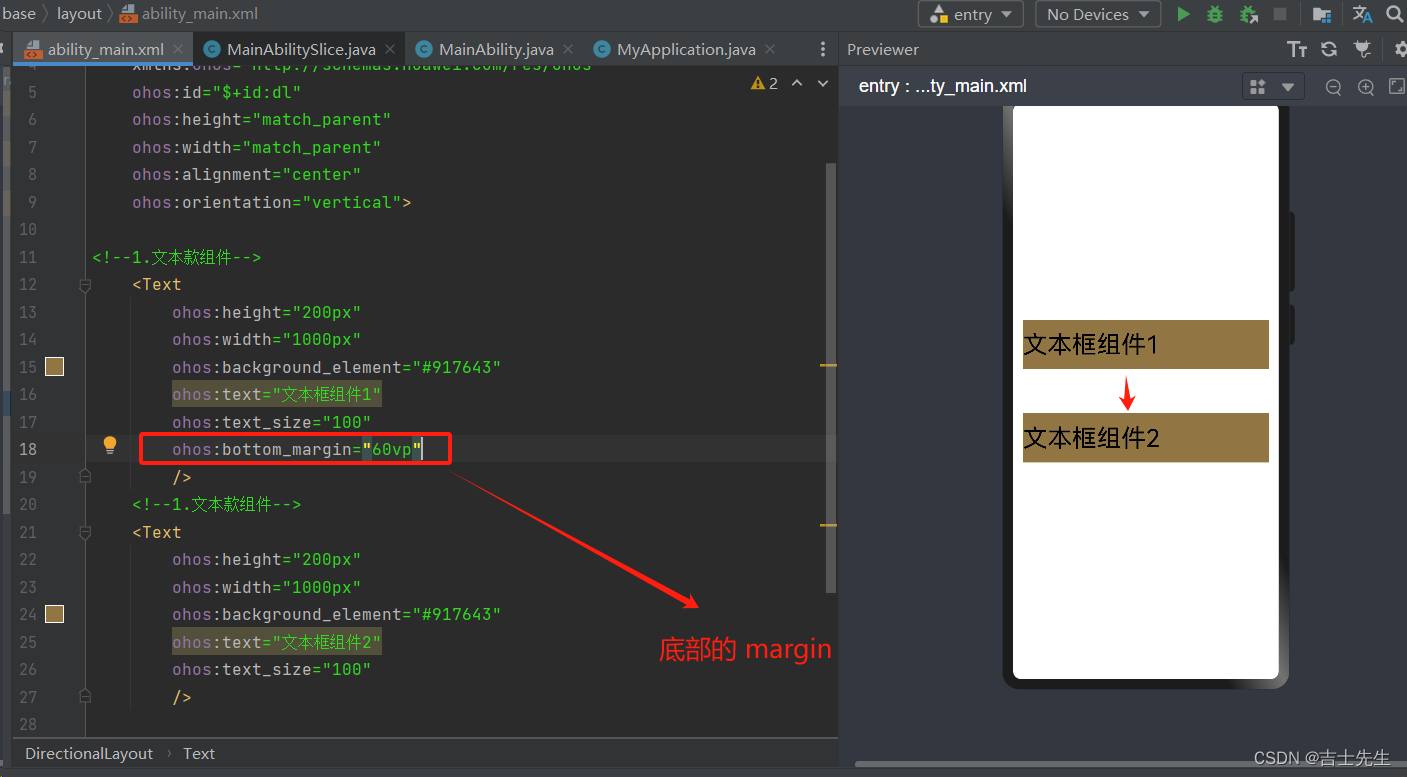
-
属性失效的场景:
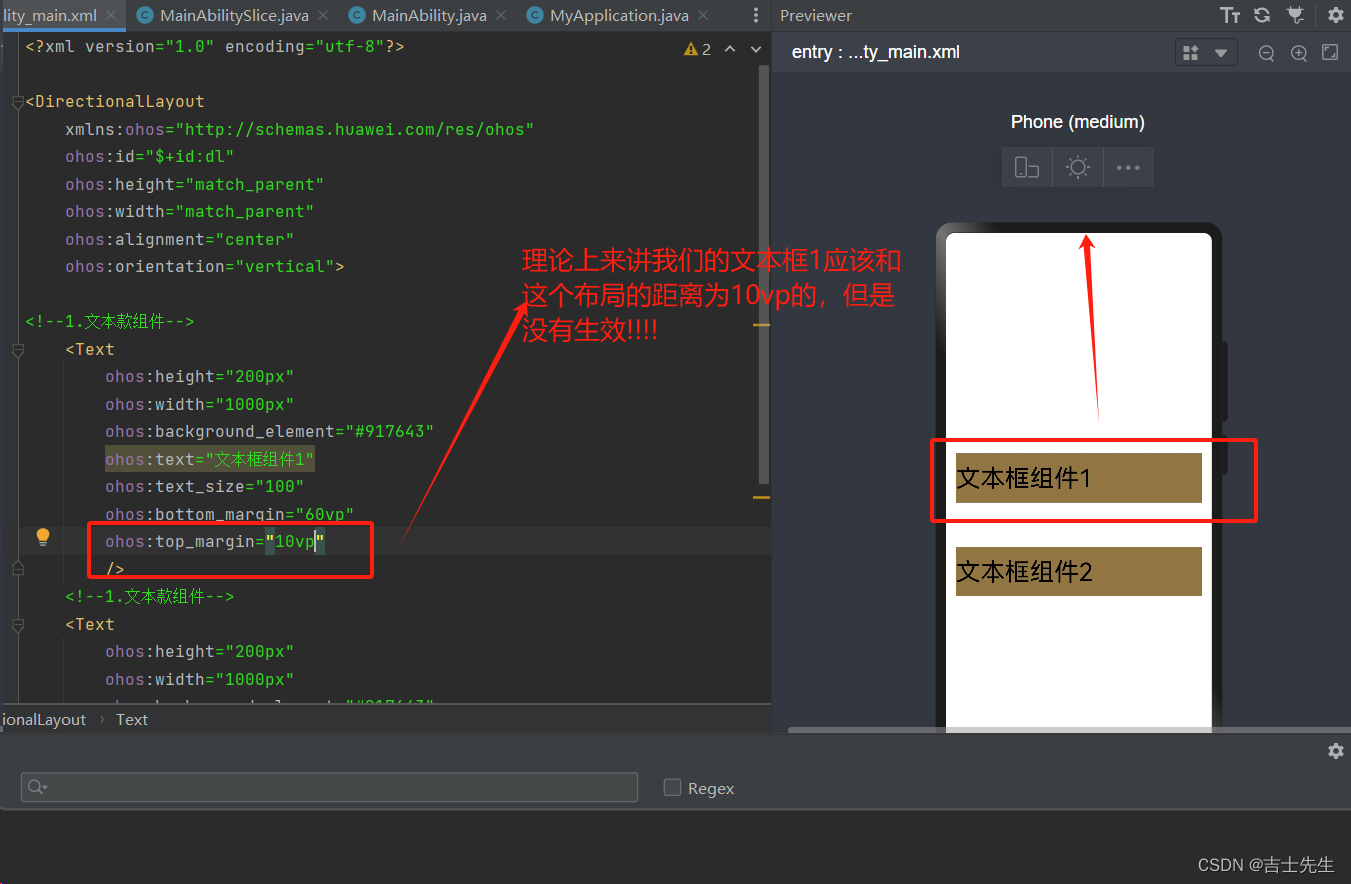
-
如果组件外侧没有其他组件,则是到父布局的距离。
-
组件边框外侧没有其他组件,则是到父布局的距离。
-
- 内边距: 组件边框内侧与文本的距离
- padding: 假如设置了会实现上下左右四个位置的变动
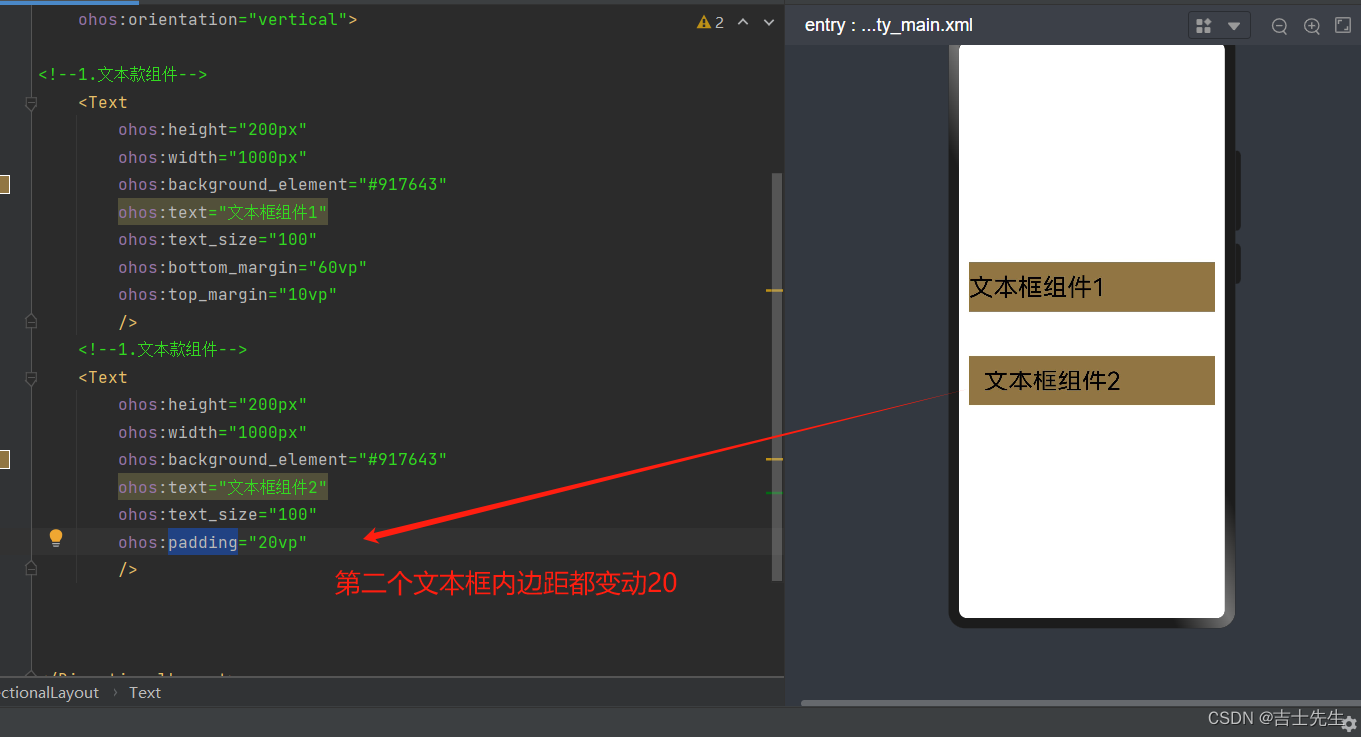
- left_padding: 左侧内边距
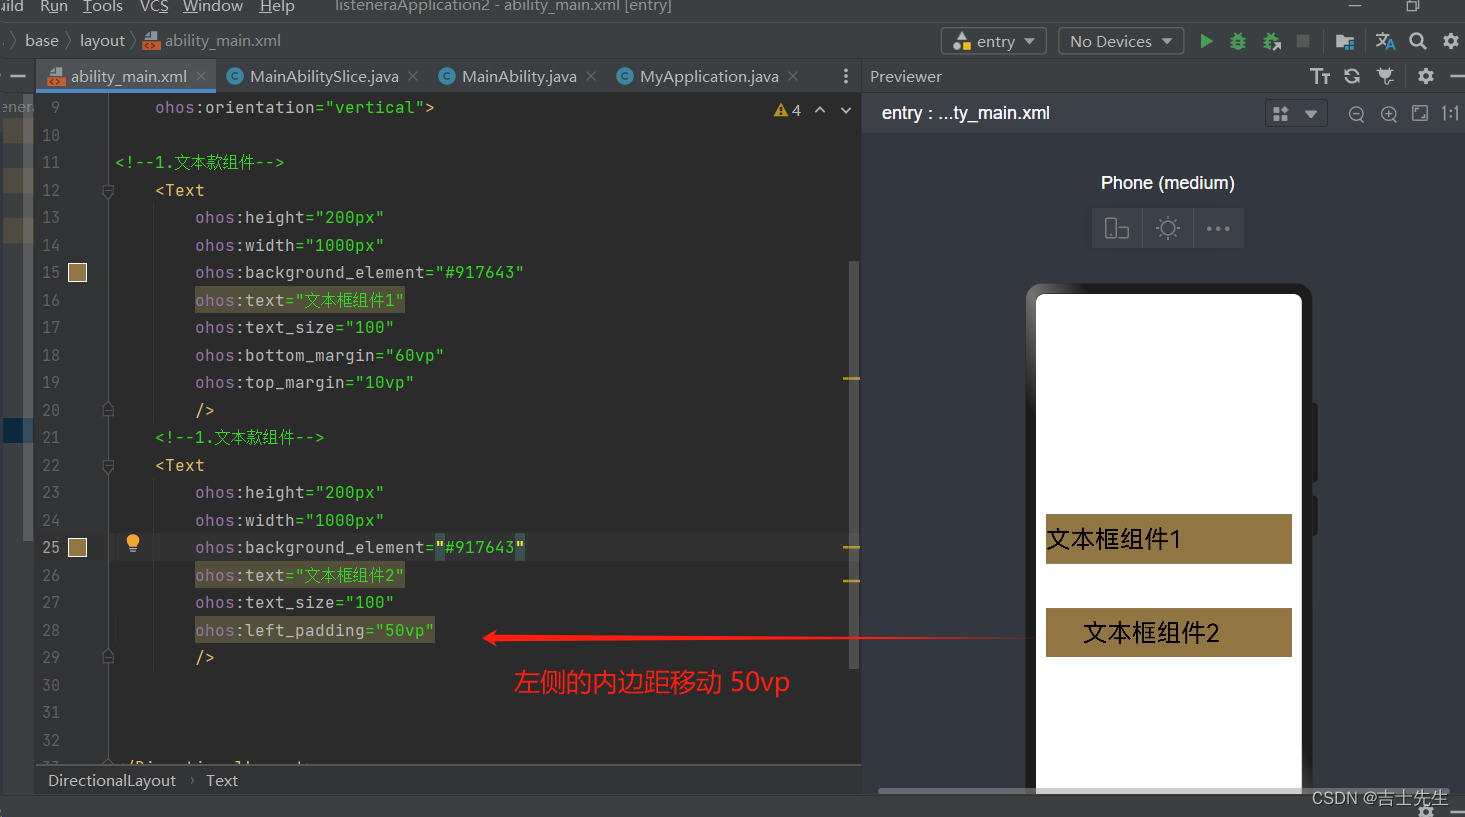
- padding: 假如设置了会实现上下左右四个位置的变动
(1).练习_登入页面
效果图:
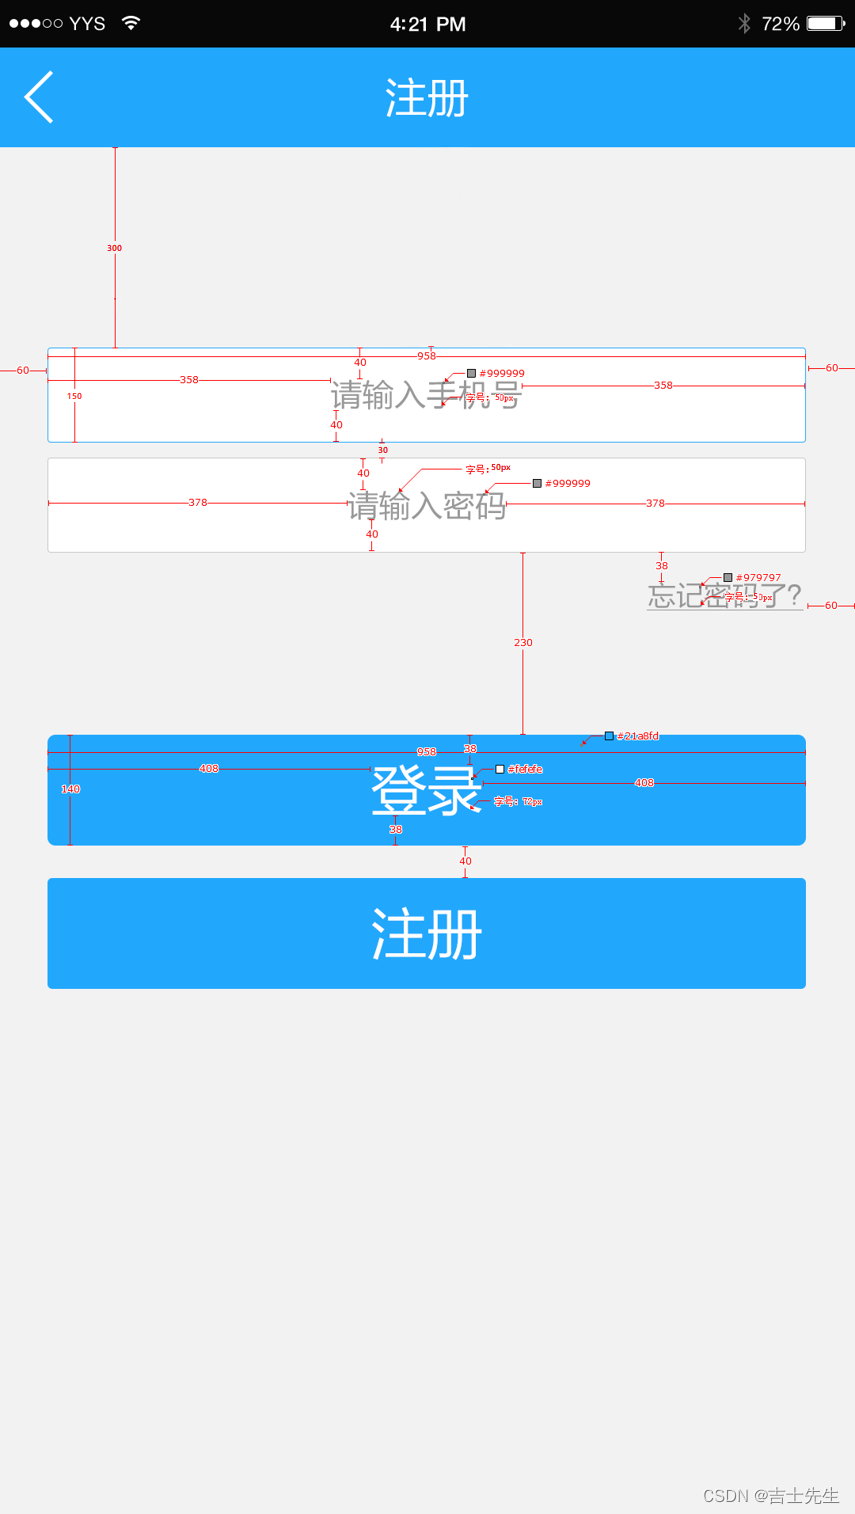
<?xml version="1.0" encoding="utf-8"?>
<!-- alignment: 水平且垂直居中-->
<DirectionalLayout
    xmlns:ohos="http://schemas.huawei.com/res/ohos"
    ohos:height="match_parent"
    ohos:width="match_parent"
    ohos:background_element="#F2F2F2"
    ohos:orientation="vertical"
    >

    <!-- text_alignment: center 水平且垂直居中 horizontal_center : 水平居中 vertical_center: 垂直居中   -->
    <!-- ⭐ 整个文本框怎么布局: layout_alignment: 水平居中 layout_direction: 垂直居中   -->
    <Text
        ohos:height="50vp"
        ohos:width="319vp"
        ohos:background_element="#FFFFFF"
        ohos:layout_alignment="horizontal_center"
        ohos:text="请输入手机"
        ohos:text_alignment="center"
        ohos:text_color="#999999"
        ohos:text_size="17vp"
        ohos:top_margin="100vp"
        />

    <!-- text_alignment: center 水平且垂直居中 horizontal_center : 水平居中 vertical_center: 垂直居中   -->
    <!-- ⭐ 整个文本框怎么布局:  layout_alignment: 水平居中 layout_direction: 垂直居中   -->
    <Text
        ohos:height="50vp"
        ohos:width="319vp"
        ohos:background_element="#FFFFFF"
        ohos:layout_alignment="horizontal_center"
        ohos:text="请输入密码"
        ohos:text_alignment="center"
        ohos:text_color="#999999"
        ohos:text_size="17vp"
        ohos:top_margin="10vp"
        />

    <!--  right_margin: 我们发现我们设置的右外边距失效了 ohos:layout_alignment="right"->标注靠右侧开始 ⭐ -->
    <!--  整个文本款右侧布局: ohos:layout_alignment="right" -->
    <Text
        ohos:height="match_content"
        ohos:width="match_content"
        ohos:layout_alignment="right"
        ohos:right_margin="20vp"
        ohos:text="忘记密码了?"
        ohos:text_color="#979797"
        ohos:text_size="17fp"
        ohos:top_margin="13vp"
        />

    <!--  整个按钮水平居中布局布局: ohos:layout_alignment="horizontal_center" -->
    <Button
        ohos:height="47vp"
        ohos:width="319vp"
        ohos:background_element="#21a8fd"
        ohos:layout_alignment="horizontal_center"
        ohos:text="登入"
        ohos:text_alignment="center"
        ohos:text_color="#FEFEFE"
        ohos:text_size="24vp"
        ohos:top_margin="77vp"
        />

    <!--  整个按钮水平居中布局布局: ohos:layout_alignment="horizontal_center" -->
    <Button
        ohos:height="47vp"
        ohos:width="319vp"
        ohos:background_element="#21a8fd"
        ohos:layout_alignment="horizontal_center"
        ohos:text="注册"
        ohos:text_alignment="center"
        ohos:text_color="#FEFEFE"
        ohos:text_size="24vp"
        ohos:top_margin="10vp"
        />

</DirectionalLayout>
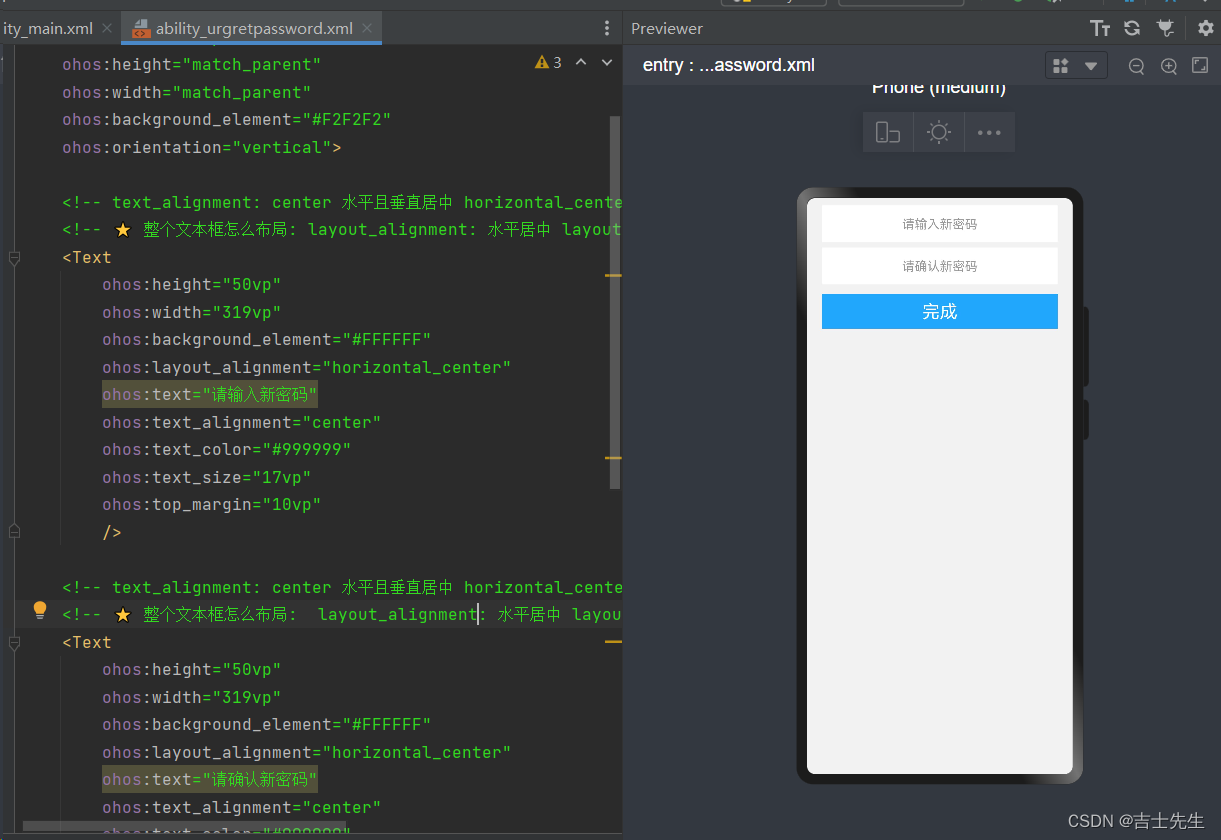
(2).练习_修改密码页面
1.效果图展示:
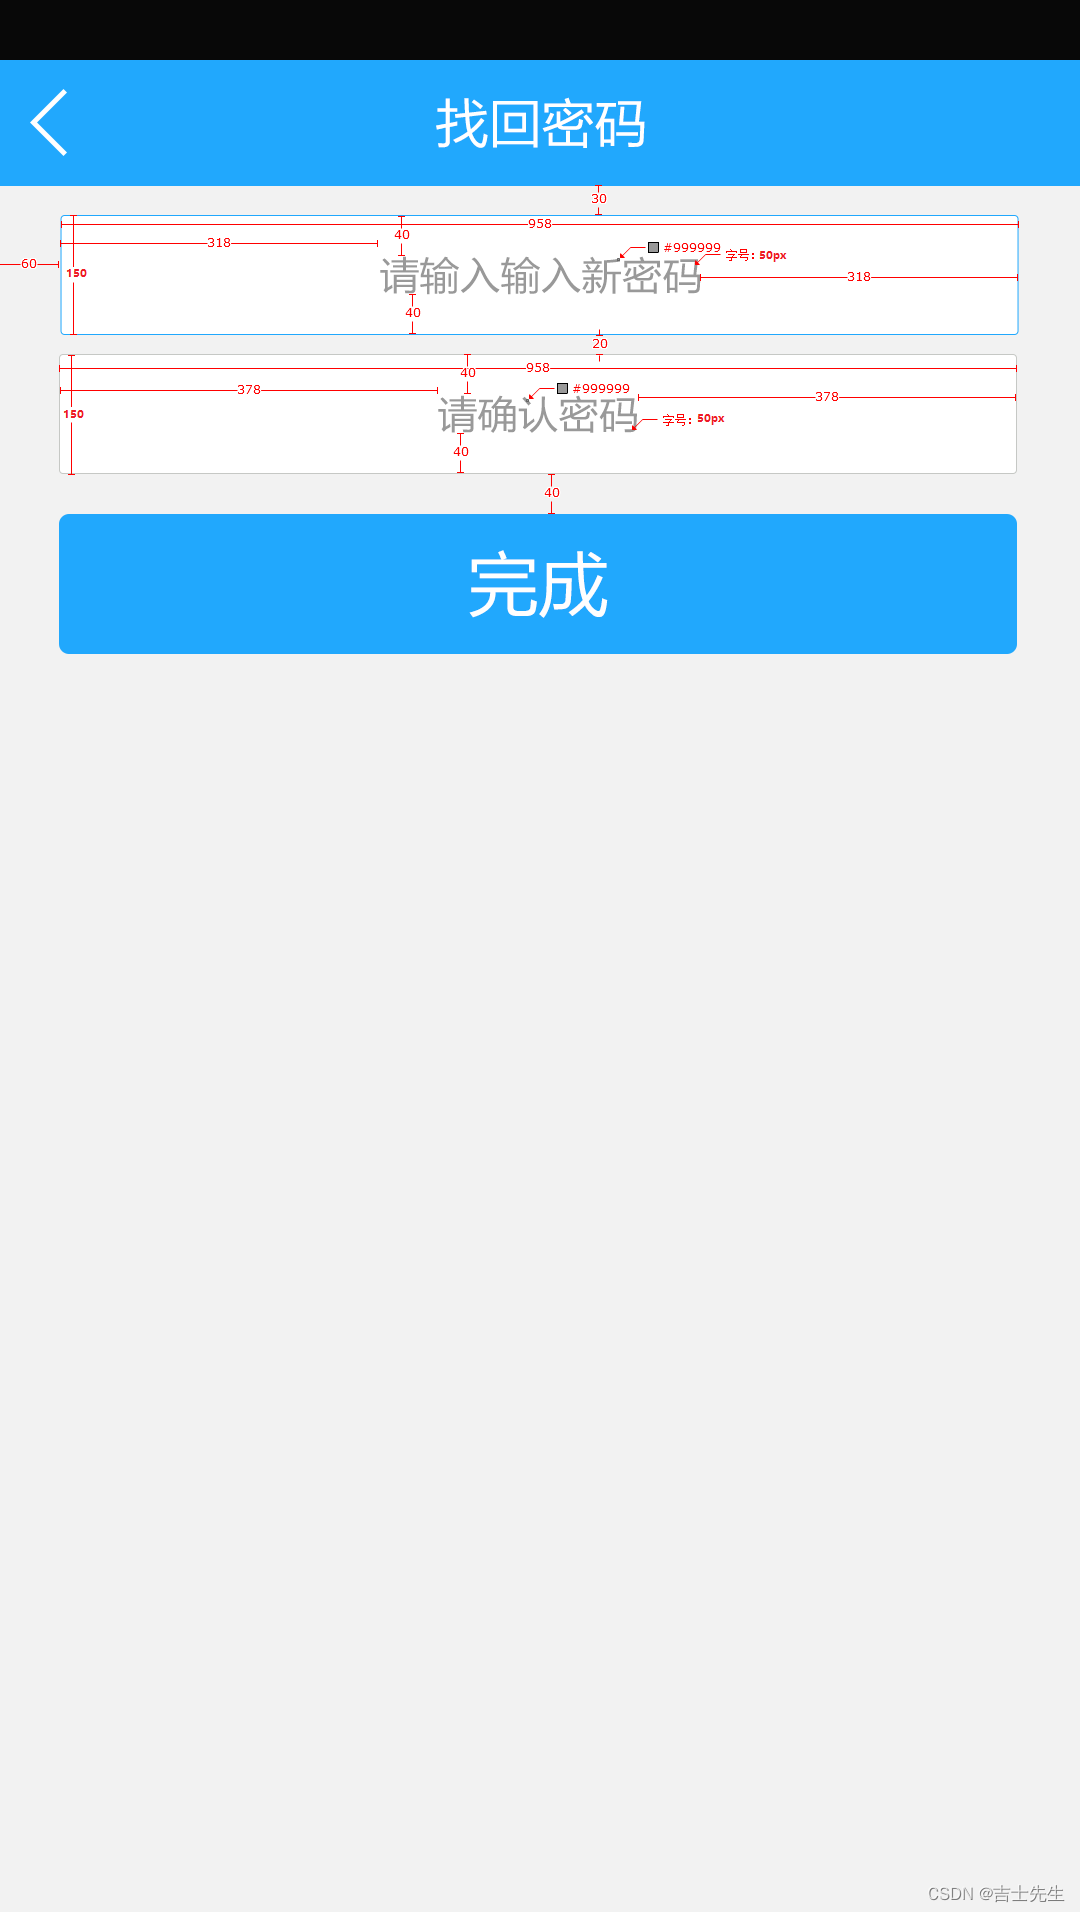
2.新建一个ability
<?xml version="1.0" encoding="utf-8"?>
<DirectionalLayout
    xmlns:ohos="http://schemas.huawei.com/res/ohos"
    ohos:height="match_parent"
    ohos:width="match_parent"
    ohos:background_element="#F2F2F2"
    ohos:orientation="vertical">

    <!-- text_alignment: center 水平且垂直居中 horizontal_center : 水平居中 vertical_center: 垂直居中   -->
    <!-- ⭐ 整个文本框怎么布局: layout_alignment: 水平居中 layout_direction: 垂直居中   -->
    <Text
        ohos:height="50vp"
        ohos:width="319vp"
        ohos:background_element="#FFFFFF"
        ohos:layout_alignment="horizontal_center"
        ohos:text="请输入新密码"
        ohos:text_alignment="center"
        ohos:text_color="#999999"
        ohos:text_size="17vp"
        ohos:top_margin="10vp"
        />

    <!-- text_alignment: center 水平且垂直居中 horizontal_center : 水平居中 vertical_center: 垂直居中   -->
    <!-- ⭐ 整个文本框怎么布局:  layout_alignment: 水平居中 layout_direction: 垂直居中   -->
    <Text
        ohos:height="50vp"
        ohos:width="319vp"
        ohos:background_element="#FFFFFF"
        ohos:layout_alignment="horizontal_center"
        ohos:text="请确认新密码"
        ohos:text_alignment="center"
        ohos:text_color="#999999"
        ohos:text_size="17vp"
        ohos:top_margin="7vp"
        />


    <!--  整个按钮水平居中布局布局: ohos:layout_alignment="horizontal_center" -->
    <Button
        ohos:height="47vp"
        ohos:width="319vp"
        ohos:background_element="#21a8fd"
        ohos:layout_alignment="horizontal_center"
        ohos:text="完成"
        ohos:text_alignment="center"
        ohos:text_color="#FEFEFE"
        ohos:text_size="24vp"
        ohos:top_margin="13vp"
        />


</DirectionalLayout>
(3).练习_文本域 (跑马灯效果)
ohos:multiple_lines="true": 自动换行
跑马灯效果的两个必要设置:
ohos:multiple_lines="false": 关闭自动换行ohos:max_text_lines="1": 文本最大行数为1行ohos:truncation_mode="auto_scrolling" : 自动滚动ohos:auto_scrolling_count="unlimited" : 一直运行ohos:auto_scrolling_duration="2000" : 2秒跑完
- 跑马灯效果
<?xml version="1.0" encoding="utf-8"?>
<!-- alignment: 水平且垂直居中-->
<DirectionalLayout
    xmlns:ohos="http://schemas.huawei.com/res/ohos"
    ohos:height="match_parent"
    ohos:width="match_parent"
    ohos:alignment="center"
    ohos:background_element="#F2F2F2"
    ohos:orientation="vertical"
    >
<!--
    ohos:truncation_mode="auto_scrolling" : 自动滚动
    ohos:auto_scrolling_count="unlimited" : 一直运行
    ohos:auto_scrolling_duration="2000" : 2秒跑完
    ohos:max_text_lines="1" : 最多为1行
    ohos:multiple_lines="false" : 不允许换行
 -->
    <Text
        ohos:id="$+id:text1"
        ohos:height="100vp"
        ohos:width="300vp"
        ohos:background_element="#55121212"
        ohos:text="龙川萍: '我非常非常非常非常非常非常非常非常非常非常非常非常喜欢李威涛'"
        ohos:text_size="40vp"
        ohos:multiple_lines="false"
        ohos:max_text_lines="1"

        ohos:truncation_mode="auto_scrolling"
        ohos:auto_scrolling_count="unlimited"
        ohos:auto_scrolling_duration="2000"
        />

</DirectionalLayout>
2.我们还需要事件处理: 事件处理之后才能实现跑马灯
package com.jsxs.textapplication.slice;

import com.jsxs.textapplication.ResourceTable;
import ohos.aafwk.ability.AbilitySlice;
import ohos.aafwk.content.Intent;
import ohos.agp.components.Component;
import ohos.agp.components.Text;

public class MainAbilitySlice extends AbilitySlice {
    @Override
    public void onStart(Intent intent) {
        super.onStart(intent);
        super.setUIContent(ResourceTable.Layout_ability_main);

        // 1.获取Text组件
        Text text = (Text) this.findComponentById(ResourceTable.Id_text1);

        // 2.给text文本框添加事件
        text.setClickedListener(new Component.ClickedListener() {
            @Override
            public void onClick(Component component) {
                // 3.开启文本框
                text.startAutoScrolling();
            }
        });

    }

    @Override
    public void onActive() {
        super.onActive();
    }

    @Override
    public void onForeground(Intent intent) {
        super.onForeground(intent);
    }
}
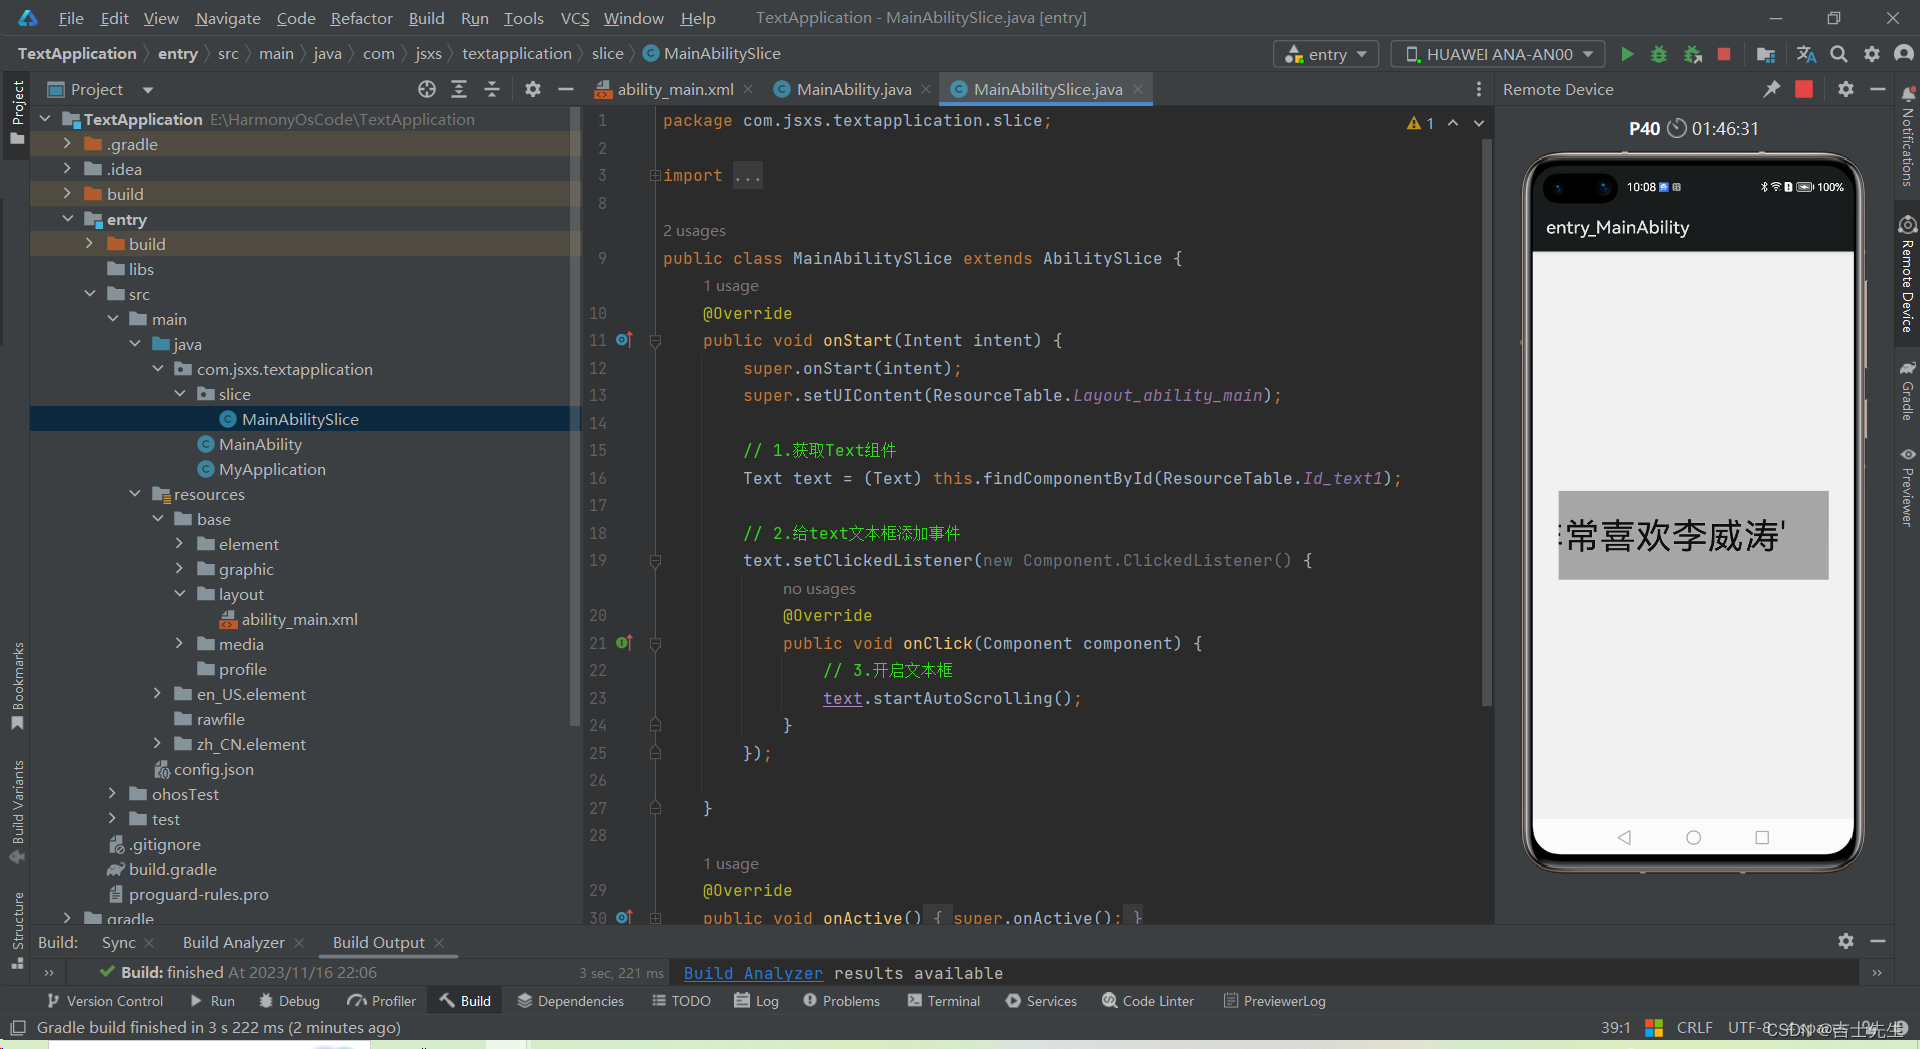
- 隐藏前面的部分
ohos:truncation_mode="ellipsis_at_start : 隐藏开头部分"
ohos:truncation_mode="ellipsis_at_end : 隐藏结尾部分"
ohos:truncation_mode="ellipsis_at_middl : 隐藏中间部分 (足够的宽)"
<?xml version="1.0" encoding="utf-8"?>
<!-- alignment: 水平且垂直居中-->
<DirectionalLayout
    xmlns:ohos="http://schemas.huawei.com/res/ohos"
    ohos:height="match_parent"
    ohos:width="match_parent"
    ohos:alignment="center"
    ohos:background_element="#F2F2F2"
    ohos:orientation="vertical"
    >
<!-- ohos:truncation_mode="ellipsis_at_start" 隐藏开始的部分,非隐藏的文字随着width变大而增多-->
    <Text
        ohos:height="100vp"
        ohos:width="100vp"
        ohos:background_element="#55121212"
        ohos:text="龙川萍: '我非常非常非常非常非常非常非常非常非常非常非常非常喜欢李威涛'"
        ohos:text_size="40vp"
        ohos:truncation_mode="ellipsis_at_start"
        />


</DirectionalLayout>
(2).Image组件 (图片)
图片(Image)是用来显示图片的组件。
当然也有id,长、宽、高等。
- 重要的属性
- background_element: 图片背景
- image_src: 图像
- clip_alignment: 图像裁剪对齐方式
- scale_mode: 图像缩放类型
单独讲解的基本属性:
image_src:如何在xml中使用本地资源文件。
顺便讲一下如何在代码中使用本地资源文件。
- 相关方法
| 方法名 | 功能说明 |
|---|---|
| setClipGravity | 设置剪切对齐模式 |
| setScaleMode | 当图像和组件的大小不同时,此方法可以缩放或者剪切图像 |
- 图片剪切显示:
- 代码中:可以用setClipGravity方法
- 上、下、左、右、居中
- 表示分别按照上、下、左、右、中间部位进行剪切。
- 代码中:可以用setClipGravity方法
- 图片缩放显示:
- 代码中:可以用setScaleMode方法
- xml文件中:可以用scale_mode属性
- inside:表示将原图按比例缩放到与Image相同或更小的尺寸,并居中显示。 有可能不会填充组件
- center:表示不缩放,按Image大小显示原图中间部分。
- stretch:表示将原图缩放到与Image大小一致。 拉伸。将组件填充。
- clip_center:表示将原图按比例缩放到与Image相同或更大的尺寸,并居中显示。超过组件的部分被剪切掉。
- zoom_center:表示原图按照比例缩放到与Image最窄边一致,并居中显示。
- zoom_end:表示原图按照比例缩放到与Image最窄边一致,并靠结束端显示。
- zoom_start:表示原图按照比例缩放到与Image最窄边一致,并靠起始端显示。
注意:
一般来讲在设置的时候会跟图片保持一致,否则图片会失真。如果业务需求要调整图片大小,那么我们是找美工重新做一张图,而不是代码拉伸或者剪切。
(1).常用属性展示
<?xml version="1.0" encoding="utf-8"?>
<DirectionalLayout
    xmlns:ohos="http://schemas.huawei.com/res/ohos"
    ohos:height="match_parent"
    ohos:width="match_parent"
    ohos:alignment="center"
    ohos:orientation="vertical">

    <Image
        ohos:height="1000px"
        ohos:width="1000px"
        ohos:background_element="#0000FF"
        ohos:image_src="$media:girl1"/>


</DirectionalLayout>
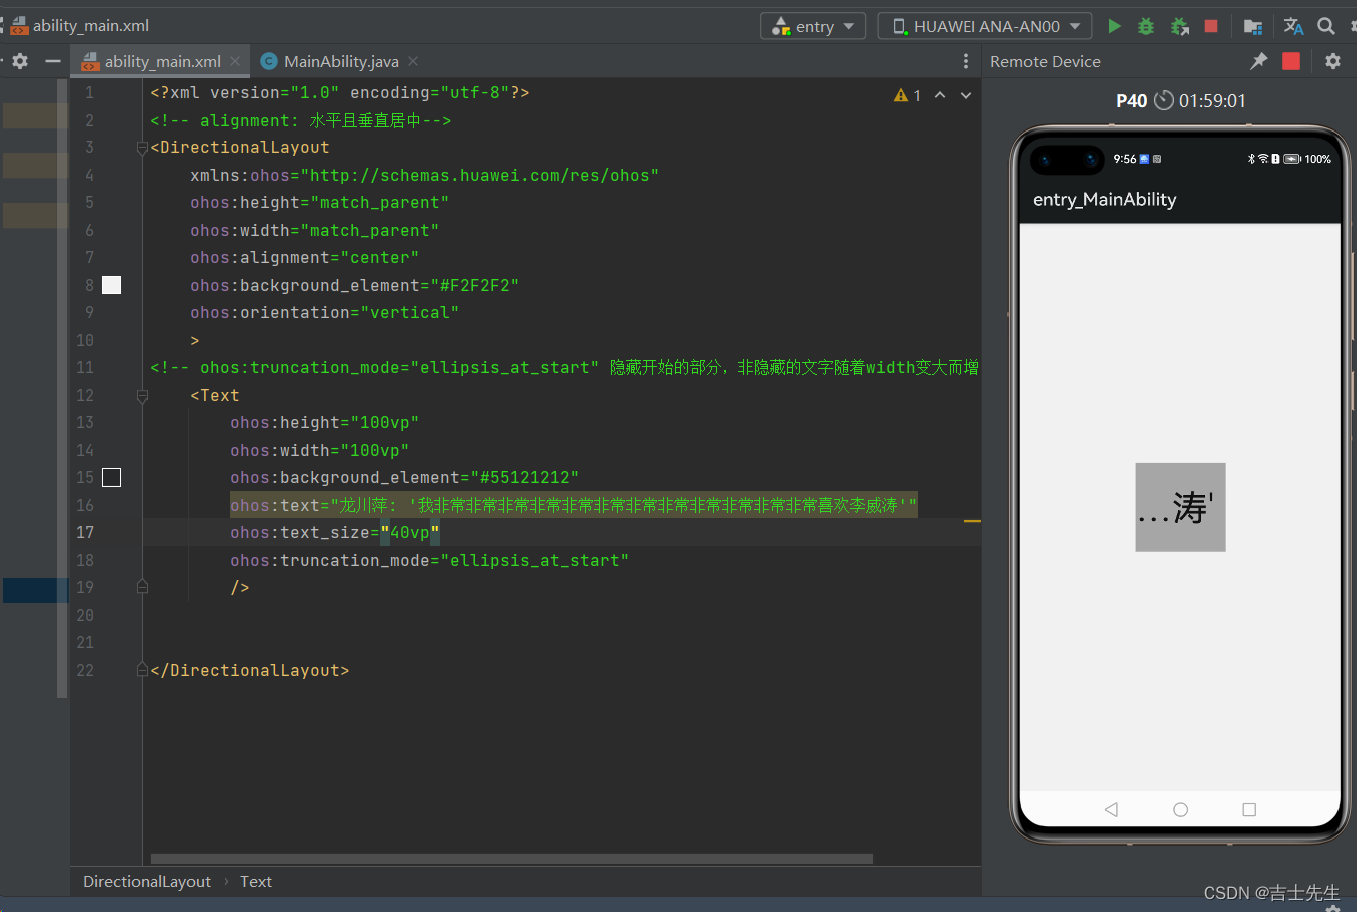
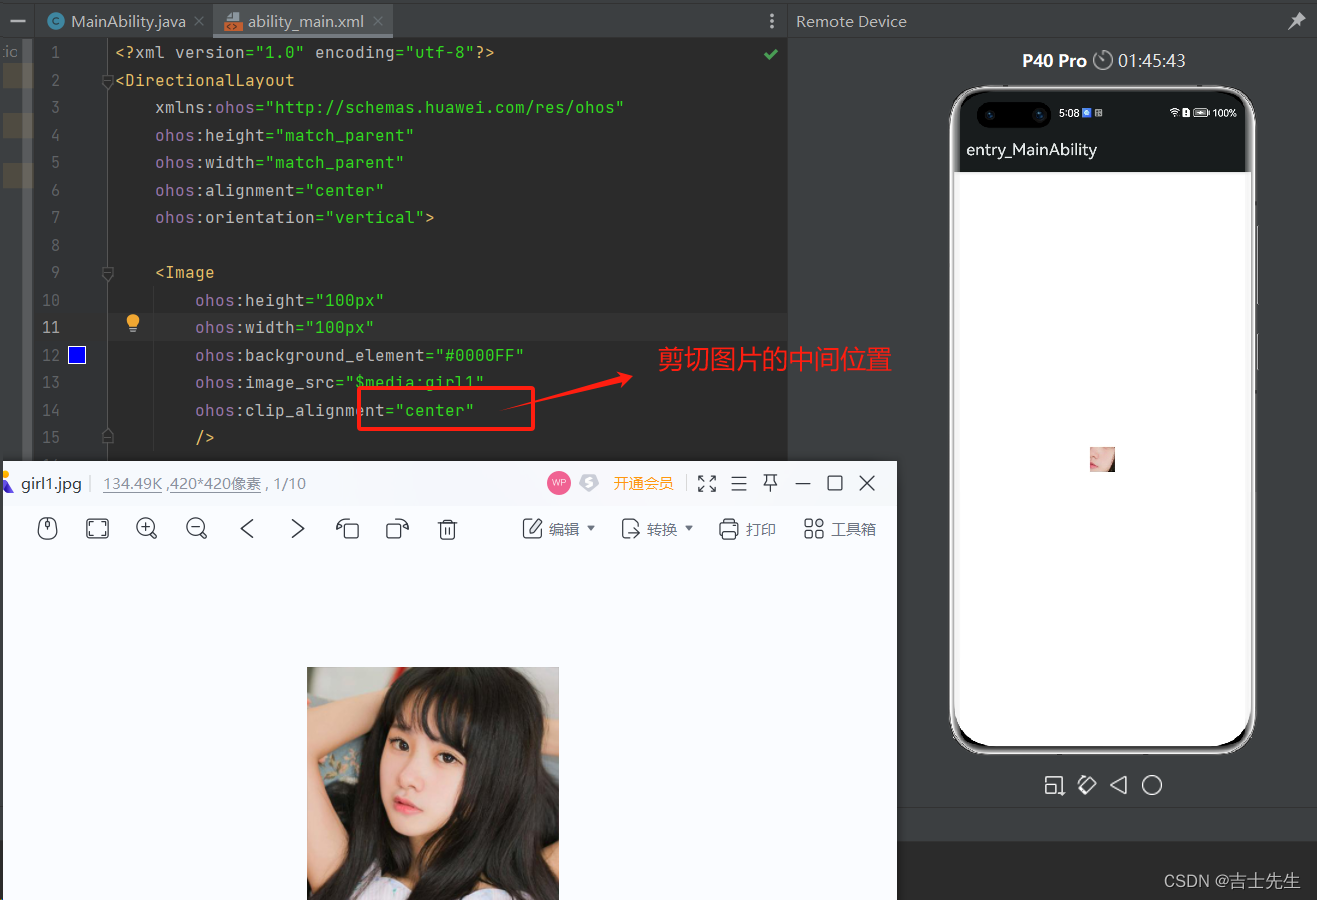
(2).剪切 (clip_alignment)
原本的图片是: 420*420;
clip_alignment: 剪切 这里的剪切随着我们图片的长和宽代表我们截取的长和宽,比如我们这里的长和宽都是100px,相当于我们截取中间部分的100*100;
<?xml version="1.0" encoding="utf-8"?>
<DirectionalLayout
    xmlns:ohos="http://schemas.huawei.com/res/ohos"
    ohos:height="match_parent"
    ohos:width="match_parent"
    ohos:alignment="center"
    ohos:orientation="vertical">

    <Image
        ohos:height="100px"
        ohos:width="100px"
        ohos:background_element="#0000FF"
        ohos:image_src="$media:girl1"
        ohos:clip_alignment="center"
        />


</DirectionalLayout>
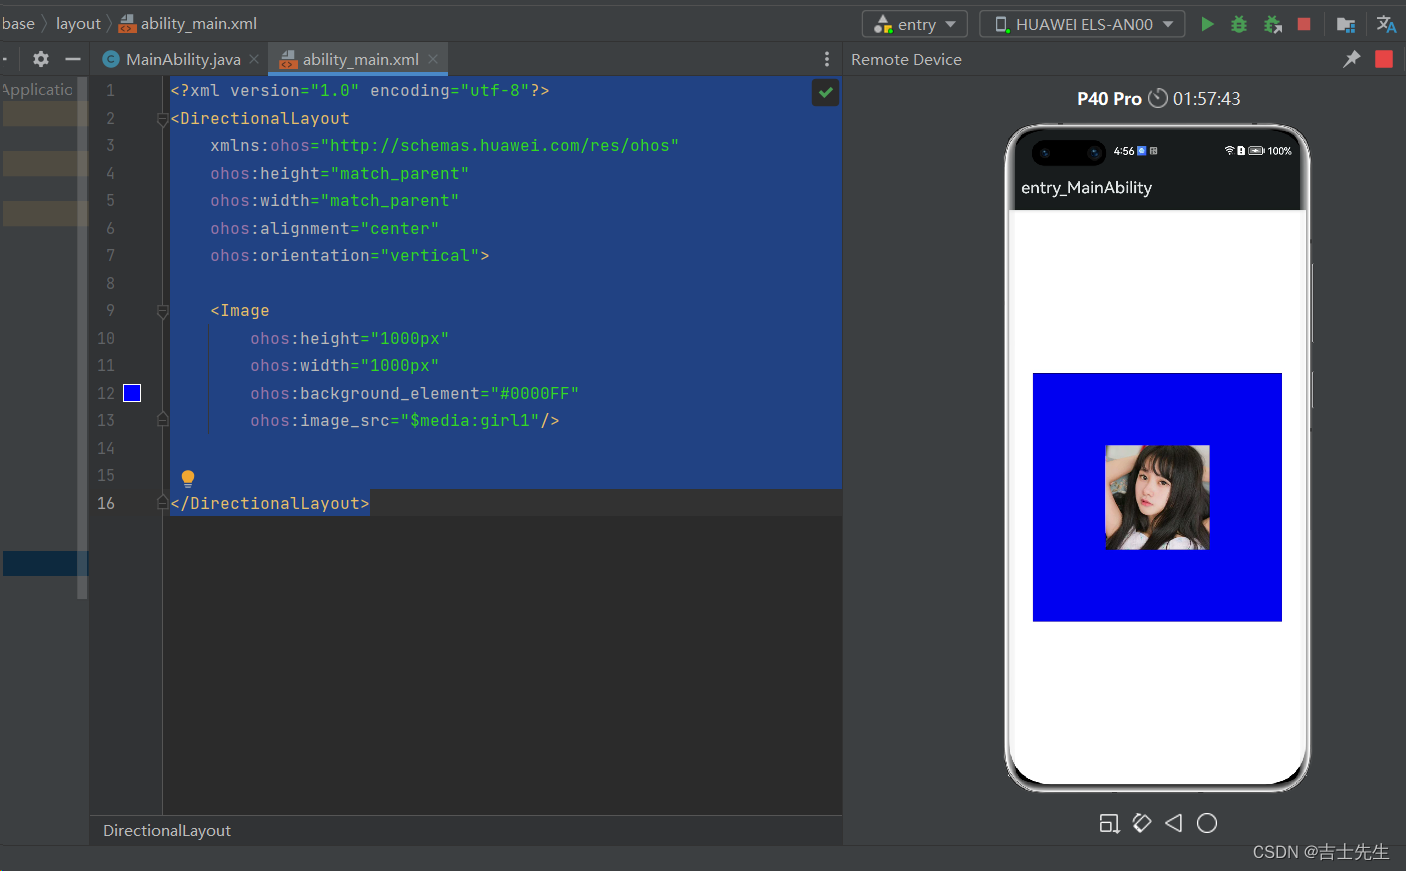
(3).缩放 (scale_mode)
原本的图片是: 500*315
<?xml version="1.0" encoding="utf-8"?>
<DirectionalLayout
    xmlns:ohos="http://schemas.huawei.com/res/ohos"
    ohos:height="match_parent"
    ohos:width="match_parent"
    ohos:alignment="center"
    ohos:orientation="vertical">

<!-- inside: 同比列缩小且居中对其  center: 不缩放按照原图大小展示中间部分  stretch: 拉伸铺满 zoom_center: 放大居中 -->
    <Image
        ohos:height="300px"
        ohos:width="300px"
        ohos:background_element="#0000FF"
        ohos:image_src="$media:plane"
        ohos:scale_mode="zoom_center"
        />


</DirectionalLayout>
(3).综合练习
(1).前端业务开发
<?xml version="1.0" encoding="utf-8"?>
<DirectionalLayout
    xmlns:ohos="http://schemas.huawei.com/res/ohos"
    ohos:height="match_parent"
    ohos:width="match_parent"
    ohos:alignment="center"
    ohos:orientation="vertical">

    <!--  1.图片的展示  -->
    <Image
        ohos:id="$+id:img"
        ohos:height="match_content"
        ohos:width="match_content"
        ohos:image_src="$media:girl1"
        />
    <!--  2.姓名 -->
    <Text
        ohos:id="$+id:name"
        ohos:height="50vp"
        ohos:width="150vp"
        ohos:text="姓名: 王美华"
        ohos:text_size="20fp"/>
    <!--  3. 年龄 -->
    <Text
        ohos:id="$+id:age"
        ohos:height="50vp"
        ohos:width="150vp"
        ohos:text="年龄:29"
        ohos:text_size="20fp"/>
    <!--  3.地址 -->
    <Text
        ohos:id="$+id:address"
        ohos:height="50vp"
        ohos:width="150vp"
        ohos:text="家庭地址:南京"
        ohos:text_size="20fp"/>

    <Button
        ohos:id="$+id:next"
        ohos:height="50vp"
        ohos:width="150vp"
        ohos:background_element="#92D050"
        ohos:text="下一个"
        ohos:text_color="#FFFFFF"
        ohos:text_size="20fp"
        />

    <Button
        ohos:top_margin="10vp"
        ohos:id="$+id:get"
        ohos:height="50vp"
        ohos:width="150vp"
        ohos:background_element="#92D050"
        ohos:text="获取练习方式"
        ohos:text_color="#FFFFFF"
        ohos:text_size="20fp"
        />

</DirectionalLayout>
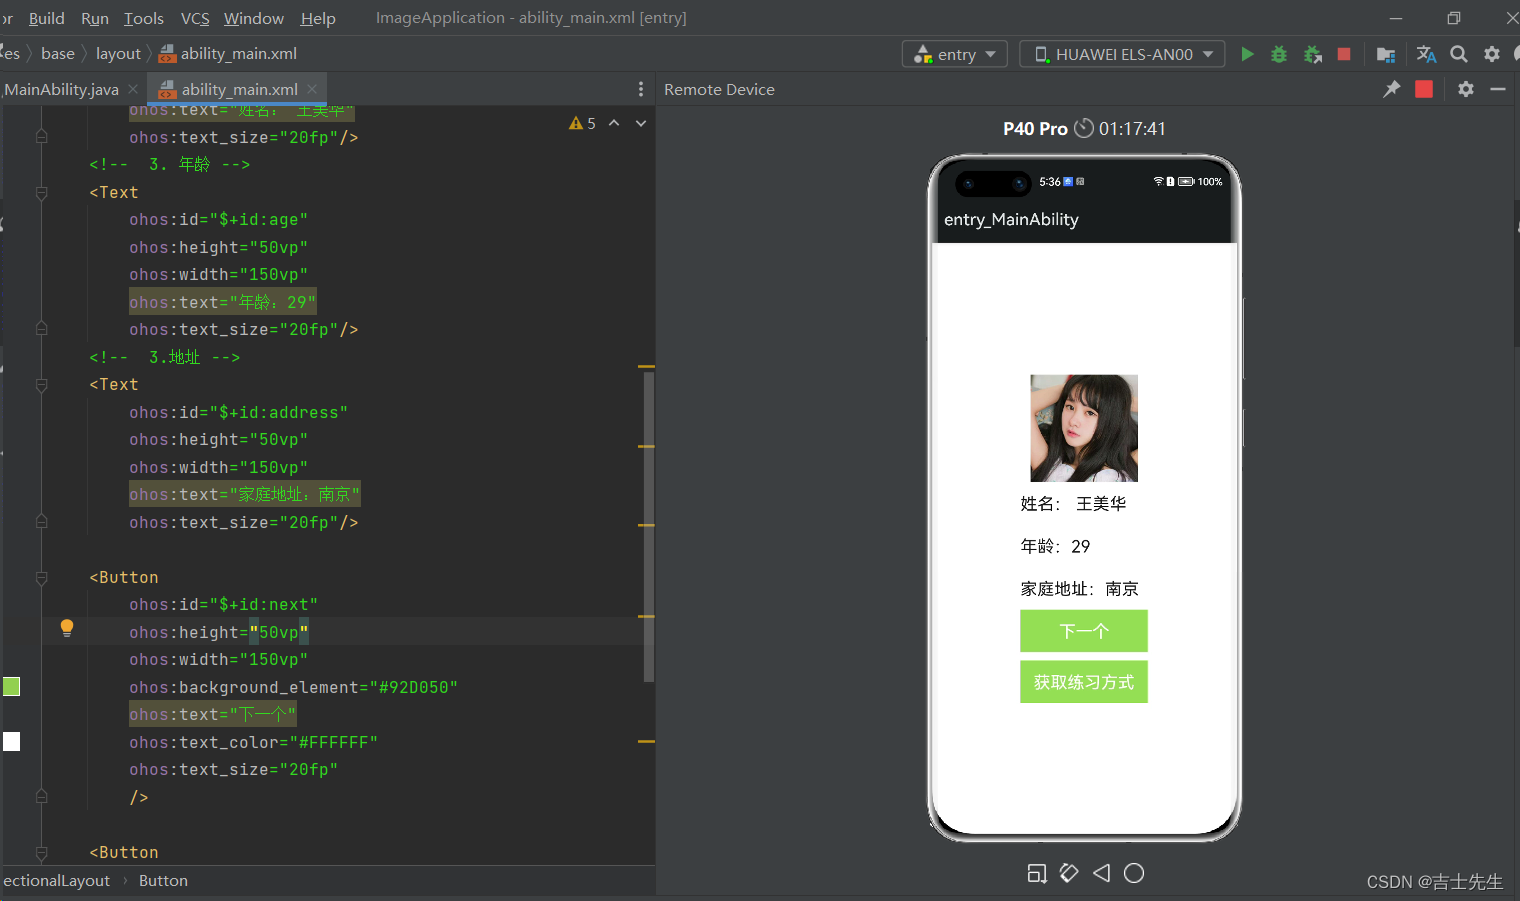
(2).后端业务逻辑
1.实体类
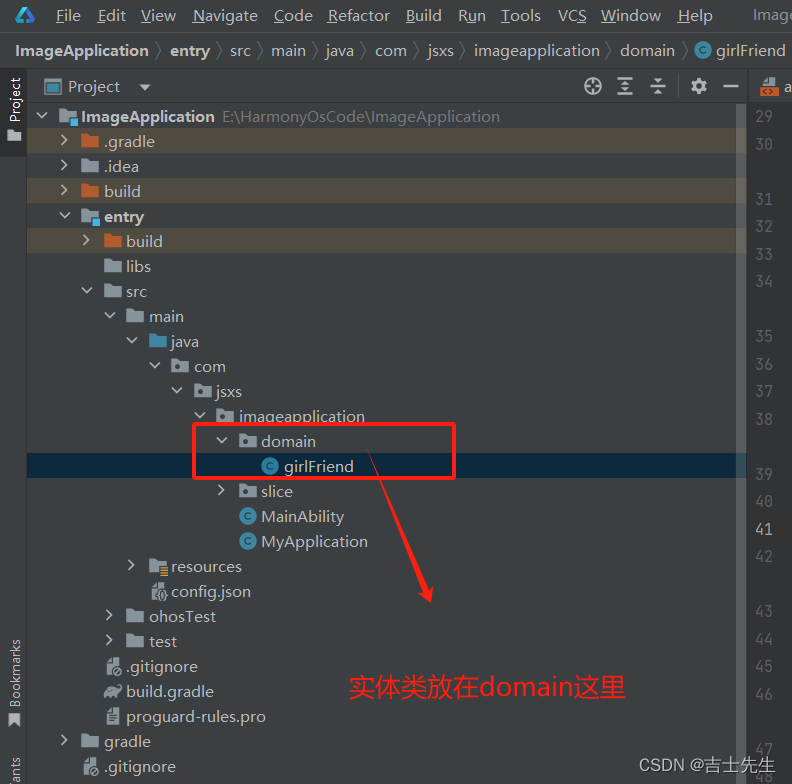
package com.jsxs.imageapplication.domain;

public class girlFriend {
    private int photoID;
    private String name;
    private int age;
    private String address;

    public girlFriend(int photoID, String name, int age, String address) {
        this.photoID = photoID;
        this.name = name;
        this.age = age;
        this.address = address;
    }

    public girlFriend() {
    }

    public int getPhotoID() {
        return photoID;
    }

    public void setPhotoID(int photoID) {
        this.photoID = photoID;
    }

    public String getName() {
        return name;
    }

    public void setName(String name) {
        this.name = name;
    }

    public int getAge() {
        return age;
    }

    public void setAge(int age) {
        this.age = age;
    }

    public String getAddress() {
        return address;
    }

    public void setAddress(String address) {
        this.address = address;
    }

    @Override
    public String toString() {
        return "girlFriend{" +
                "photoID=" + photoID +
                ", name='" + name + '\'' +
                ", age=" + age +
                ", address='" + address + '\'' +
                '}';
    }
}
2.逻辑代码
package com.jsxs.imageapplication.slice;

import com.jsxs.imageapplication.ResourceTable;
import com.jsxs.imageapplication.domain.girlFriend;
import ohos.aafwk.ability.AbilitySlice;
import ohos.aafwk.content.Intent;
import ohos.agp.components.Button;
import ohos.agp.components.Component;
import ohos.agp.components.Image;
import ohos.agp.components.Text;

import java.util.ArrayList;
import java.util.List;
import java.util.Random;

public class MainAbilitySlice extends AbilitySlice {
    @Override
    public void onStart(Intent intent) {
        super.onStart(intent);
        super.setUIContent(ResourceTable.Layout_ability_main);

        // 1. 获取图片的组件
        Image image = (Image) this.findComponentById(ResourceTable.Id_img);
        Text name = (Text) this.findComponentById(ResourceTable.Id_name);
        Text age = (Text) this.findComponentById(ResourceTable.Id_age);
        Text address = (Text) this.findComponentById(ResourceTable.Id_address);
        Button btn_next = (Button) this.findComponentById(ResourceTable.Id_next);
        Button btn_get = (Button) this.findComponentById(ResourceTable.Id_get);

        // 2.创建一个集合
        List<girlFriend> list = new ArrayList<>();
       list.add(new girlFriend(ResourceTable.Media_girl1,"小米1",21,"河南1"));
       list.add(new girlFriend(ResourceTable.Media_girl2,"小米2",22,"河南2"));
       list.add(new girlFriend(ResourceTable.Media_girl3,"小米3",23,"河南3"));
       list.add(new girlFriend(ResourceTable.Media_girl4,"小米4",24,"河南4"));
       list.add(new girlFriend(ResourceTable.Media_girl5,"小米5",25,"河南5"));
       list.add(new girlFriend(ResourceTable.Media_girl6,"小米6",26,"河南6"));
       list.add(new girlFriend(ResourceTable.Media_girl7,"小米7",27,"河南7"));
       list.add(new girlFriend(ResourceTable.Media_girl8,"小米8",28,"河南8"));
       list.add(new girlFriend(ResourceTable.Media_girl9,"小米9",29,"河南9"));

        // 2. 绑定事件
        btn_next.setClickedListener(new Component.ClickedListener() {
            @Override
            public void onClick(Component component) {
                Random random = new Random();
                girlFriend friend = list.get(random.nextInt(list.size()));
                image.setImageAndDecodeBounds(friend.getPhotoID());
                name.setText("姓名:"+friend.getName());
                age.setText("年龄:"+friend.getAge());
                address.setText("地址:"+friend.getAddress());
            }
        });

    }

    @Override
    public void onActive() {
        super.onActive();
    }

    @Override
    public void onForeground(Intent intent) {
        super.onForeground(intent);
    }
}
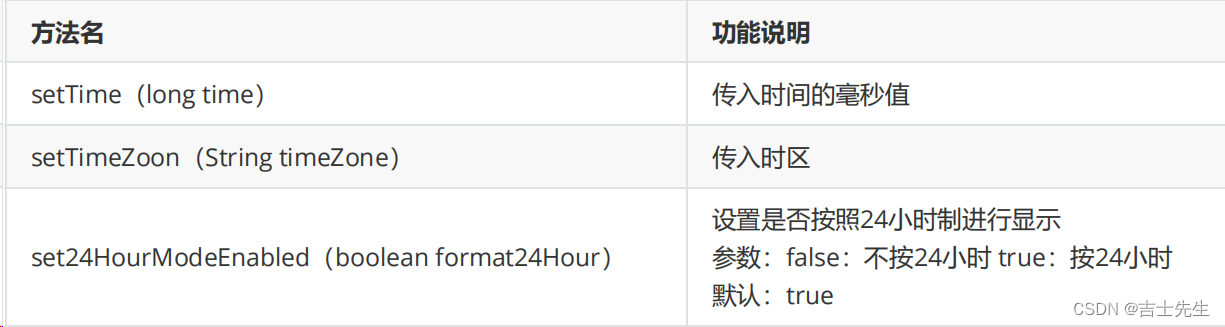
(4).Clock组件 (时钟)
是Text的子类,所以可以使用Text的一些属性。
常用属性:
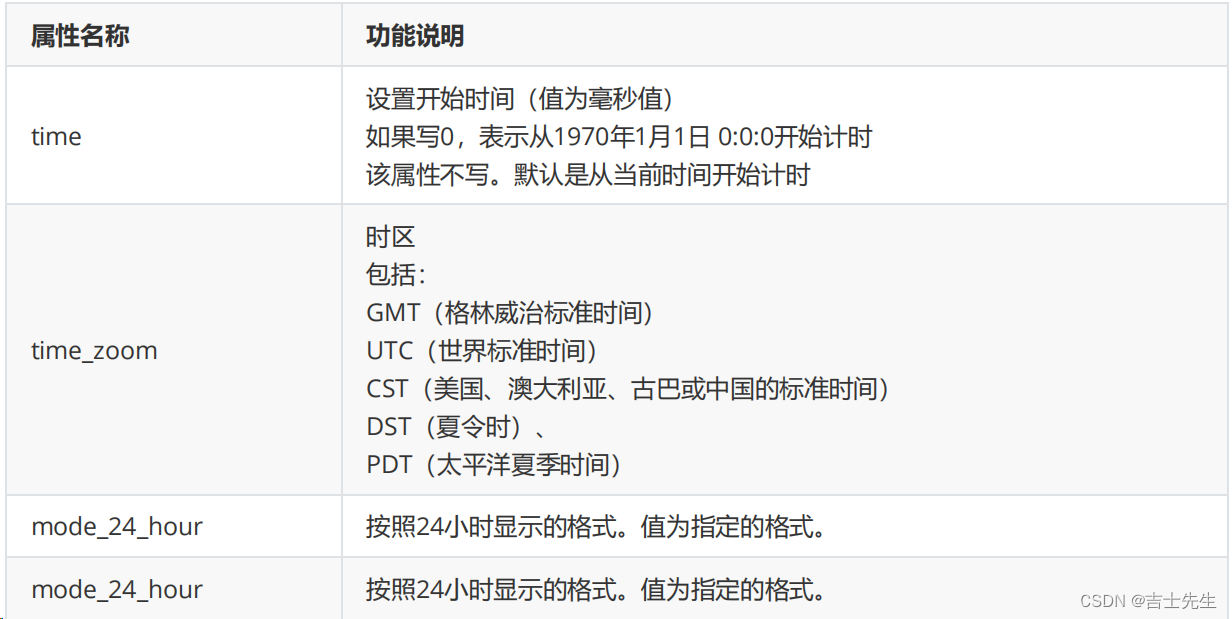
常见方法:

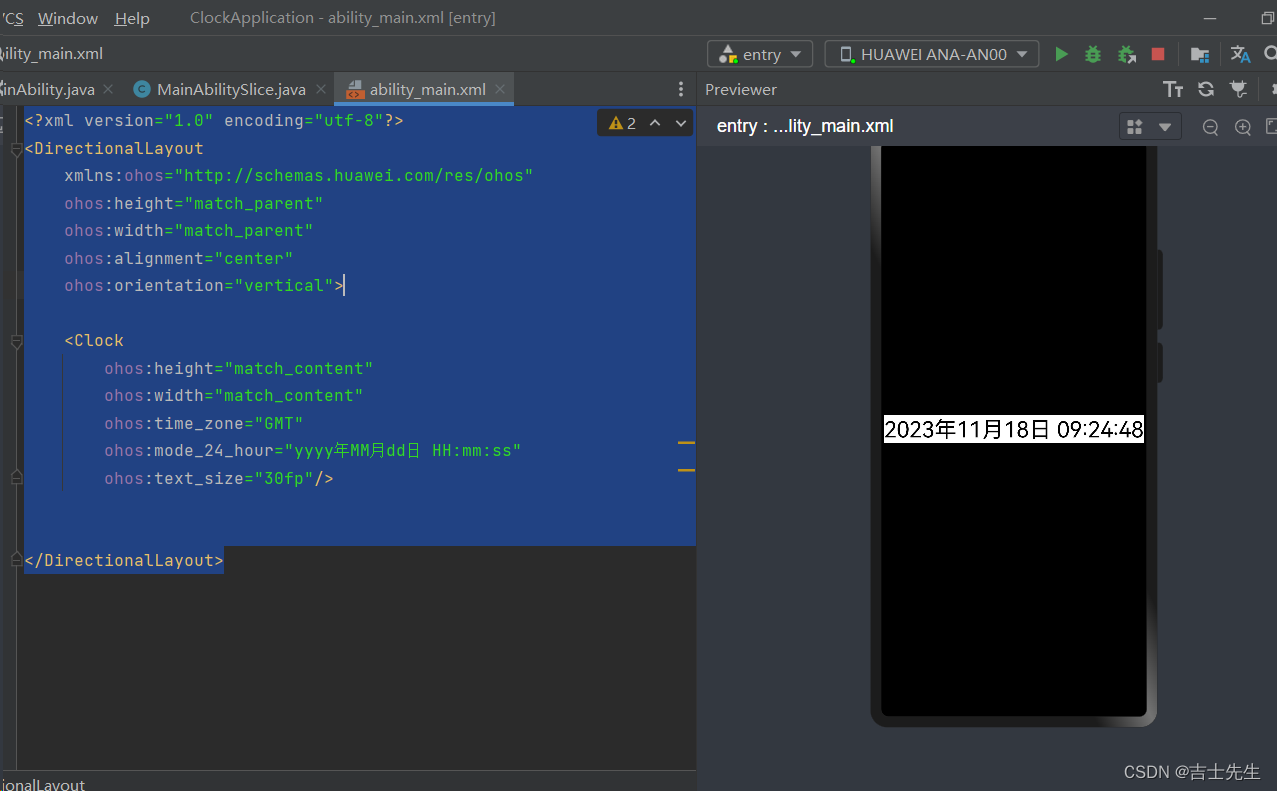
(4.1). 按照24小时的操作
- ohos:mode_24_hour=“yyyy年MM月dd日 HH:mm:ss”
<?xml version="1.0" encoding="utf-8"?>
<DirectionalLayout
    xmlns:ohos="http://schemas.huawei.com/res/ohos"
    ohos:height="match_parent"
    ohos:width="match_parent"
    ohos:alignment="center"
    ohos:orientation="vertical">

    <Clock
        ohos:height="match_content"
        ohos:width="match_content"
        ohos:time_zone="GMT"
        ohos:mode_24_hour="yyyy年MM月dd日 HH:mm:ss"
        ohos:text_size="30fp"/>


</DirectionalLayout>
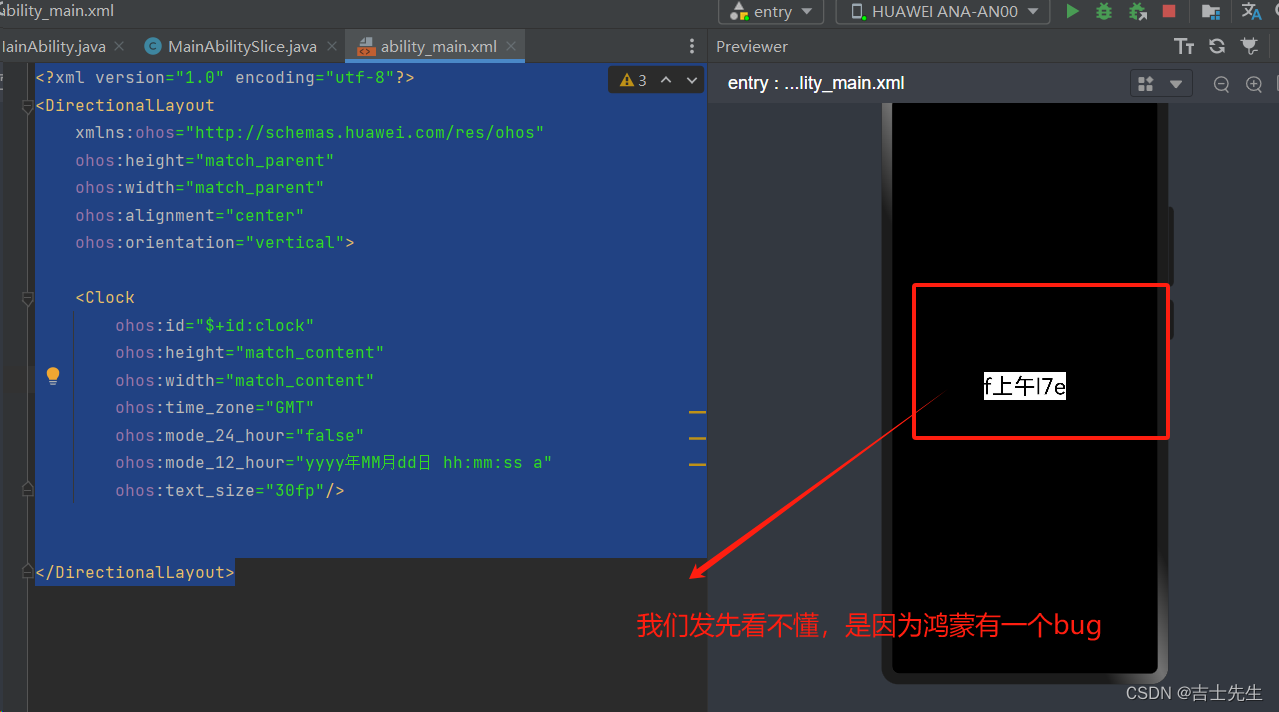
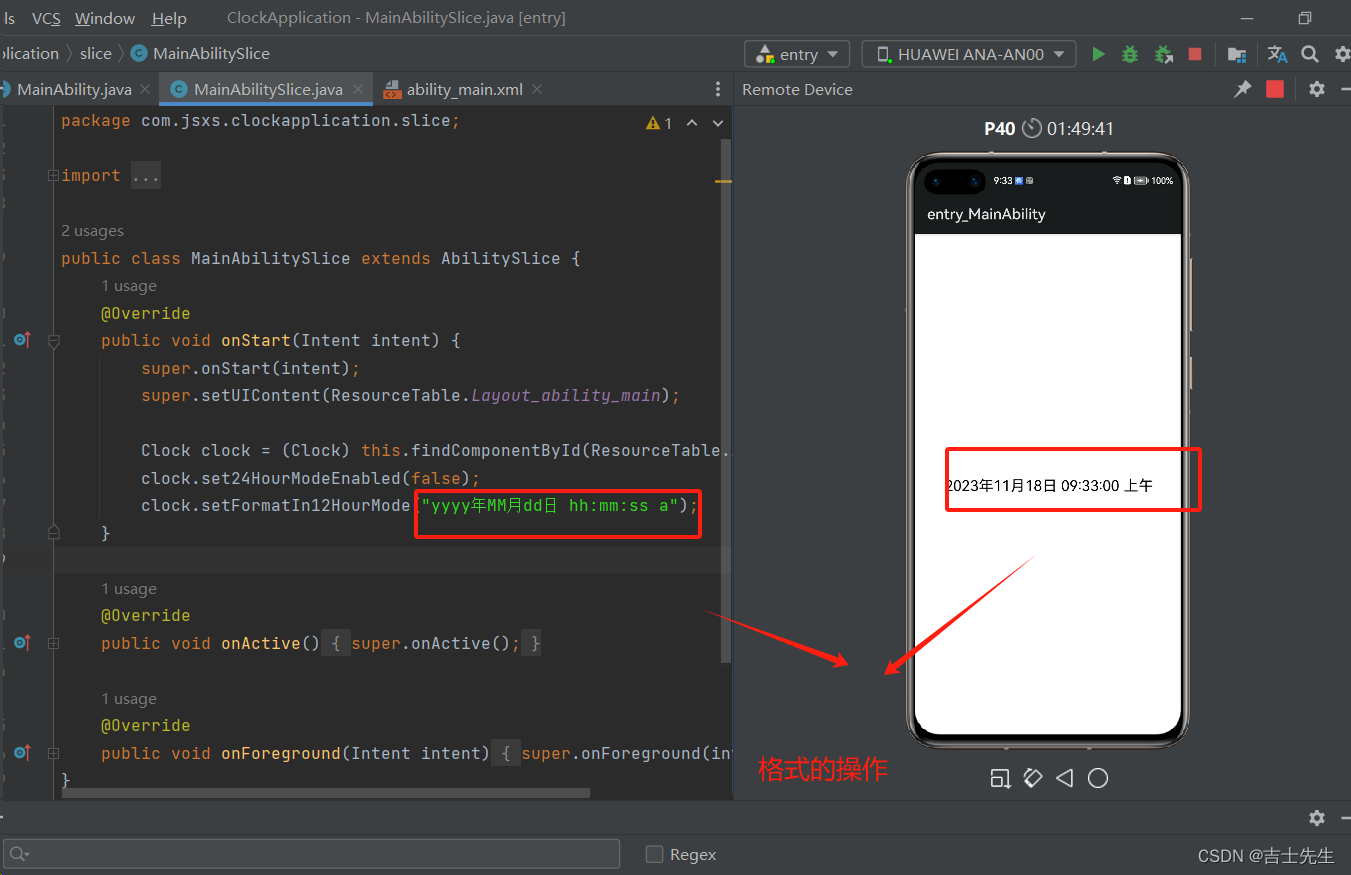
(4.2). 按照12小时的 (视图存在bug)
- 我们需要将
ohos:mode_24_hour="false"因为默认就是24 - ohos:mode_12_hour=“yyyy年MM月dd日 hh:mm:ss a”
<?xml version="1.0" encoding="utf-8"?>
<DirectionalLayout
    xmlns:ohos="http://schemas.huawei.com/res/ohos"
    ohos:height="match_parent"
    ohos:width="match_parent"
    ohos:alignment="center"
    ohos:orientation="vertical">

    <Clock
        ohos:id="$+id:clock"
        ohos:height="match_content"
        ohos:width="match_content"
        ohos:time_zone="GMT"
        ohos:mode_24_hour="false"
        ohos:mode_12_hour="yyyy年MM月dd日 hh:mm:ss a"
        ohos:text_size="30fp"/>


</DirectionalLayout>
(4.3).按照12小时的 (代码可以解决bug)
<?xml version="1.0" encoding="utf-8"?>
<DirectionalLayout
    xmlns:ohos="http://schemas.huawei.com/res/ohos"
    ohos:height="match_parent"
    ohos:width="match_parent"
    ohos:alignment="center"
    ohos:orientation="vertical">

    <Clock
        ohos:id="$+id:clock"
        ohos:height="match_content"
        ohos:width="match_content"
        ohos:time_zone="GMT"
        ohos:text_size="20fp"/>


</DirectionalLayout>
package com.jsxs.clockapplication.slice;

import com.jsxs.clockapplication.ResourceTable;
import ohos.aafwk.ability.AbilitySlice;
import ohos.aafwk.content.Intent;
import ohos.agp.components.Clock;
import ohos.agp.components.Component;

public class MainAbilitySlice extends AbilitySlice {
    @Override
    public void onStart(Intent intent) {
        super.onStart(intent);
        super.setUIContent(ResourceTable.Layout_ability_main);

        Clock clock = (Clock) this.findComponentById(ResourceTable.Id_clock);
        clock.set24HourModeEnabled(false);
        clock.setFormatIn12HourMode("yyyy年MM月dd日 hh:mm:ss a");
    }

    @Override
    public void onActive() {
        super.onActive();
    }

    @Override
    public void onForeground(Intent intent) {
        super.onForeground(intent);
    }
}
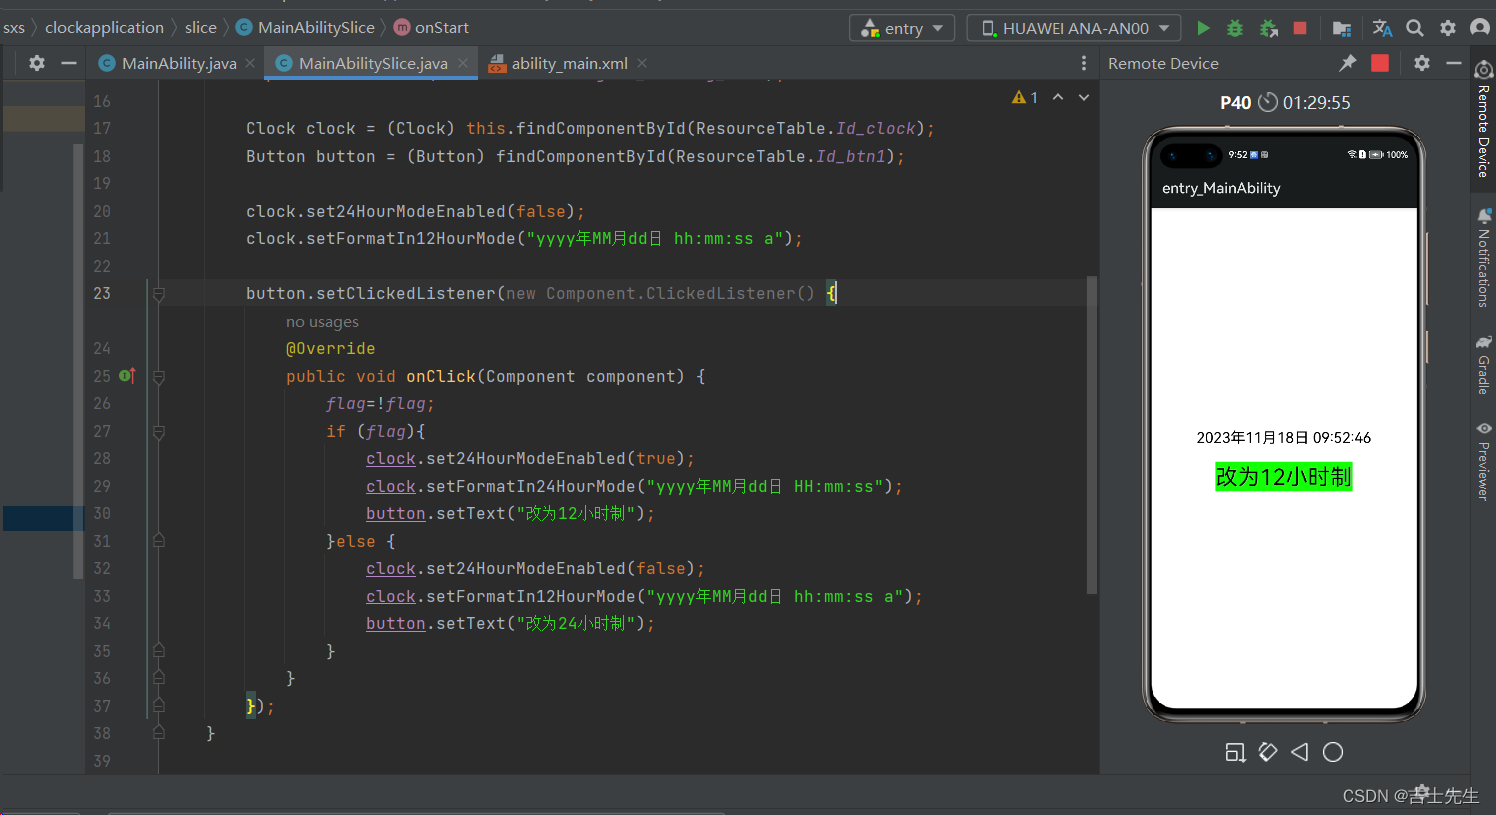
(4.4).综合练习
点击按钮来回更改12小时和24小时的制度
<?xml version="1.0" encoding="utf-8"?>
<DirectionalLayout
    xmlns:ohos="http://schemas.huawei.com/res/ohos"
    ohos:height="match_parent"
    ohos:width="match_parent"
    ohos:alignment="center"
    ohos:orientation="vertical">

    <Clock
        ohos:id="$+id:clock"
        ohos:height="match_content"
        ohos:width="match_content"
        ohos:time_zone="GMT"
        ohos:text_size="20fp"/>

    <Button
        ohos:id="$+id:btn1"
        ohos:height="match_content"
        ohos:width="match_content"
        ohos:text_size="30fp"
        ohos:background_element="green"
        ohos:text="改为24小时制"
        ohos:top_margin="20vp"
        />


</DirectionalLayout>
package com.jsxs.clockapplication.slice;

import com.jsxs.clockapplication.ResourceTable;
import ohos.aafwk.ability.AbilitySlice;
import ohos.aafwk.content.Intent;
import ohos.agp.components.Button;
import ohos.agp.components.Clock;
import ohos.agp.components.Component;

public class MainAbilitySlice extends AbilitySlice {
    static boolean flag =false;
    @Override
    public void onStart(Intent intent) {
        super.onStart(intent);
        super.setUIContent(ResourceTable.Layout_ability_main);

        Clock clock = (Clock) this.findComponentById(ResourceTable.Id_clock);
        Button button = (Button) findComponentById(ResourceTable.Id_btn1);

        clock.set24HourModeEnabled(false);
        clock.setFormatIn12HourMode("yyyy年MM月dd日 hh:mm:ss a");

        button.setClickedListener(new Component.ClickedListener() {
            @Override
            public void onClick(Component component) {
                flag=!flag;
                if (flag){
                    clock.set24HourModeEnabled(true);
                    clock.setFormatIn24HourMode("yyyy年MM月dd日 HH:mm:ss");
                    button.setText("改为12小时制");
                }else {
                    clock.set24HourModeEnabled(false);
                    clock.setFormatIn12HourMode("yyyy年MM月dd日 hh:mm:ss a");
                    button.setText("改为24小时制");
                }
            }
        });
    }

    @Override
    public void onActive() {
        super.onActive();
    }

    @Override
    public void onForeground(Intent intent) {
        super.onForeground(intent);
    }
}
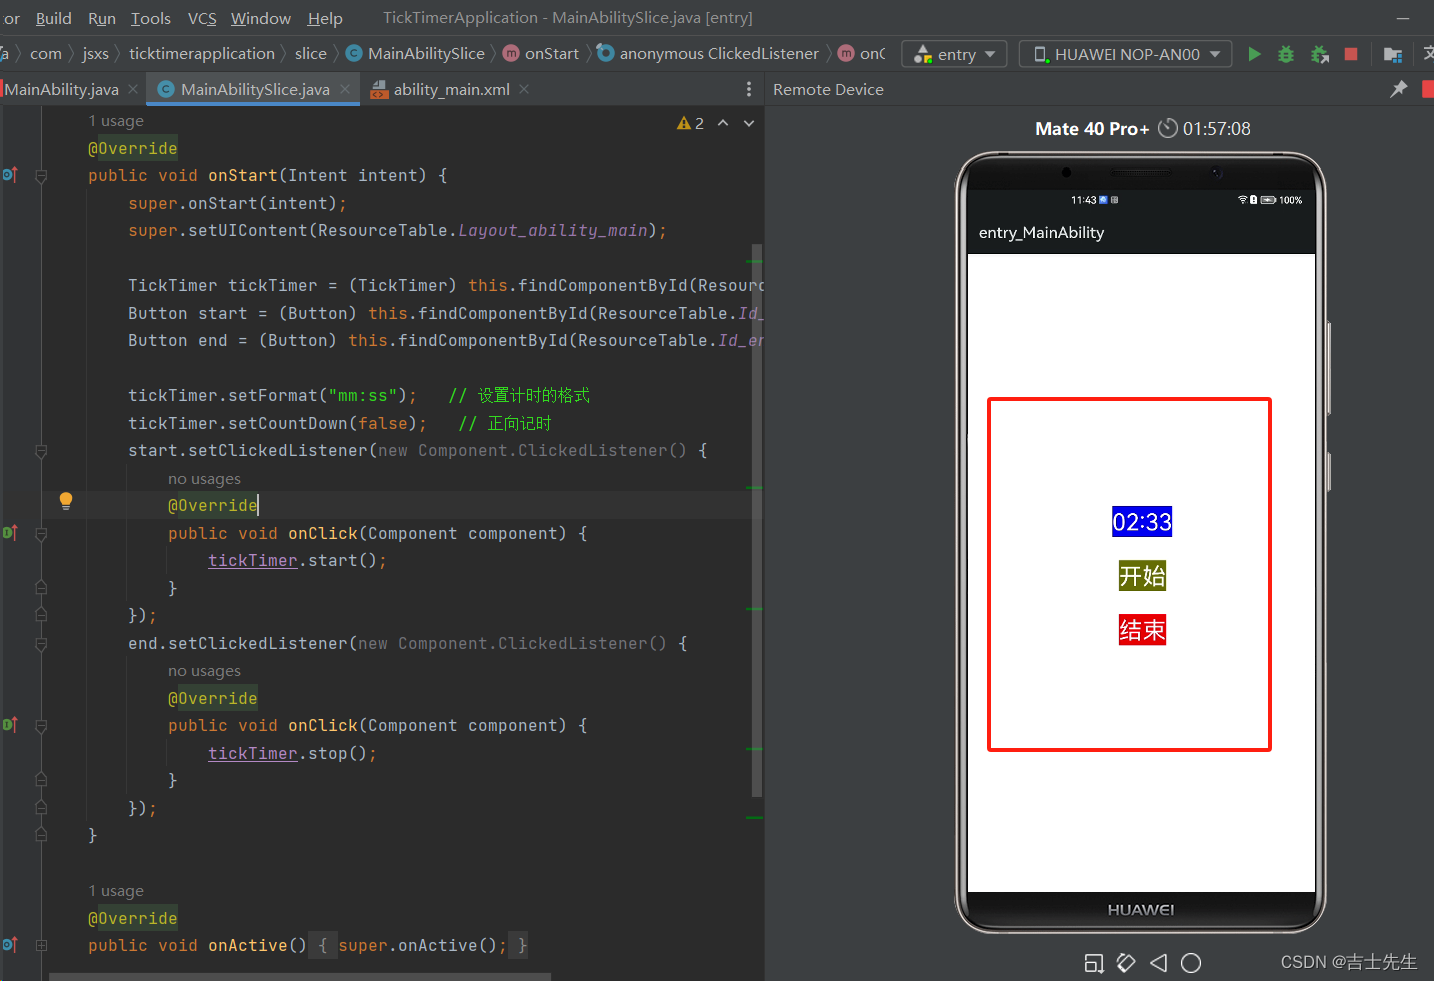
(5).TickTimer组件 (定时器)
是Text的子类,所以可以使用Text的一些属性。
该组件目前有一些bug。这些bug黑马程序员已经反馈至鸿蒙官方,后续版本中会修复这些bug。
(4.1).计时功能 (仍然存在bug)
当我们未点击开始和结束的时候也会进行计时
1.视图的操作
<?xml version="1.0" encoding="utf-8"?>
<DirectionalLayout
    xmlns:ohos="http://schemas.huawei.com/res/ohos"
    ohos:height="match_parent"
    ohos:width="match_parent"
    ohos:alignment="center"
    ohos:orientation="vertical">

    <TickTimer
        ohos:id="$+id:ticktimer"
        ohos:height="match_content"
        ohos:width="match_content"
        ohos:background_element="#0000FF"
        ohos:layout_alignment="center"
        ohos:text_alignment="center"
        ohos:text_color="#FFFFFF"
        ohos:text_size="30fp"
        />
    <Button
        ohos:id="$+id:start"
        ohos:height="match_content"
        ohos:width="match_content"
        ohos:text="开始"
        ohos:text_size="30fp"
        ohos:text_color="#FFFFFF"
        ohos:background_element="#666600"
        ohos:text_alignment="center"
        ohos:layout_alignment="center"
        ohos:top_margin="30vp"
        />

    <Button
        ohos:id="$+id:end"
        ohos:height="match_content"
        ohos:width="match_content"
        ohos:text="结束"
        ohos:text_size="30fp"
        ohos:text_color="#FFFFFF"
        ohos:background_element="#FF0000"
        ohos:text_alignment="center"
        ohos:layout_alignment="center"
        ohos:top_margin="30vp"
        />


</DirectionalLayout>
2.后端逻辑代码
package com.jsxs.ticktimerapplication.slice;

import com.jsxs.ticktimerapplication.ResourceTable;
import ohos.aafwk.ability.AbilitySlice;
import ohos.aafwk.content.Intent;
import ohos.agp.components.Button;
import ohos.agp.components.Component;
import ohos.agp.components.TickTimer;

public class MainAbilitySlice extends AbilitySlice {
    @Override
    public void onStart(Intent intent) {
        super.onStart(intent);
        super.setUIContent(ResourceTable.Layout_ability_main);

        TickTimer tickTimer = (TickTimer) this.findComponentById(ResourceTable.Id_ticktimer);
        Button start = (Button) this.findComponentById(ResourceTable.Id_start);
        Button end = (Button) this.findComponentById(ResourceTable.Id_end);

        tickTimer.setFormat("mm:ss");   // 设置计时的格式
        tickTimer.setCountDown(false);   // 正向记时
        start.setClickedListener(new Component.ClickedListener() {
            @Override
            public void onClick(Component component) {
                tickTimer.start();
            }
        });
        end.setClickedListener(new Component.ClickedListener() {
            @Override
            public void onClick(Component component) {
                tickTimer.stop();
            }
        });
    }

    @Override
    public void onActive() {
        super.onActive();
    }

    @Override
    public void onForeground(Intent intent) {
        super.onForeground(intent);
    }
}
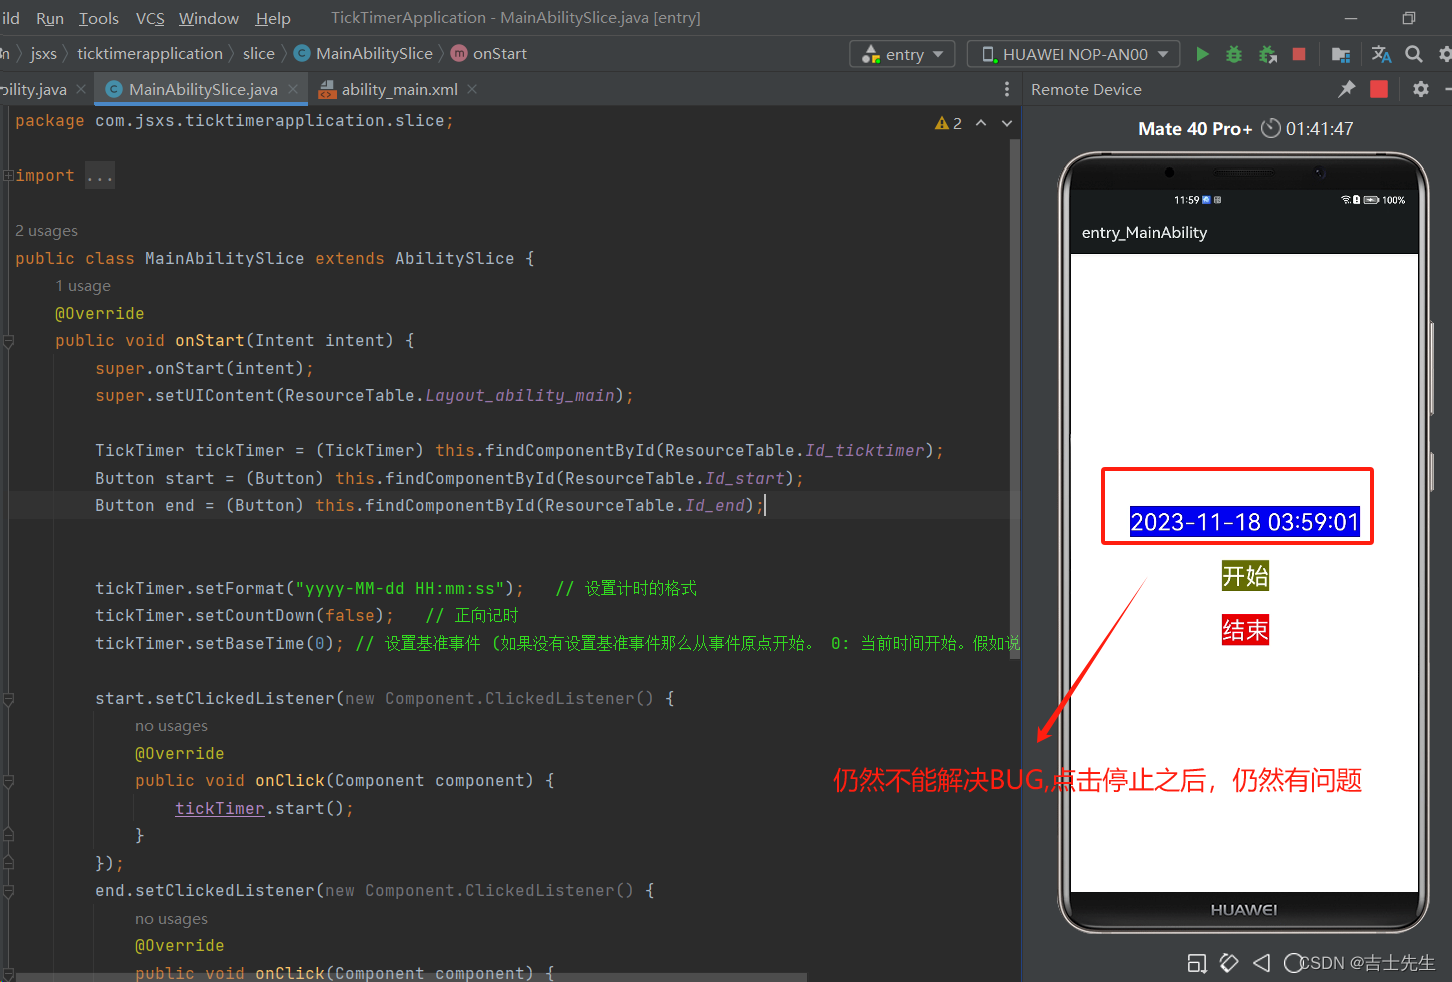
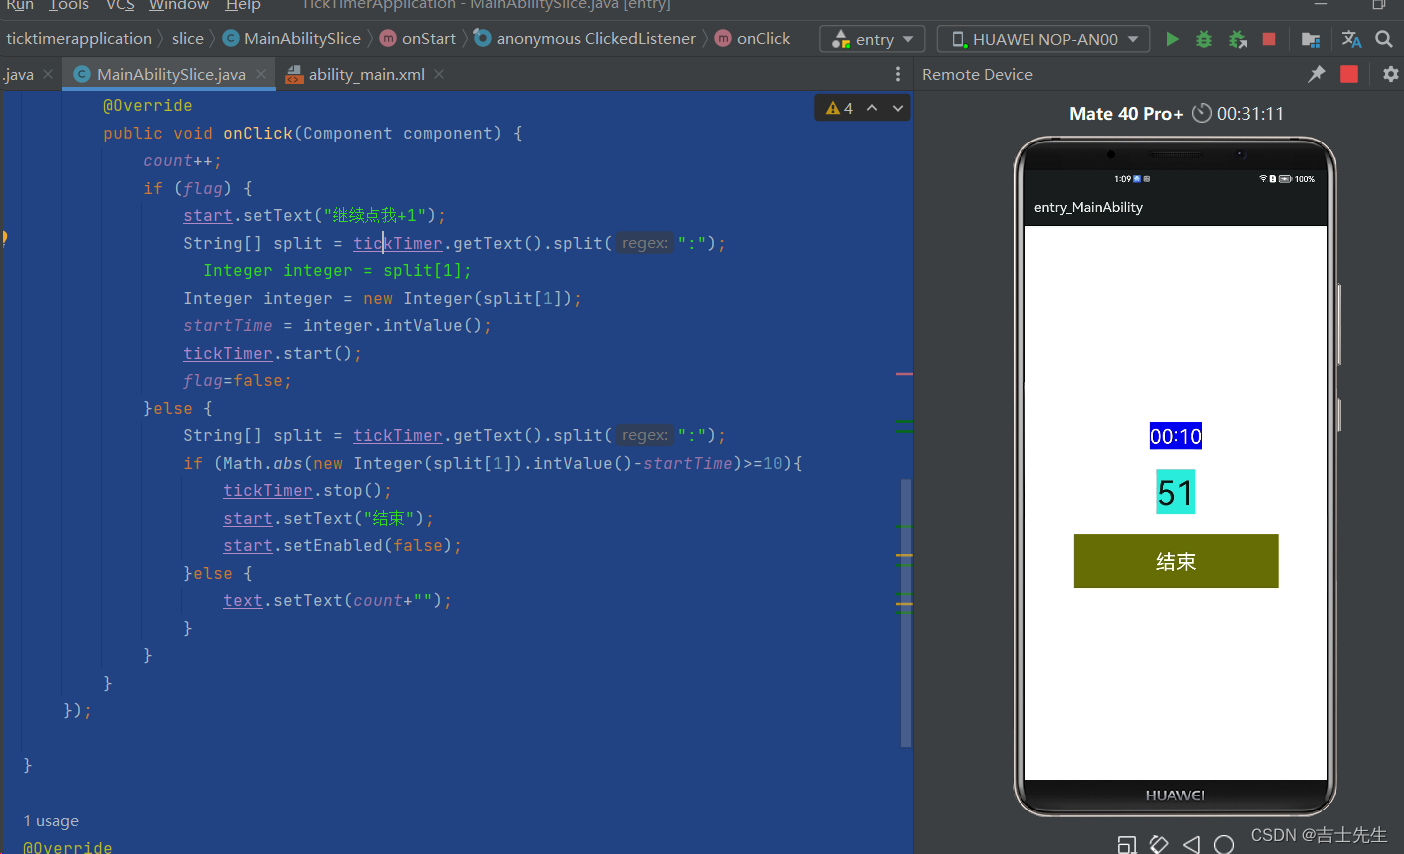
(5.2)计时功能 (解决BUG)
package com.jsxs.ticktimerapplication.slice;

import com.jsxs.ticktimerapplication.ResourceTable;
import ohos.aafwk.ability.AbilitySlice;
import ohos.aafwk.content.Intent;
import ohos.agp.components.Button;
import ohos.agp.components.Component;
import ohos.agp.components.TickTimer;

public class MainAbilitySlice extends AbilitySlice {
    @Override
    public void onStart(Intent intent) {
        super.onStart(intent);
        super.setUIContent(ResourceTable.Layout_ability_main);

        TickTimer tickTimer = (TickTimer) this.findComponentById(ResourceTable.Id_ticktimer);
        Button start = (Button) this.findComponentById(ResourceTable.Id_start);
        Button end = (Button) this.findComponentById(ResourceTable.Id_end);


        tickTimer.setFormat("yyyy-MM-dd HH:mm:ss");   // 设置计时的格式
        tickTimer.setCountDown(false);   // 正向记时
        tickTimer.setBaseTime(0); // 设置基准事件 (如果没有设置基准事件那么从事件原点开始。 0: 当前时间开始。假如说 大于0那么就会往后计时)✅✅✅✅✅

        start.setClickedListener(new Component.ClickedListener() {
            @Override
            public void onClick(Component component) {
                tickTimer.start();
            }
        });
        end.setClickedListener(new Component.ClickedListener() {
            @Override
            public void onClick(Component component) {
                tickTimer.stop();
            }
        });
    }

    @Override
    public void onActive() {
        super.onActive();
    }

    @Override
    public void onForeground(Intent intent) {
        super.onForeground(intent);
    }
}
(5.3).综合练习
<?xml version="1.0" encoding="utf-8"?>
<DirectionalLayout
    xmlns:ohos="http://schemas.huawei.com/res/ohos"
    ohos:height="match_parent"
    ohos:width="match_parent"
    ohos:alignment="center"
    ohos:orientation="vertical">

    <TickTimer
        ohos:id="$+id:ticktimer"
        ohos:height="match_content"
        ohos:width="match_content"
        ohos:background_element="#0000FF"
        ohos:layout_alignment="center"
        ohos:text_alignment="center"
        ohos:text_color="#FFFFFF"
        ohos:text_size="30fp"
        />

    <Text
        ohos:id="$+id:count"
        ohos:height="match_content"
        ohos:width="match_content"
        ohos:background_element="#FF1AD8DD"
        ohos:text="0"
        ohos:top_margin="30vp"
        ohos:text_size="50fp"
        />

    <Button
        ohos:id="$+id:start"
        ohos:width="300vp"
        ohos:height="80vp"
        ohos:background_element="#666600"
        ohos:layout_alignment="center"
        ohos:text="开始"
        ohos:text_alignment="center"
        ohos:text_color="#FFFFFF"
        ohos:text_size="30fp"
        ohos:top_margin="30vp"
        />


</DirectionalLayout>
2.后台逻辑
我们这里需要设置成元年。也就是不设置基准时间。
package com.jsxs.ticktimerapplication.slice;

import com.jsxs.ticktimerapplication.ResourceTable;
import ohos.aafwk.ability.AbilitySlice;
import ohos.aafwk.content.Intent;
import ohos.agp.components.Button;
import ohos.agp.components.Component;
import ohos.agp.components.Text;
import ohos.agp.components.TickTimer;

public class MainAbilitySlice extends AbilitySlice {

    static boolean flag = true;
    static int count = 0;
    static int startTime = 0;

    @Override
    public void onStart(Intent intent) {
        super.onStart(intent);
        super.setUIContent(ResourceTable.Layout_ability_main);

        TickTimer tickTimer = (TickTimer) this.findComponentById(ResourceTable.Id_ticktimer);
        Button start = (Button) this.findComponentById(ResourceTable.Id_start);
        Text text = (Text) findComponentById(ResourceTable.Id_count);


        tickTimer.setFormat("mm:ss");   // 设置计时的格式
        tickTimer.setCountDown(false);   // 正向记时


        start.setClickedListener(new Component.ClickedListener() {
            @Override
            public void onClick(Component component) {
                count++;
                if (flag) {
                    start.setText("继续点我+1");
                    String[] split = tickTimer.getText().split(":");
//                    Integer integer = split[1];
                    Integer integer = new Integer(split[1]);
                    startTime = integer.intValue();
                    tickTimer.start();
                    flag=false;
                }else {
                    String[] split = tickTimer.getText().split(":");
                    if (Math.abs(new Integer(split[1]).intValue()-startTime)>=10){
                        tickTimer.stop();
                        start.setText("结束");
                        start.setEnabled(false);
                    }else {
                        text.setText(count+"");
                    }
                }
            }
        });

    }

    @Override
    public void onActive() {
        super.onActive();
    }

    @Override
    public void onForeground(Intent intent) {
        super.onForeground(intent);
    }
}
(6).ProgressBar组件 (进度条)
常见app中,下载进度条,完成任务的进度条等都会用到。
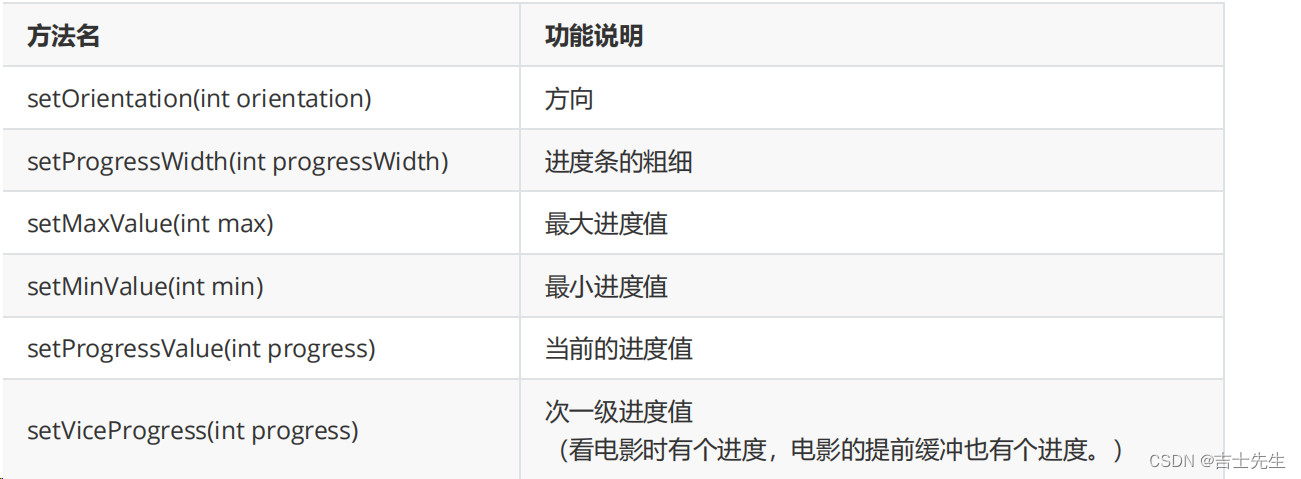
常见属性:
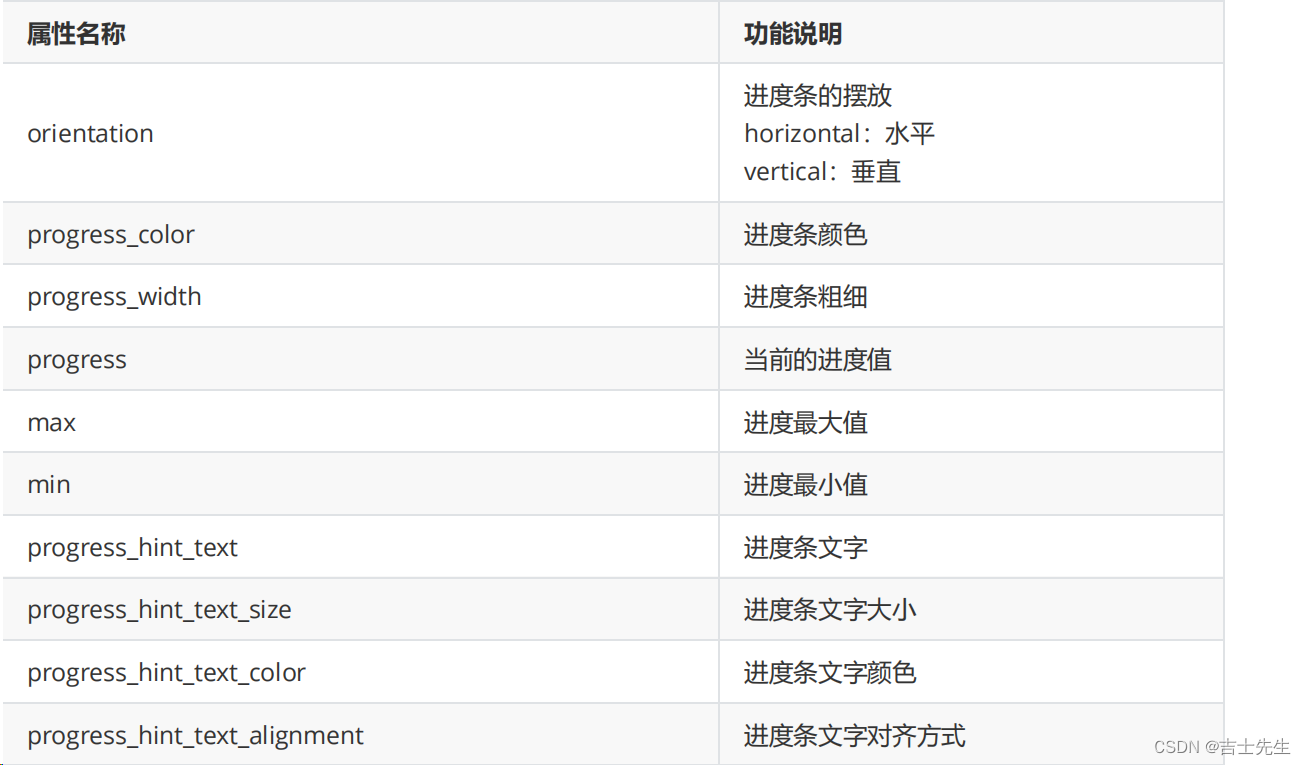
常见方法:
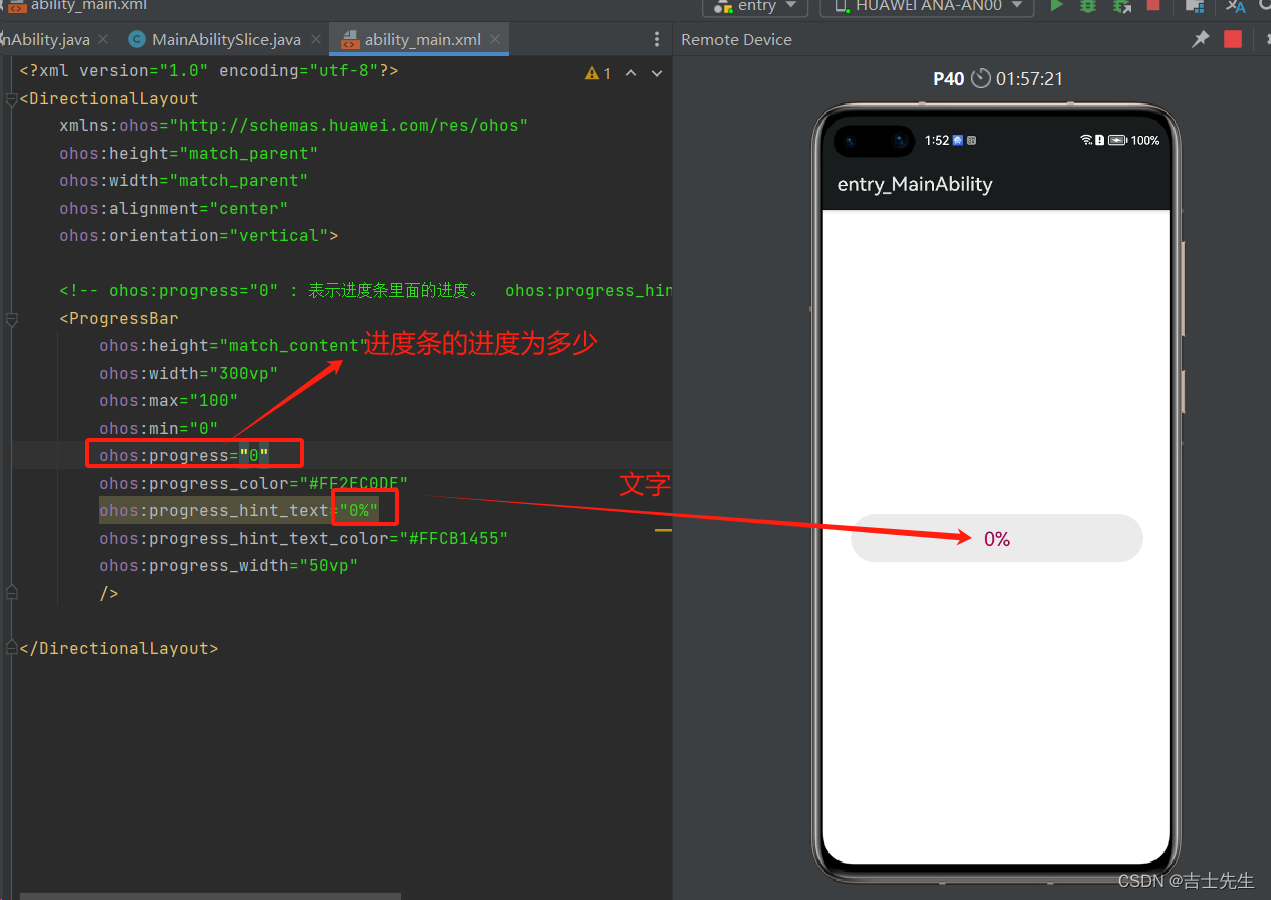
(6.1).基本进度条
<?xml version="1.0" encoding="utf-8"?>
<DirectionalLayout
    xmlns:ohos="http://schemas.huawei.com/res/ohos"
    ohos:height="match_parent"
    ohos:width="match_parent"
    ohos:alignment="center"
    ohos:orientation="vertical">

    <!-- ohos:progress="0" : 表示进度条里面的进度。  ohos:progress_hint_text="0%" 设置进度条上面的提示文字  -->
    <ProgressBar
        ohos:height="match_content"
        ohos:width="300vp"
        ohos:max="100"
        ohos:min="0"
        ohos:progress="0"
        ohos:progress_color="#FF2EC0DE"
        ohos:progress_hint_text="0%"
        ohos:progress_hint_text_color="#FFCB1455"
        ohos:progress_width="50vp"
        />

</DirectionalLayout>
(6.2).点击进度条 (进度条加5%)
<?xml version="1.0" encoding="utf-8"?>
<DirectionalLayout
    xmlns:ohos="http://schemas.huawei.com/res/ohos"
    ohos:height="match_parent"
    ohos:width="match_parent"
    ohos:alignment="center"
    ohos:orientation="vertical">

    <!-- ohos:progress="0" : 表示进度条里面的进度。  ohos:progress_hint_text="0%" 设置进度条上面的提示文字  -->
    <ProgressBar
        ohos:id="$+id:pb"
        ohos:height="match_content"
        ohos:width="300vp"
        ohos:max="100"
        ohos:min="0"
        ohos:progress="0"
        ohos:progress_color="#FF2EC0DE"
        ohos:progress_hint_text="0%"
        ohos:progress_hint_text_color="#FFCB1455"
        ohos:progress_width="50vp"
        />

</DirectionalLayout>
2.后端逻辑代码
package com.jsxs.progressbarapplication.slice;

import com.jsxs.progressbarapplication.ResourceTable;
import ohos.aafwk.ability.AbilitySlice;
import ohos.aafwk.content.Intent;
import ohos.agp.components.Component;
import ohos.agp.components.ProgressBar;

public class MainAbilitySlice extends AbilitySlice {

    static int count=0;
    @Override
    public void onStart(Intent intent) {
        super.onStart(intent);
        super.setUIContent(ResourceTable.Layout_ability_main);

        ProgressBar pb = (ProgressBar)findComponentById(ResourceTable.Id_pb);

        pb.setClickedListener(new Component.ClickedListener() {
            @Override
            public void onClick(Component component) {
                count=pb.getProgress()+5;
                if (count<=100){
                    pb.setProgressHintText(count+"%");
                    pb.setProgressValue(count);
                }else {
                    pb.setProgressHintText(100+"%");
                    pb.setProgressValue(100);
                }

            }
        });
    }

    @Override
    public void onActive() {
        super.onActive();
    }

    @Override
    public void onForeground(Intent intent) {
        super.onForeground(intent);
    }
}
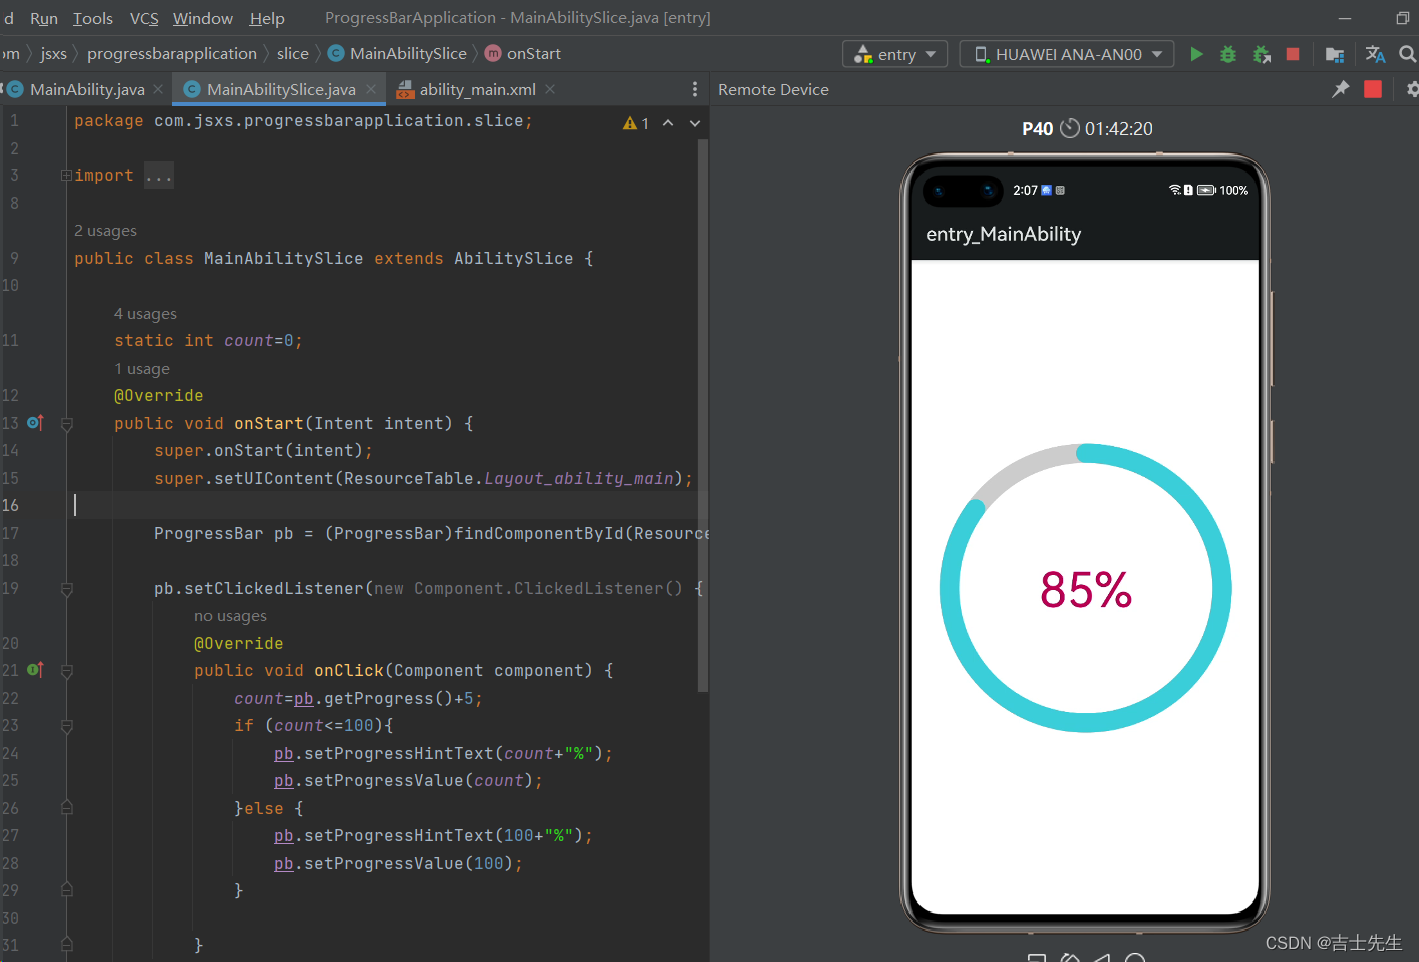
(7).RoundProgressBar组件 (圆形进度条)
是ProgressBar的子类,用法跟ProgressBar一模一样,只是显示的方式不一样。
(7.1).点击进度条 (进度条加5%)
<?xml version="1.0" encoding="utf-8"?>
<DirectionalLayout
    xmlns:ohos="http://schemas.huawei.com/res/ohos"
    ohos:height="match_parent"
    ohos:width="match_parent"
    ohos:alignment="center"
    ohos:orientation="vertical">

    <!-- ohos:progress="0" : 表示进度条里面的进度。  ohos:progress_hint_text="0%" 设置进度条上面的提示文字  -->
    <RoundProgressBar
        ohos:id="$+id:pb"
        ohos:height="300vp"
        ohos:width="300vp"
        ohos:max="100"
        ohos:min="0"
        ohos:progress="80"
        ohos:progress_color="#FF2EC0DE"
        ohos:progress_hint_text="80%"
        ohos:progress_hint_text_color="#FFCB1455"
        ohos:progress_hint_text_size="50vp"
        ohos:progress_width="20vp"
        />

</DirectionalLayout>
package com.jsxs.progressbarapplication.slice;

import com.jsxs.progressbarapplication.ResourceTable;
import ohos.aafwk.ability.AbilitySlice;
import ohos.aafwk.content.Intent;
import ohos.agp.components.Component;
import ohos.agp.components.ProgressBar;

public class MainAbilitySlice extends AbilitySlice {

    static int count=0;
    @Override
    public void onStart(Intent intent) {
        super.onStart(intent);
        super.setUIContent(ResourceTable.Layout_ability_main);

        ProgressBar pb = (ProgressBar)findComponentById(ResourceTable.Id_pb);

        pb.setClickedListener(new Component.ClickedListener() {
            @Override
            public void onClick(Component component) {
                count=pb.getProgress()+5;
                if (count<=100){
                    pb.setProgressHintText(count+"%");
                    pb.setProgressValue(count);
                }else {
                    pb.setProgressHintText(100+"%");
                    pb.setProgressValue(100);
                }

            }
        });
    }

    @Override
    public void onActive() {
        super.onActive();
    }

    @Override
    public void onForeground(Intent intent) {
        super.onForeground(intent);
    }
}
3.交互类组件
(1).CommonDialog _ 普通弹框组件
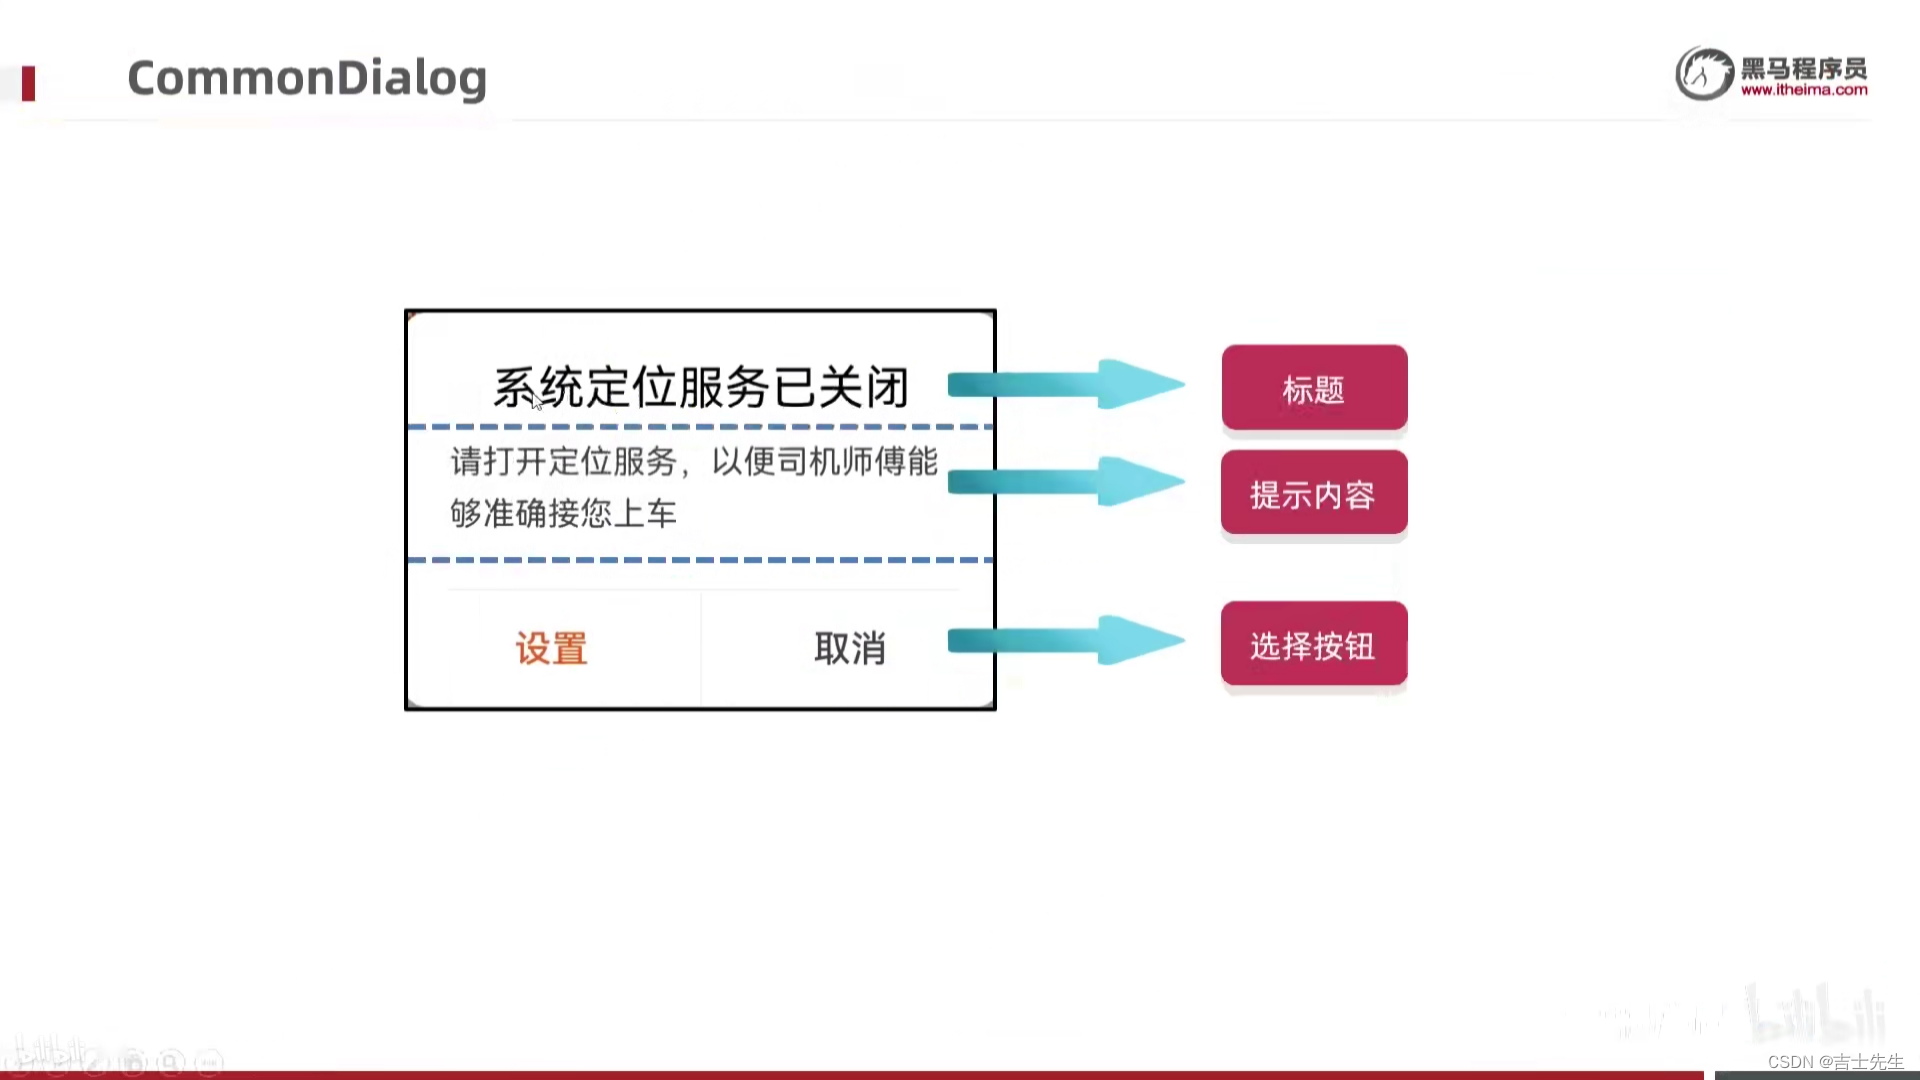
(1.1).普通的弹窗展示
1.前端展示页面
<?xml version="1.0" encoding="utf-8"?>
<DirectionalLayout
    xmlns:ohos="http://schemas.huawei.com/res/ohos"
    ohos:height="match_parent"
    ohos:width="match_parent"
    ohos:alignment="center"
    ohos:orientation="vertical">

    <Button
        ohos:id="$+id:btn1"
        ohos:height="match_content"
        ohos:width="match_content"
        ohos:background_element="red"
        ohos:text="点我"
        ohos:text_size="20fp"
        />

</DirectionalLayout>
2.后端逻辑页面
package com.jsxs.dialogapplication.slice;

import com.jsxs.dialogapplication.ResourceTable;
import ohos.aafwk.ability.AbilitySlice;
import ohos.aafwk.content.Intent;
import ohos.agp.components.Button;
import ohos.agp.components.Component;
import ohos.agp.window.dialog.CommonDialog;
import ohos.agp.window.dialog.IDialog;

public class MainAbilitySlice extends AbilitySlice implements Component.ClickedListener {
    @Override
    public void onStart(Intent intent) {
        super.onStart(intent);
        super.setUIContent(ResourceTable.Layout_ability_main);

        // 1.找到我们的按钮
        Button button = (Button) this.findComponentById(ResourceTable.Id_btn1);

        // 2.给按钮添加我们的点击事件
        button.setClickedListener(this);
    }

    @Override
    public void onActive() {
        super.onActive();
    }

    @Override
    public void onForeground(Intent intent) {
        super.onForeground(intent);
    }

    @Override
    public void onClick(Component component) {

        // 3.讲普通弹框页面弹出来就好了
        CommonDialog commonDialog = new CommonDialog(this); // 这里的参数是展示在哪里?
        // 4.因为弹框里面有默认布局
        // 4.1标题
        commonDialog.setTitleText("系统定位服务已关闭");
        // 4.2内容
        commonDialog.setContentText("请打开定位服务,以便司机师傅能够精确接您上车!");
        // 4.3按钮 参数1: 按钮的索引(0,1,2)。参数2: 按钮上的文字。参数3: 点击按钮之后做什么
        commonDialog.setButton(0, "设置", new IDialog.ClickedListener() {
            @Override
            public void onClick(IDialog iDialog, int i) {
                // 写上点击了设置之后,要做的事情
                // 如果点击之后我不需要做任何事情,在第三个参数传递为null

            }
        });
        commonDialog.setButton(1, "取消", new IDialog.ClickedListener() {
            @Override
            public void onClick(IDialog iDialog, int i) {
                commonDialog.destroy();  //4.4取消的方法
            }
        });
        // 5.鼠标点击灰色区域关闭
        commonDialog.setAutoClosable(true);

        // 5.把弹框显示出来
        commonDialog.show();
    }
}

(1.2).自定义弹框组件 (弹窗中内嵌一个xml视图)
==切记在内嵌组件的时候两个布局都要为:
ohos:height="match_content"
ohos:width="match_content"
1.ability_main.xml
<?xml version="1.0" encoding="utf-8"?>
<DirectionalLayout
    xmlns:ohos="http://schemas.huawei.com/res/ohos"
    ohos:height="match_content"
    ohos:width="match_content"
    ohos:alignment="center"
    ohos:orientation="vertical">

    <Button
        ohos:id="$+id:btn1"
        ohos:height="match_content"
        ohos:width="match_content"
        ohos:background_element="red"
        ohos:text="点我"
        ohos:text_size="40fp"
        />

</DirectionalLayout>
2.messagedialog.xml
<?xml version="1.0" encoding="utf-8"?>
<DirectionalLayout
    xmlns:ohos="http://schemas.huawei.com/res/ohos"
    ohos:height="match_content"
    ohos:width="match_content"
    ohos:orientation="vertical">

    <Text
        ohos:id="$+id:message"
        ohos:height="match_content"
        ohos:width="match_content"
        ohos:text_size="40fp"
        />

    <Button
        ohos:id="$+id:submit"
        ohos:height="match_content"
        ohos:width="match_content"
        ohos:background_element="#21a896"
        ohos:text="确定"
        ohos:text_size="40fp"
        />

    <Button
        ohos:id="$+id:cancel"
        ohos:height="match_content"
        ohos:width="match_content"
        ohos:background_element="#21a896"
        ohos:top_margin="10vp"
        ohos:text="取消"
        ohos:text_size="40fp"
        />

</DirectionalLayout>
3.后端逻辑
package com.jsxs.dialogapplication.slice;

import com.jsxs.dialogapplication.ResourceTable;
import ohos.aafwk.ability.AbilitySlice;
import ohos.aafwk.content.Intent;
import ohos.agp.components.*;
import ohos.agp.window.dialog.CommonDialog;
import ohos.agp.window.dialog.IDialog;

public class MainAbilitySlice extends AbilitySlice implements Component.ClickedListener {
    @Override
    public void onStart(Intent intent) {
        super.onStart(intent);
        super.setUIContent(ResourceTable.Layout_ability_main);

        // 1.找到我们的按钮
        Button button = (Button) this.findComponentById(ResourceTable.Id_btn1);

        // 2.给按钮添加我们的点击事件
        button.setClickedListener(this);
    }

    @Override
    public void onActive() {
        super.onActive();
    }

    @Override
    public void onForeground(Intent intent) {
        super.onForeground(intent);
    }

    @Override
    public void onClick(Component component) {

        // 3.讲普通弹框页面弹出来就好了
        CommonDialog commonDialog = new CommonDialog(this); // 这里的参数是展示在哪里?
        // 大小是默认包裹内容的
        //弹框默认是居中放置
        //弹框默认是透明的
        //弹框默认是直角,可以把直角设置为圆角
        commonDialog.setCornerRadius(15);

        // 把messagedislog的xml文件加载到内存单中。交给弹框并展示出来

        //加载xml文件并获得一个布局对象
        // 参数1: 要加载的xml文件。 参数2: 该xml文件是否跟其他的ml文件有关,如果无关就是独立的,就写null就可以了。 参数3: 如果文件是独立的,那么直接写false
        DirectionalLayout dl = (DirectionalLayout)LayoutScatter.getInstance(this).parse(ResourceTable.Layout_messagedialog, null, false);
        // 4.要给布局里面的文本进行设置事件或者修改内容
        Text title = (Text) dl.findComponentById(ResourceTable.Id_message);
        title.setText("请选择下面的按钮并点击");
        Button submit_but = (Button) dl.findComponentById(ResourceTable.Id_submit);
        Button cancel_but = (Button) dl.findComponentById(ResourceTable.Id_cancel);

        // 5.给按钮添加单机事件
        submit_but.setClickedListener(new Component.ClickedListener() {
            @Override
            public void onClick(Component component) {
                title.setText("点击了确定按钮");
            }
        });

        cancel_but.setClickedListener(new Component.ClickedListener() {
            @Override
            public void onClick(Component component) {
                // 当我们点击了取消的按钮的时候,我们把弹框给销毁
               commonDialog.destroy();
            }
        });

        //6.此时布局对象跟弹框还没有任何关系: 产生关系⭐⭐
        commonDialog.setContentCustomComponent(dl);
        // 弹窗展示出来
        commonDialog.show();

    }
}
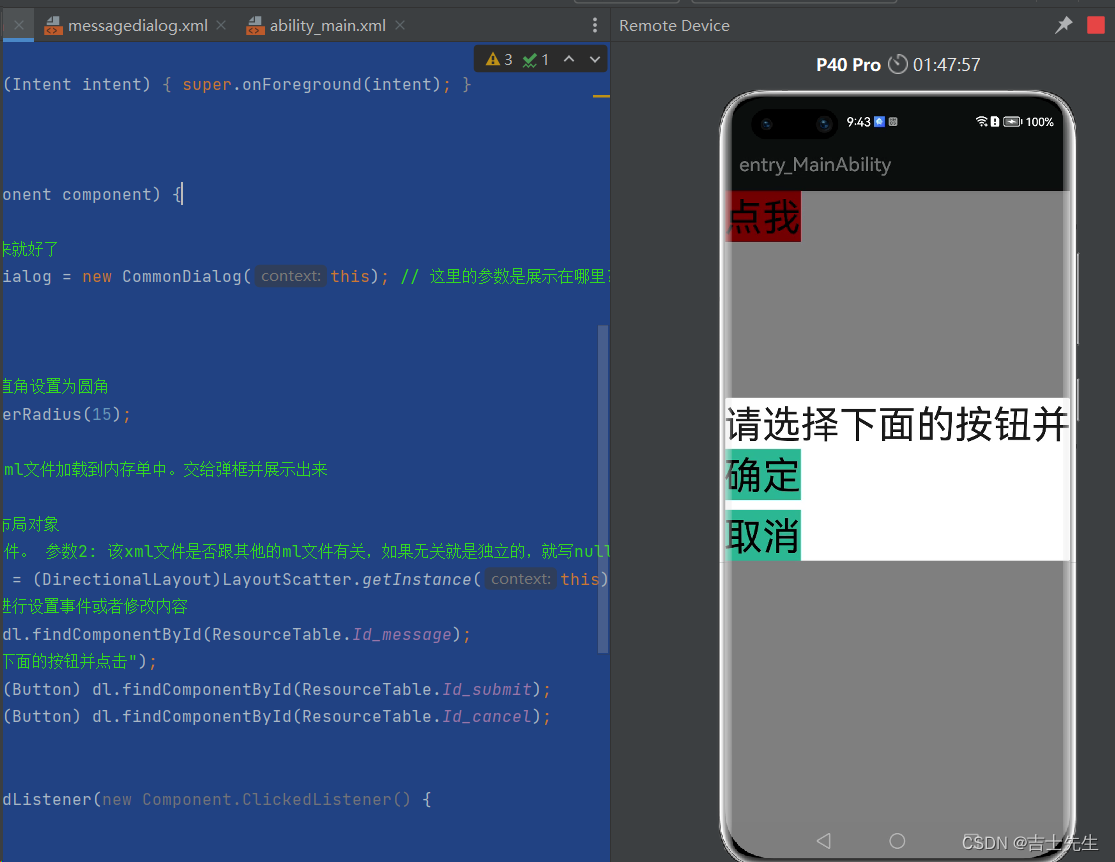
(1.3).抽取公共弹窗组件
1.抽取的工具类
package com.jsxs.dialogapplication.dialogytils;

import com.jsxs.dialogapplication.ResourceTable;
import ohos.agp.components.*;
import ohos.agp.window.dialog.CommonDialog;
import ohos.app.Context;

public class dialog {
    public static void show(Context context){  // ⭐ 这里我们负责接受我们的展示到哪个组件中
        // 3.讲普通弹框页面弹出来就好了
        CommonDialog commonDialog = new CommonDialog(context); // 这里的参数是展示在哪里?
        // 大小是默认包裹内容的
        //弹框默认是居中放置
        //弹框默认是透明的
        //弹框默认是直角,可以把直角设置为圆角
        commonDialog.setCornerRadius(15);

        // 把messagedislog的xml文件加载到内存单中。交给弹框并展示出来

        //加载xml文件并获得一个布局对象
        // 参数1: 要加载的xml文件。 参数2: 该xml文件是否跟其他的ml文件有关,如果无关就是独立的,就写null就可以了。 参数3: 如果文件是独立的,那么直接写false
        DirectionalLayout dl = (DirectionalLayout) LayoutScatter.getInstance(context).parse(ResourceTable.Layout_messagedialog, null, false);
        // 4.要给布局里面的文本进行设置事件或者修改内容
        Text title = (Text) dl.findComponentById(ResourceTable.Id_message);
        title.setText("请选择下面的按钮并点击");
        Button submit_but = (Button) dl.findComponentById(ResourceTable.Id_submit);
        Button cancel_but = (Button) dl.findComponentById(ResourceTable.Id_cancel);

        // 5.给按钮添加单机事件
        submit_but.setClickedListener(new Component.ClickedListener() {
            @Override
            public void onClick(Component component) {
                title.setText("点击了确定按钮");
            }
        });

        cancel_but.setClickedListener(new Component.ClickedListener() {
            @Override
            public void onClick(Component component) {
                // 当我们点击了取消的按钮的时候,我们把弹框给销毁
                commonDialog.destroy();
            }
        });

        //6.此时布局对象跟弹框还没有任何关系
        commonDialog.setContentCustomComponent(dl);
        // 弹窗展示出来
        commonDialog.show();

    }
}
2.主要代码块
package com.jsxs.dialogapplication.slice;

import com.jsxs.dialogapplication.ResourceTable;
import com.jsxs.dialogapplication.dialogytils.dialog;
import ohos.aafwk.ability.AbilitySlice;
import ohos.aafwk.content.Intent;
import ohos.agp.components.*;
import ohos.agp.window.dialog.CommonDialog;
import ohos.agp.window.dialog.IDialog;

public class MainAbilitySlice extends AbilitySlice implements Component.ClickedListener {
    @Override
    public void onStart(Intent intent) {
        super.onStart(intent);
        super.setUIContent(ResourceTable.Layout_ability_main);

        // 1.找到我们的按钮
        Button button = (Button) this.findComponentById(ResourceTable.Id_btn1);

        // 2.给按钮添加我们的点击事件
        button.setClickedListener(this);
    }

    @Override
    public void onActive() {
        super.onActive();
    }

    @Override
    public void onForeground(Intent intent) {
        super.onForeground(intent);
    }

    @Override
    public void onClick(Component component) {
        dialog.show(this);  // 3.⭐⭐ 我们只需要调用工具类即可
    }
}
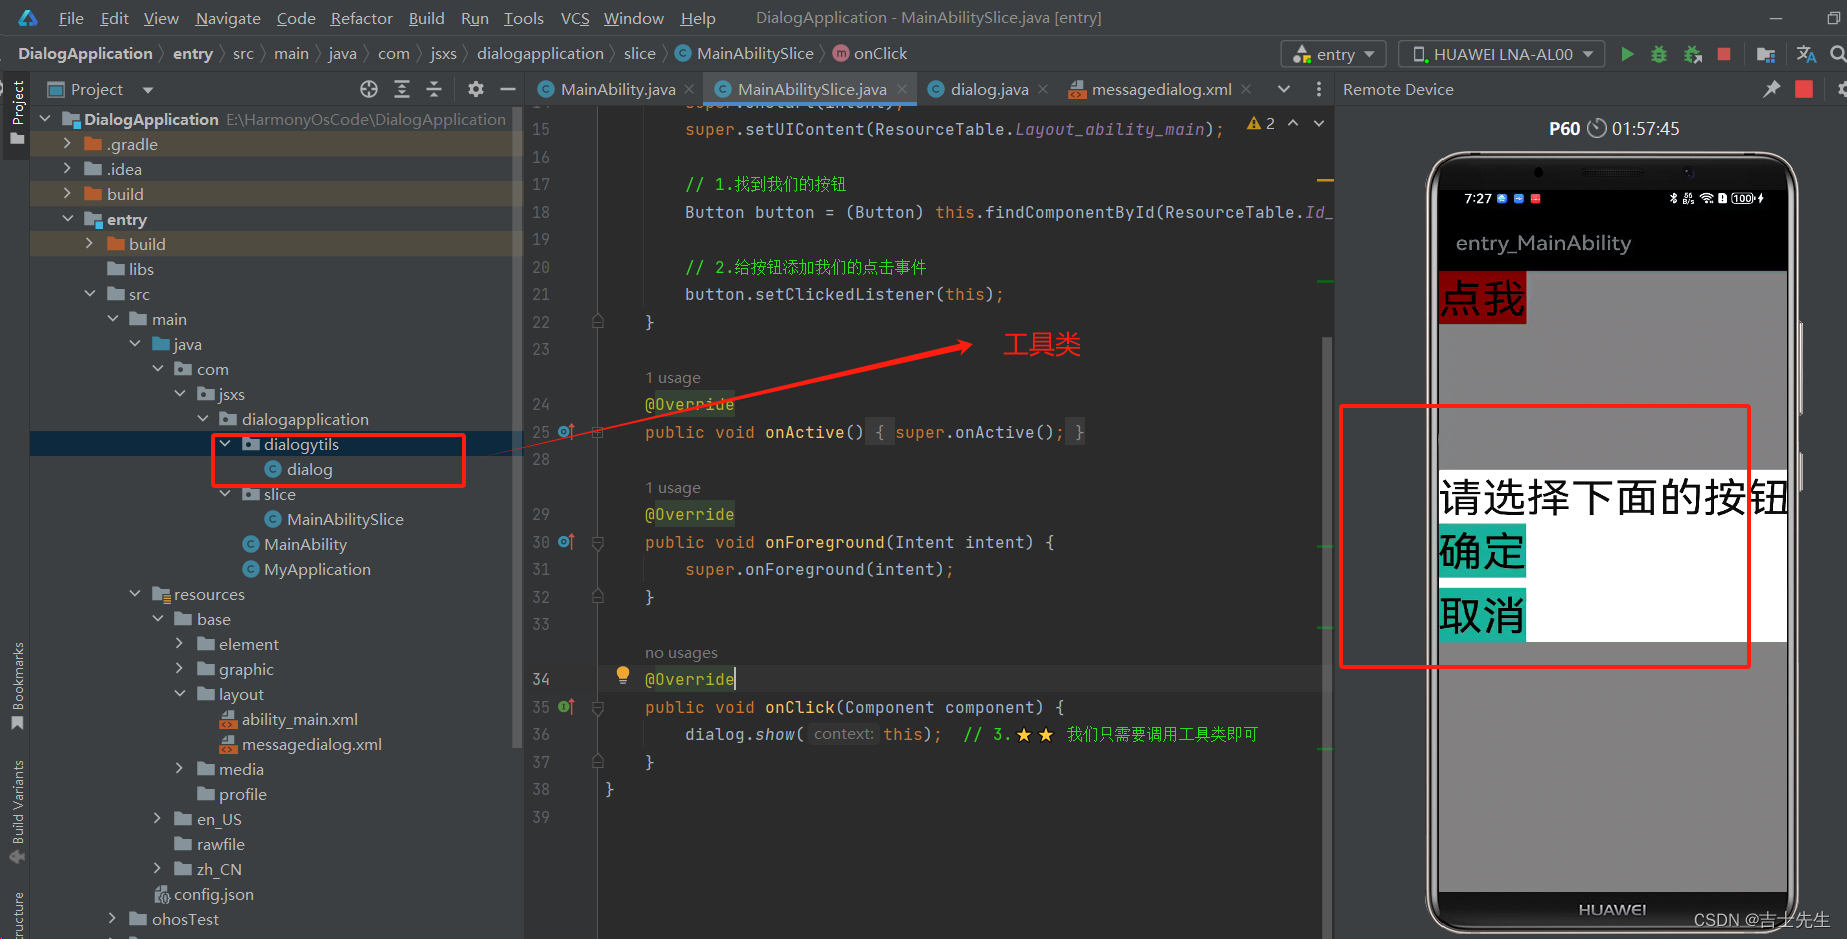
(2).ToastDialog_吐司弹窗
(2.1).土司弹窗介绍
<?xml version="1.0" encoding="utf-8"?>
<DirectionalLayout
    xmlns:ohos="http://schemas.huawei.com/res/ohos"
    ohos:height="match_content"
    ohos:width="match_content"
    ohos:alignment="center"
    ohos:orientation="vertical">

    <Button
        ohos:id="$+id:btn1"
        ohos:height="match_content"
        ohos:width="match_content"
        ohos:background_element="red"
        ohos:text="点我展示土司弹窗"
        ohos:text_size="40fp"
        />

</DirectionalLayout>
package com.jsxs.dialogapplication.slice;

import com.jsxs.dialogapplication.ResourceTable;
import ohos.aafwk.ability.AbilitySlice;
import ohos.aafwk.content.Intent;
import ohos.agp.components.*;
import ohos.agp.utils.LayoutAlignment;
import ohos.agp.window.dialog.CommonDialog;
import ohos.agp.window.dialog.IDialog;
import ohos.agp.window.dialog.ToastDialog;

public class MainAbilitySlice extends AbilitySlice implements Component.ClickedListener {
    @Override
    public void onStart(Intent intent) {
        super.onStart(intent);
        super.setUIContent(ResourceTable.Layout_ability_main);

        // 1.找到我们的按钮
        Button button = (Button) this.findComponentById(ResourceTable.Id_btn1);

        // 2.给按钮添加我们的点击事件
        button.setClickedListener(this);
    }

    @Override
    public void onActive() {
        super.onActive();
    }

    @Override
    public void onForeground(Intent intent) {
        super.onForeground(intent);
    }

    @Override
    public void onClick(Component component) {
       // 3.展示一个土司弹框
        ToastDialog td = new ToastDialog(this);
        td.setText("天冷了,宝贝请加衣服!");
        td.setAlignment(LayoutAlignment.CENTER);  // 居中对其
        td.setDuration(2000);  // 出现的时长
       // 4.让弹窗展示
       td.show();

    }
}

(2.2)自定义弹框组件 + 抽取工具类
切记: 两个XML文件的长和宽一定要是 match_content。
1.首页
<?xml version="1.0" encoding="utf-8"?>
<DirectionalLayout
    xmlns:ohos="http://schemas.huawei.com/res/ohos"
    ohos:height="match_content" ✅ ✅ ✅ ✅
    ohos:width="match_content" ✅ ✅ ✅ ✅
    ohos:alignment="center"
    ohos:orientation="vertical">

    <Button
        ohos:id="$+id:btn1"
        ohos:height="match_content"
        ohos:width="match_content"
        ohos:background_element="red"
        ohos:text="点我展示土司弹窗"
        ohos:text_size="40fp"
        />

</DirectionalLayout>
2.内嵌页
<?xml version="1.0" encoding="utf-8"?>
<DirectionalLayout
    xmlns:ohos="http://schemas.huawei.com/res/ohos"
    ohos:height="match_content" ✅ ✅ ✅ ✅
    ohos:width="match_content"  ✅ ✅ ✅ ✅
    ohos:orientation="vertical">

    <Text
        ohos:id="$+id:ts_text"
        ohos:height="match_content"
        ohos:width="match_content"
        ohos:text_size="30fp"

        ohos:text_alignment="center"
        ohos:background_element="gray"/>


</DirectionalLayout>
3.工具类
package com.jsxs.dialogapplication.toastutil;

import com.jsxs.dialogapplication.ResourceTable;
import ohos.agp.components.Component;
import ohos.agp.components.DirectionalLayout;
import ohos.agp.components.LayoutScatter;
import ohos.agp.components.Text;
import ohos.agp.text.Layout;
import ohos.agp.utils.LayoutAlignment;
import ohos.agp.window.dialog.ToastDialog;
import ohos.app.Context;


public class toast {
    public static void showToast(Context context,String message){
        // 1.读取xml文件
        DirectionalLayout dl = (DirectionalLayout) LayoutScatter.getInstance(context).parse(ResourceTable.Layout_ability_toast, null, false);
        Text toast_ts = (Text) dl.findComponentById(ResourceTable.Id_ts_text);
        // 2.对文本进行赋值
        toast_ts.setText(message);

        // 3.创建一个土司对象
        ToastDialog td = new ToastDialog(context);
        td.setAlignment(LayoutAlignment.BOTTOM);  // 居中对其
        td.setSize(DirectionalLayout.LayoutConfig.MATCH_CONTENT,DirectionalLayout.LayoutConfig.MATCH_CONTENT);
		td.setOffset(0,300);  // 向上偏移300
        td.setDuration(2000);  // 出现的时长
        // 4.将我们自定义的组件放入到我们的土司弹窗中⭐
        td.setContentCustomComponent(dl);
        // 5.让弹窗展示
        td.show();

    }
}
4.调用
package com.jsxs.dialogapplication.slice;

import com.jsxs.dialogapplication.ResourceTable;
import com.jsxs.dialogapplication.toastutil.toast;
import ohos.aafwk.ability.AbilitySlice;
import ohos.aafwk.content.Intent;
import ohos.agp.components.*;
import ohos.agp.utils.LayoutAlignment;
import ohos.agp.window.dialog.CommonDialog;
import ohos.agp.window.dialog.IDialog;
import ohos.agp.window.dialog.ToastDialog;

public class MainAbilitySlice extends AbilitySlice implements Component.ClickedListener {
    @Override
    public void onStart(Intent intent) {
        super.onStart(intent);
        super.setUIContent(ResourceTable.Layout_ability_main);

        // 1.找到我们的按钮
        Button button = (Button) this.findComponentById(ResourceTable.Id_btn1);

        // 2.给按钮添加我们的点击事件
        button.setClickedListener(this);
    }

    @Override
    public void onActive() {
        super.onActive();
    }

    @Override
    public void onForeground(Intent intent) {
        super.onForeground(intent);
    }

    @Override
    public void onClick(Component component) {
        toast.showToast(this,"无法找到当前位置");
    }
}
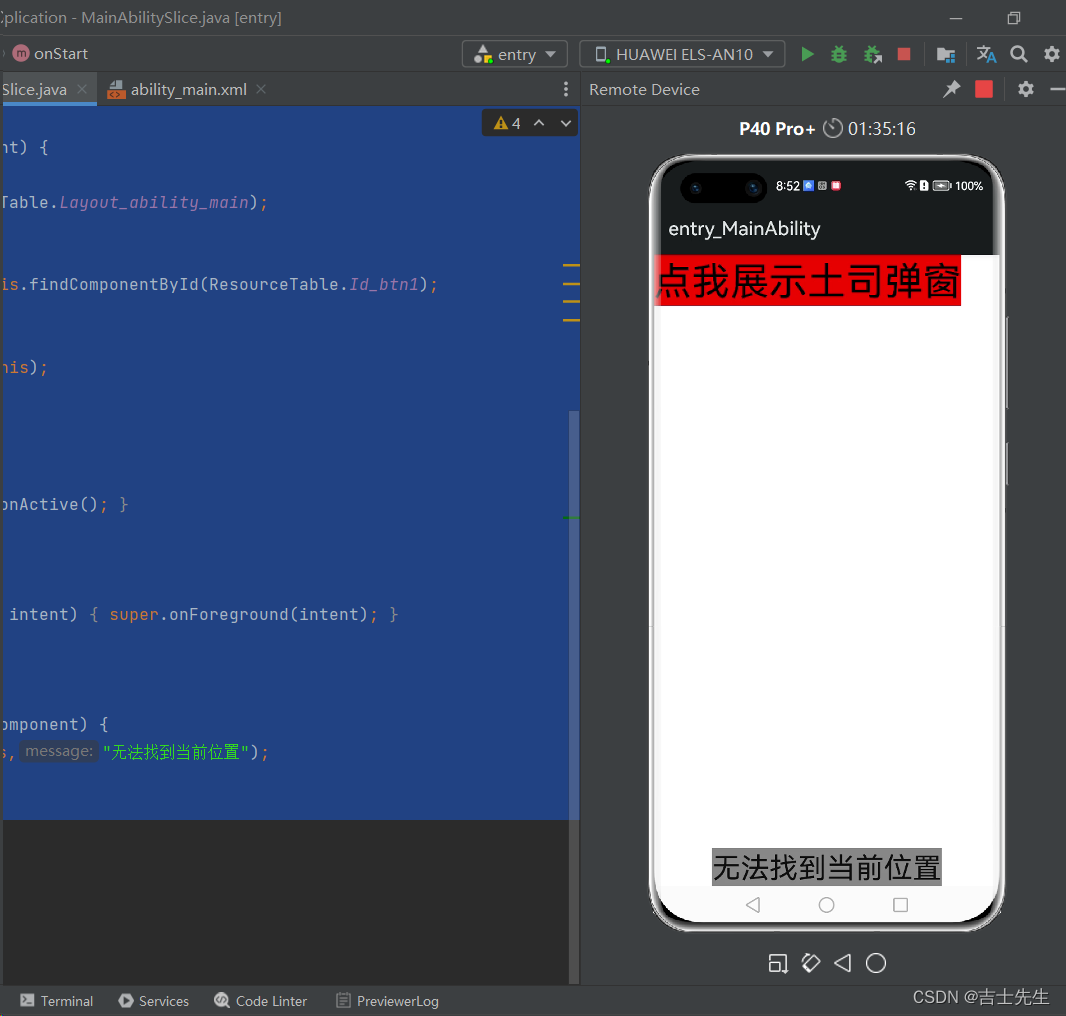
(3).TexFileld组件 (输入框)
是Text的子类,用来进行用户输入数据的。

(3.1).基本用法
<?xml version="1.0" encoding="utf-8"?>
<DirectionalLayout
    xmlns:ohos="http://schemas.huawei.com/res/ohos"
    ohos:height="match_parent"
    ohos:width="match_parent"
    ohos:background_element="#F2F2F2"
    ohos:orientation="vertical">
<!--  ohos:hint="请输入信息" 提示信息 ohos:hint_color="#999999" 提示信息的颜色-->
    <TextField
        ohos:height="50vp"
        ohos:width="319vp"
        ohos:text=""
        ohos:hint="请输入信息"
        ohos:hint_color="#999999"
        ohos:text_size="30fp"
        ohos:text_alignment="center"
        ohos:top_margin="100vp"
        ohos:layout_alignment="horizontal_center"
        ohos:background_element="#FFFFFF"
        />


</DirectionalLayout>

(3.2).获取按钮文字 (明文展示)
<?xml version="1.0" encoding="utf-8"?>
<DirectionalLayout
    xmlns:ohos="http://schemas.huawei.com/res/ohos"
    ohos:height="match_parent"
    ohos:width="match_parent"
    ohos:background_element="#F2F2F2"
    ohos:orientation="vertical">
    <!--  ohos:hint="请输入信息" 提示信息 ohos:hint_color="#999999" 提示信息的颜色-->
    <TextField
        ohos:id="$+id:txt"
        ohos:height="50vp"
        ohos:width="319vp"
        ohos:background_element="#FFFFFF"
        ohos:hint="请输入信息"
        ohos:hint_color="#999999"
        ohos:layout_alignment="horizontal_center"
        ohos:text=""
        ohos:text_alignment="center"
        ohos:text_size="30fp"
        ohos:top_margin="100vp"
        />

    <Button
        ohos:id="$+id:btn"
        ohos:height="50vp"
        ohos:width="230vp"
        ohos:background_element="#FF16E028"
        ohos:layout_alignment="horizontal_center"
        ohos:text="提交"
        ohos:text_alignment="center"
        ohos:text_size="30fp"
        ohos:top_margin="30vp"
        />

</DirectionalLayout>
后端逻辑代码
package com.jsxs.textfieldapplication.slice;

import com.jsxs.textfieldapplication.ResourceTable;
import ohos.aafwk.ability.AbilitySlice;
import ohos.aafwk.content.Intent;
import ohos.agp.components.Button;
import ohos.agp.components.Component;
import ohos.agp.components.TextField;
import ohos.agp.utils.Color;

public class MainAbilitySlice extends AbilitySlice {
    @Override
    public void onStart(Intent intent) {
        super.onStart(intent);
        super.setUIContent(ResourceTable.Layout_ability_main);

        Button btn = (Button) findComponentById(ResourceTable.Id_btn);
        TextField tf = (TextField) findComponentById(ResourceTable.Id_txt);

        btn.setClickedListener(new Component.ClickedListener() {
            @Override
            public void onClick(Component component) {
                btn.setText(tf.getText());
                btn.setEnabled(false);
                btn.setTextColor(Color.BLUE);
            }
        });
    }

    @Override
    public void onActive() {
        super.onActive();
    }

    @Override
    public void onForeground(Intent intent) {
        super.onForeground(intent);
    }
}
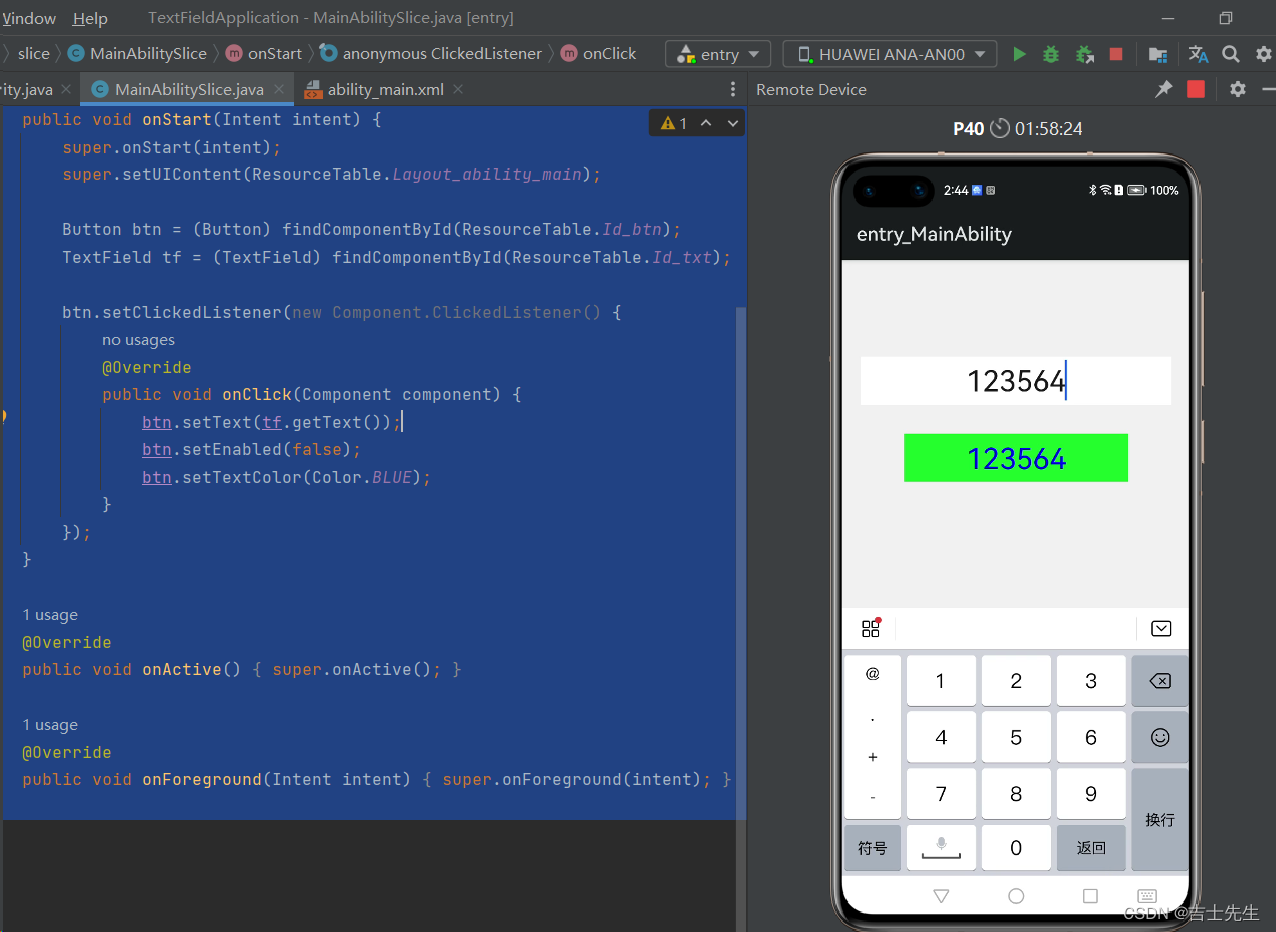
(3.3).基线和非明文展示
<?xml version="1.0" encoding="utf-8"?>
<DirectionalLayout
    xmlns:ohos="http://schemas.huawei.com/res/ohos"
    ohos:height="match_parent"
    ohos:width="match_parent"
    ohos:background_element="#F2F2F2"
    ohos:orientation="vertical">
    <!-- basement : 设置基线 值是基线的颜色  -->
    <TextField
        ohos:id="$+id:username"
        ohos:height="50vp"
        ohos:width="319vp"
        ohos:background_element="#FFFFFF"
        ohos:hint="请输入账户"
        ohos:hint_color="#999999"
        ohos:layout_alignment="horizontal_center"
        ohos:text=""
        ohos:text_alignment="center"
        ohos:text_size="30fp"
        ohos:top_margin="100vp"
        ohos:basement="#000000"
        />

    <!-- text_input_type: 文本输入的类型  ⭐ 密码框不明文展示 -->
    <TextField
        ohos:id="$+id:password"
        ohos:height="50vp"
        ohos:width="319vp"
        ohos:background_element="#FFFFFF"
        ohos:hint="请输入密码"
        ohos:hint_color="#999999"
        ohos:layout_alignment="horizontal_center"
        ohos:text=""
        ohos:text_alignment="center"
        ohos:text_size="30fp"
        ohos:top_margin="30vp"
        ohos:text_input_type="pattern_password"
        />

    <Button
        ohos:id="$+id:btn"
        ohos:height="50vp"
        ohos:width="230vp"
        ohos:background_element="#FF16E028"
        ohos:layout_alignment="horizontal_center"
        ohos:text="提交"
        ohos:text_alignment="center"
        ohos:text_size="30fp"
        ohos:top_margin="30vp"
        />

</DirectionalLayout>
package com.jsxs.textfieldapplication.slice;

import com.jsxs.textfieldapplication.ResourceTable;
import ohos.aafwk.ability.AbilitySlice;
import ohos.aafwk.content.Intent;
import ohos.agp.components.Button;
import ohos.agp.components.Component;
import ohos.agp.components.TextField;
import ohos.agp.utils.Color;

public class MainAbilitySlice extends AbilitySlice {
    @Override
    public void onStart(Intent intent) {
        super.onStart(intent);
        super.setUIContent(ResourceTable.Layout_ability_main);

        Button btn = (Button) findComponentById(ResourceTable.Id_btn);
//        TextField tf = (TextField) findComponentById(ResourceTable.Id_txt);

    }

    @Override
    public void onActive() {
        super.onActive();
    }

    @Override
    public void onForeground(Intent intent) {
        super.onForeground(intent);
    }
}
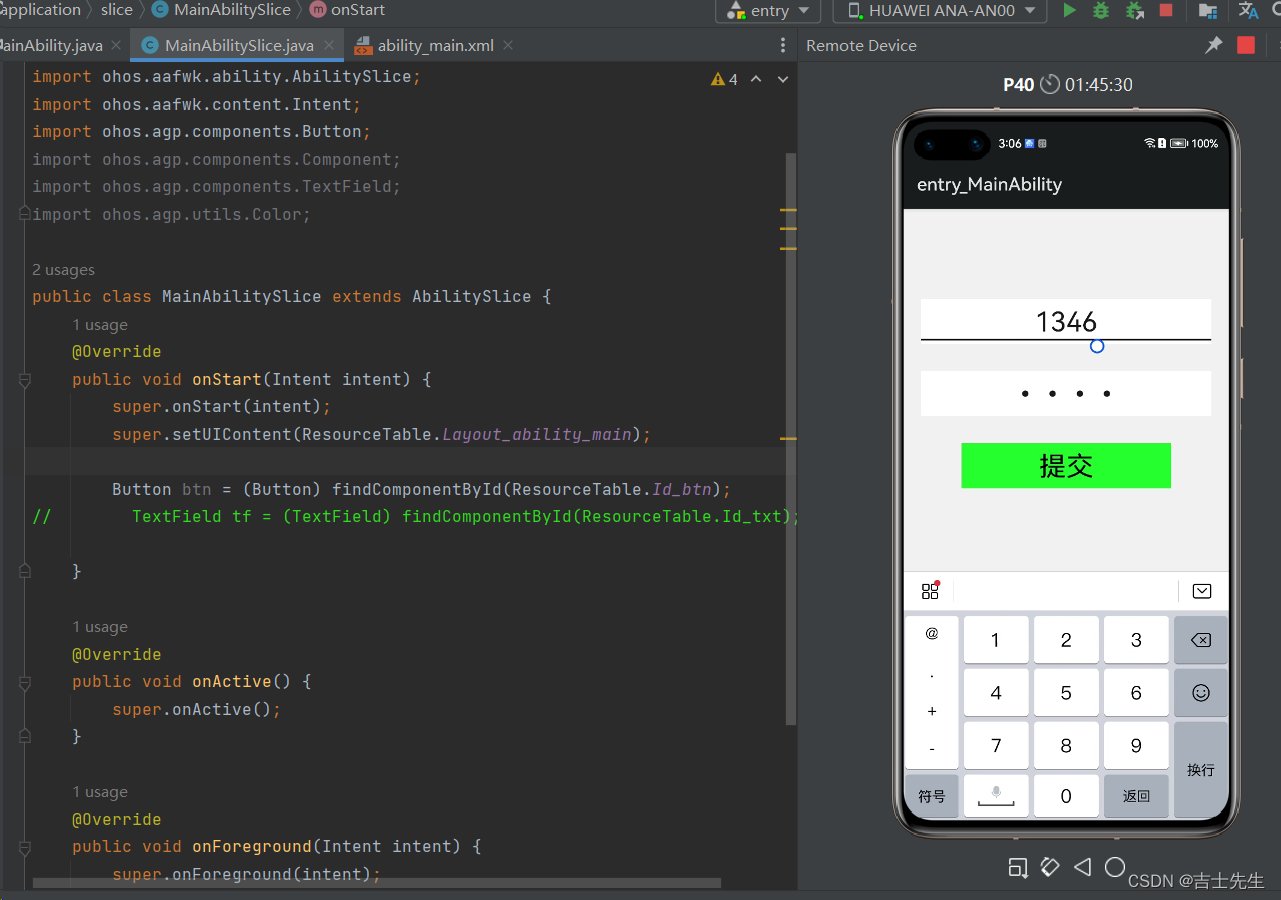
(3.4).自定义气泡

气泡指令
- ohos:element_selection_left_bubble=“$media:left”
选中左侧 - ohos:element_selection_right_bubble=“$media:right”
选中右侧 - ohos:element_cursor_bubble=“$media:bubble”
未选中气泡 - ohos:selection_color=“#F00000”
选中背景颜色
<?xml version="1.0" encoding="utf-8"?>
<DirectionalLayout
    xmlns:ohos="http://schemas.huawei.com/res/ohos"
    ohos:height="match_parent"
    ohos:width="match_parent"
    ohos:background_element="#F2F2F2"
    ohos:orientation="vertical">
    <!-- basement : 设置基线 值是基线的颜色

     -->
    <TextField
        ohos:id="$+id:username"
        ohos:height="50vp"
        ohos:width="319vp"
        ohos:background_element="#FFFFFF"
        ohos:hint="请输入账户"
        ohos:hint_color="#999999"
        ohos:layout_alignment="horizontal_center"
        ohos:text=""
        ohos:text_alignment="center"
        ohos:text_size="30fp"
        ohos:top_margin="100vp"
        ohos:basement="#000000"
        ohos:element_selection_left_bubble="$media:left"
        ohos:element_selection_right_bubble="$media:right"
        ohos:element_cursor_bubble="$media:bubble"
        ohos:selection_color="#F00000"
        />

    <!-- text_input_type: 文本输入的类型  ⭐ 密码框不明文展示 -->
    <TextField
        ohos:id="$+id:password"
        ohos:height="50vp"
        ohos:width="319vp"
        ohos:background_element="#FFFFFF"
        ohos:hint="请输入密码"
        ohos:hint_color="#999999"
        ohos:layout_alignment="horizontal_center"
        ohos:text=""
        ohos:text_alignment="center"
        ohos:text_size="30fp"
        ohos:top_margin="30vp"
        ohos:text_input_type="pattern_password"
        />

    <Button
        ohos:id="$+id:btn"
        ohos:height="50vp"
        ohos:width="230vp"
        ohos:background_element="#FF16E028"
        ohos:layout_alignment="horizontal_center"
        ohos:text="提交"
        ohos:text_alignment="center"
        ohos:text_size="30fp"
        ohos:top_margin="30vp"

        />

</DirectionalLayout>
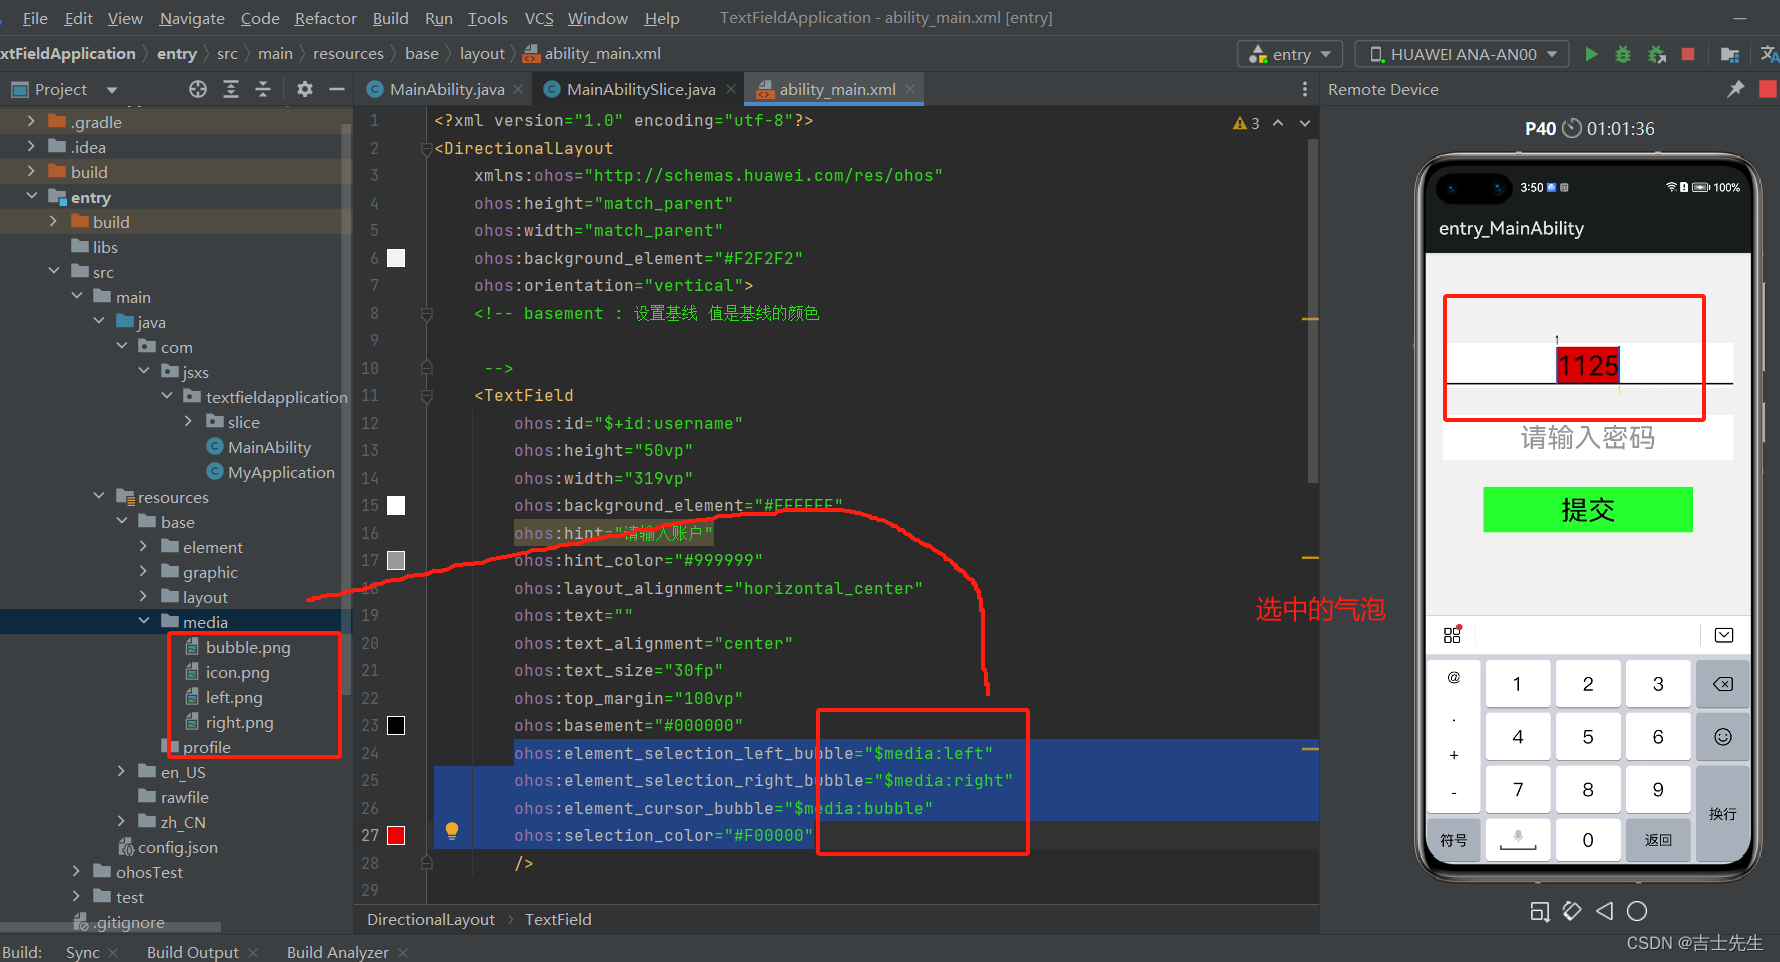
(3.5).密码明文暗文切换
1.前端没任何变化
<?xml version="1.0" encoding="utf-8"?>
<DirectionalLayout
    xmlns:ohos="http://schemas.huawei.com/res/ohos"
    ohos:height="match_parent"
    ohos:width="match_parent"
    ohos:background_element="#F2F2F2"
    ohos:orientation="vertical">

    <!-- text_input_type: 文本输入的类型  ⭐ 密码框不明文展示 -->
    <TextField
        ohos:id="$+id:password"
        ohos:height="50vp"
        ohos:width="319vp"
        ohos:background_element="#FFFFFF"
        ohos:hint="请输入密码"
        ohos:hint_color="#999999"
        ohos:layout_alignment="horizontal_center"
        ohos:text=""
        ohos:text_alignment="center"
        ohos:text_size="30fp"
        ohos:top_margin="30vp"
        ohos:text_input_type="pattern_password"
        />

    <Button
        ohos:id="$+id:btn"
        ohos:height="50vp"
        ohos:width="230vp"
        ohos:background_element="#FF16E028"
        ohos:layout_alignment="horizontal_center"
        ohos:text="查看"
        ohos:text_alignment="center"
        ohos:text_size="30fp"
        ohos:top_margin="30vp"

        />

</DirectionalLayout>
package com.jsxs.textfieldapplication.slice;

import com.jsxs.textfieldapplication.ResourceTable;
import ohos.aafwk.ability.AbilitySlice;
import ohos.aafwk.content.Intent;
import ohos.agp.components.Button;
import ohos.agp.components.Component;
import ohos.agp.components.InputAttribute;
import ohos.agp.components.TextField;
import ohos.agp.utils.Color;
import ohos.multimodalinput.event.TouchEvent;

public class MainAbilitySlice extends AbilitySlice {
    @Override
    public void onStart(Intent intent) {
        super.onStart(intent);
        super.setUIContent(ResourceTable.Layout_ability_main);

        Button btn = (Button) findComponentById(ResourceTable.Id_btn);
        TextField tf = (TextField) findComponentById(ResourceTable.Id_password);

       btn.setTouchEventListener(new Component.TouchEventListener() {
           @Override
           public boolean onTouchEvent(Component component, TouchEvent touchEvent) {

               int action = touchEvent.getAction();
               if (action==TouchEvent.PRIMARY_POINT_DOWN){
                   // 将文本框类型切换成明文
                   tf.setTextInputType(InputAttribute.PATTERN_NULL);

               }else if (action==TouchEvent.PRIMARY_POINT_UP){
                   tf.setTextInputType(InputAttribute.PATTERN_PASSWORD);
               }
               return true;
           }
       });

    }

    @Override
    public void onActive() {
        super.onActive();
    }

    @Override
    public void onForeground(Intent intent) {
        super.onForeground(intent);
    }
}
展示成明文
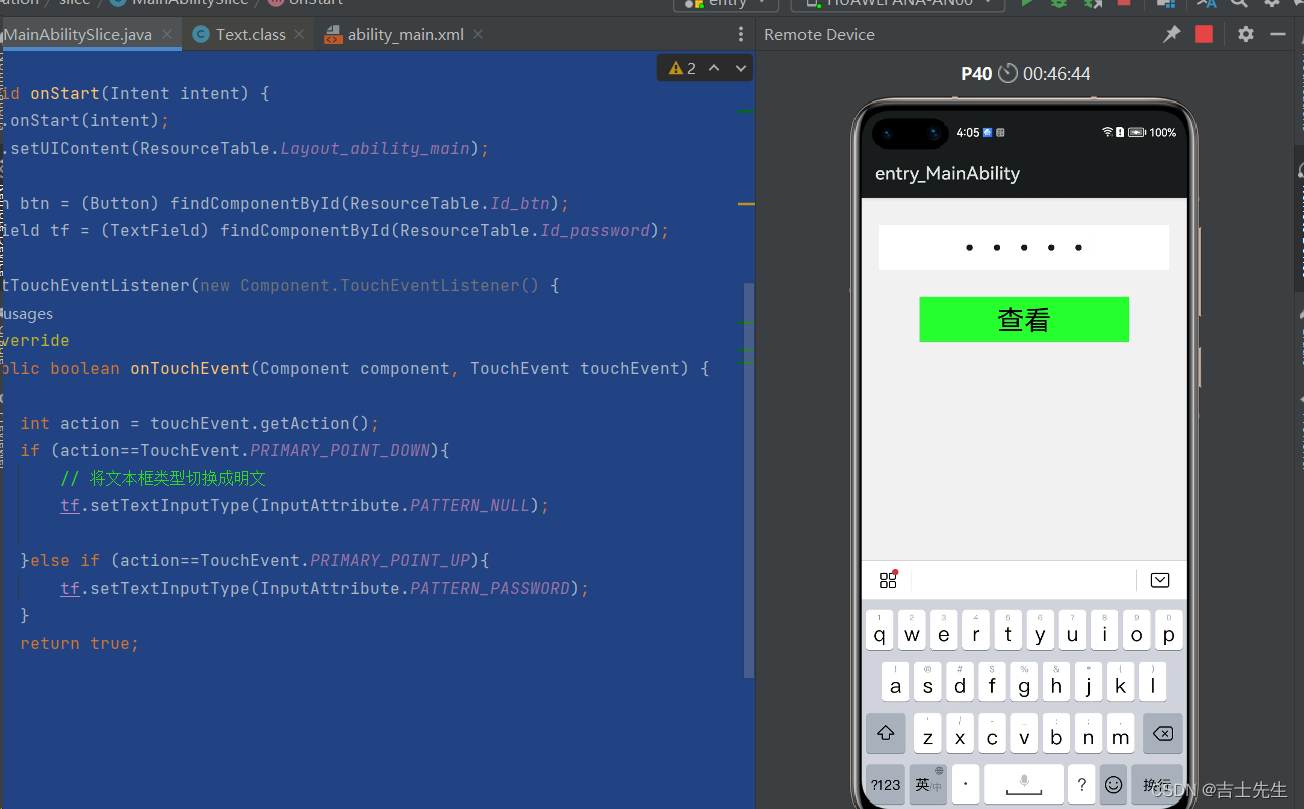
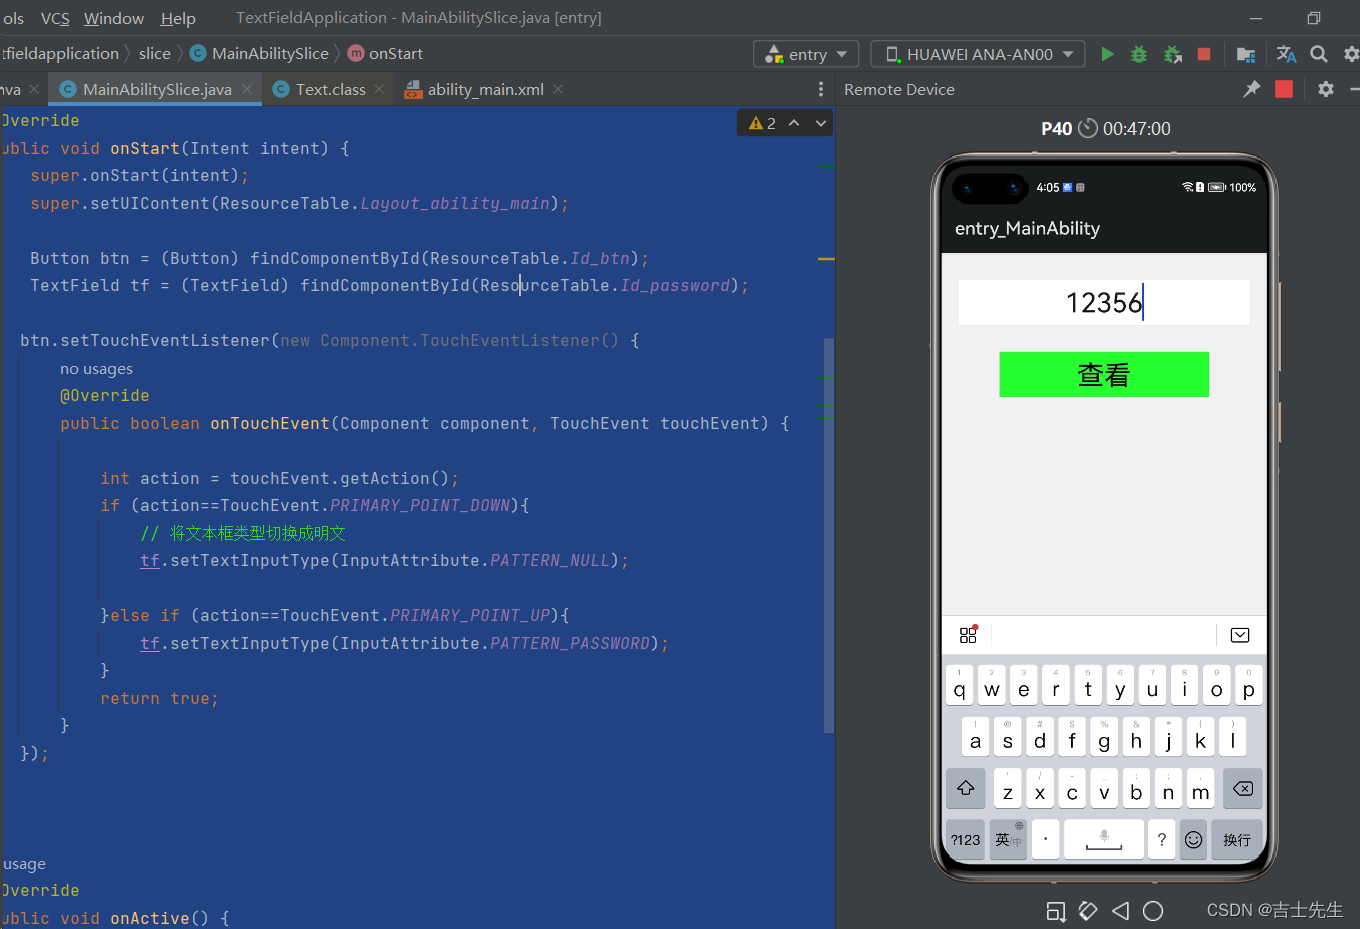
(4).Checkboc多选框组件
父类是AbsButton,而AbsButton的父类是Button。
当我们需要同时选择多个元素的时候就需要用到多选框组件。
比如:发送图片的时候需要多选,注册的时候选择爱好也需要多选等。
常见属性:

常见方法:

(4.1).基本多选框
<?xml version="1.0" encoding="utf-8"?>
<DirectionalLayout
    xmlns:ohos="http://schemas.huawei.com/res/ohos"
    ohos:height="match_parent"
    ohos:width="match_parent"
    ohos:alignment="center"
    ohos:orientation="vertical">

 <Checkbox
     ohos:height="match_content"
     ohos:width="match_content"
     ohos:text="玩游戏"
     ohos:text_size="30fp"
     ohos:background_element="red"
     />

</DirectionalLayout>
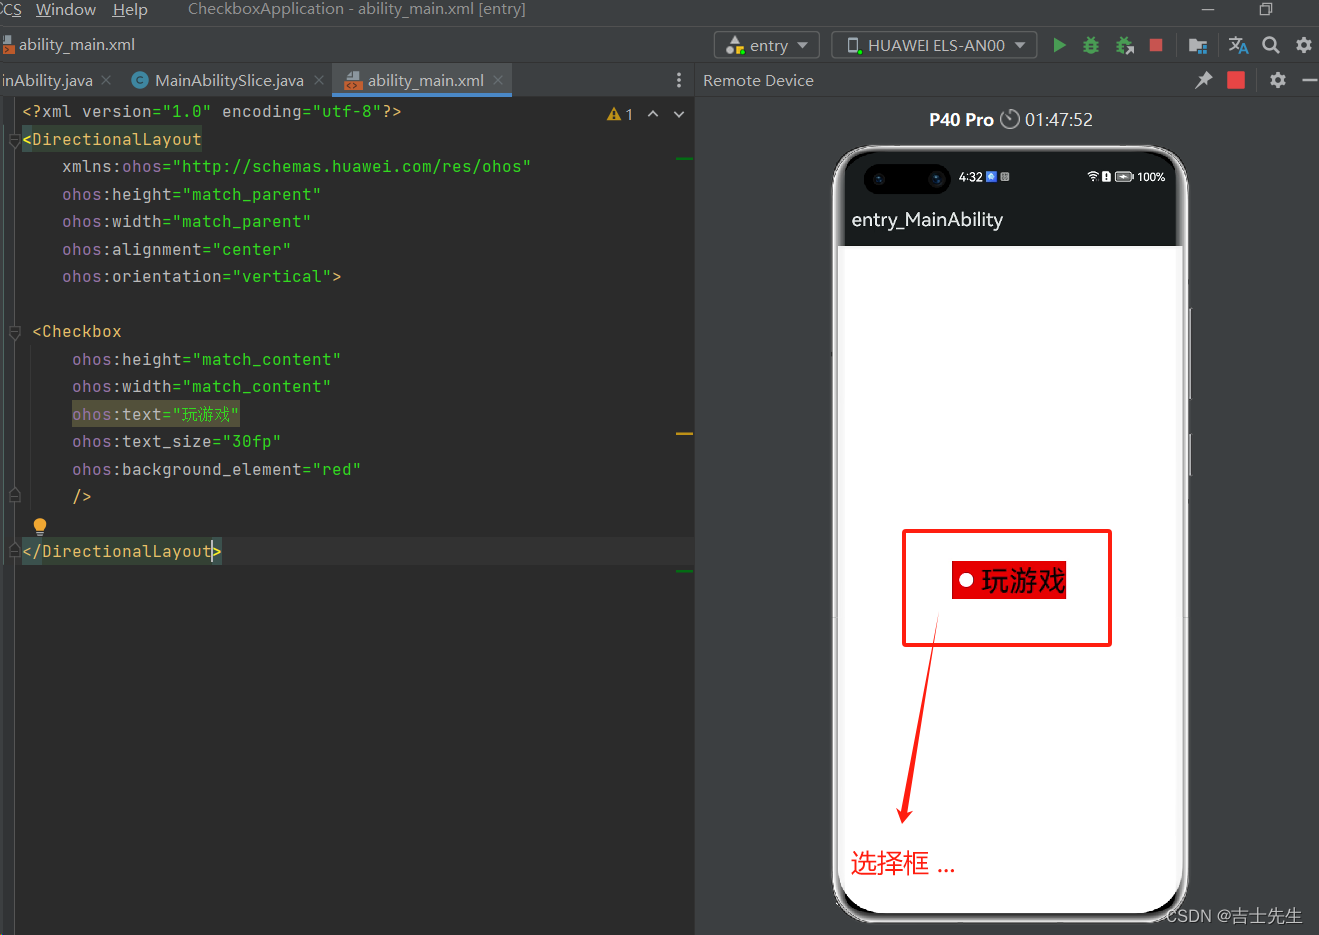
(4.2).无问题的多选框监听
<?xml version="1.0" encoding="utf-8"?>
<DirectionalLayout
    xmlns:ohos="http://schemas.huawei.com/res/ohos"
    ohos:height="match_parent"
    ohos:width="match_parent"
    ohos:alignment="center"
    ohos:orientation="vertical">

    <!--
        ohos:marked="true" : 表示是否勾选
        check_element : 设置图片
    -->
    <Checkbox
        ohos:id="$+id:chbox"
        ohos:height="match_content"
        ohos:width="match_content"
        ohos:background_element="red"
        ohos:text="玩游戏"
        ohos:text_size="30fp"
        />


</DirectionalLayout>
onCheckedChanged
package com.jsxs.checkboxapplication.slice;

import com.jsxs.checkboxapplication.ResourceTable;
import ohos.aafwk.ability.AbilitySlice;
import ohos.aafwk.content.Intent;
import ohos.agp.components.AbsButton;
import ohos.agp.components.Checkbox;
import ohos.agp.components.Component;
import ohos.agp.utils.Color;

public class MainAbilitySlice extends AbilitySlice {
    @Override
    public void onStart(Intent intent) {
        super.onStart(intent);
        super.setUIContent(ResourceTable.Layout_ability_main);

        // 1.找到多选框组件
        Checkbox checkbox = (Checkbox) findComponentById(ResourceTable.Id_chbox);


        //  多选框的监听接口
        checkbox.setCheckedStateChangedListener(new AbsButton.CheckedStateChangedListener() {
            /**
             *
             * @param absButton : 表示状态被改变的哪个多选框
             * @param b : 表示当前多选框是否被选中
             */
            @Override
            public void onCheckedChanged(AbsButton absButton, boolean b) {
                if (b){
                    checkbox.setText("被选中");
                }else {
                    checkbox.setText("不选中");
                }
            }
        });


    }

    @Override
    public void onActive() {
        super.onActive();
    }

    @Override
    public void onForeground(Intent intent) {
        super.onForeground(intent);
    }
}
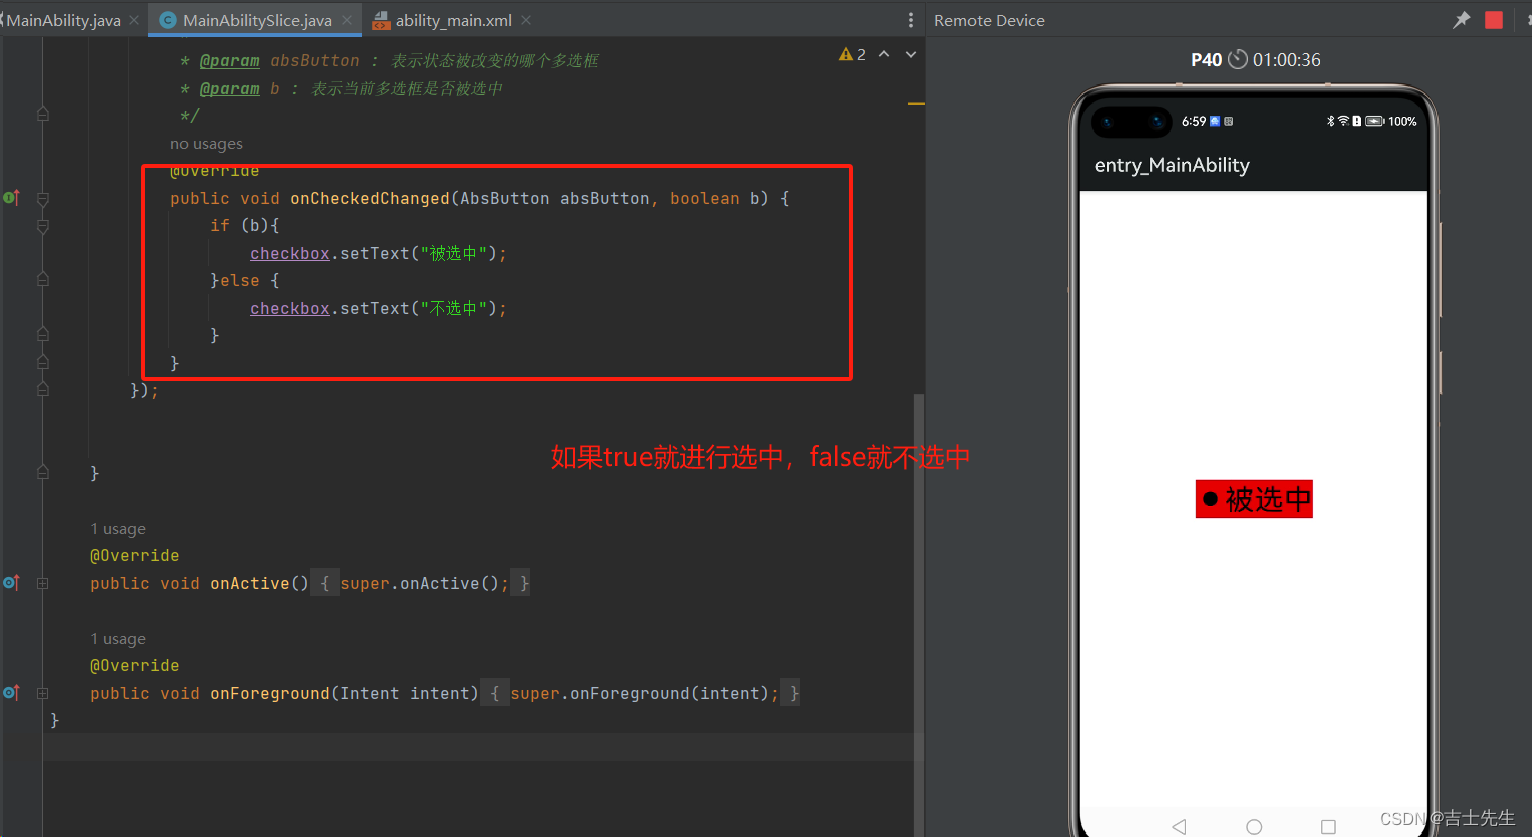
(4.3).有问题的多选框监听
如果这里使用按钮的监听的话,会相反。主要原因是因为: “我们先监听到然后才进行改变的,所以会相反”,我们想点选中,相反会转成flase; ⭐
package com.jsxs.checkboxapplication.slice;

import com.jsxs.checkboxapplication.ResourceTable;
import ohos.aafwk.ability.AbilitySlice;
import ohos.aafwk.content.Intent;
import ohos.agp.components.AbsButton;
import ohos.agp.components.Checkbox;
import ohos.agp.components.Component;
import ohos.agp.utils.Color;

public class MainAbilitySlice extends AbilitySlice {
    @Override
    public void onStart(Intent intent) {
        super.onStart(intent);
        super.setUIContent(ResourceTable.Layout_ability_main);

        // 1.找到多选框组件
        Checkbox checkbox = (Checkbox) findComponentById(ResourceTable.Id_chbox);

        // 2.如果这里使用按钮的监听的话,会相反。主要原因是因为: "我们先监听到然后才进行改变的,所以会相反"
        // 我们想点选中,相反会转成flase; ⭐
        checkbox.setClickedListener(new Component.ClickedListener() {
            @Override
            public void onClick(Component component) {
                if (checkbox.isChecked()){
                    checkbox.setText("被选中");
                }else {
                    checkbox.setText("不选中");
                }
            }
        });

    }

    @Override
    public void onActive() {
        super.onActive();
    }

    @Override
    public void onForeground(Intent intent) {
        super.onForeground(intent);
    }
}
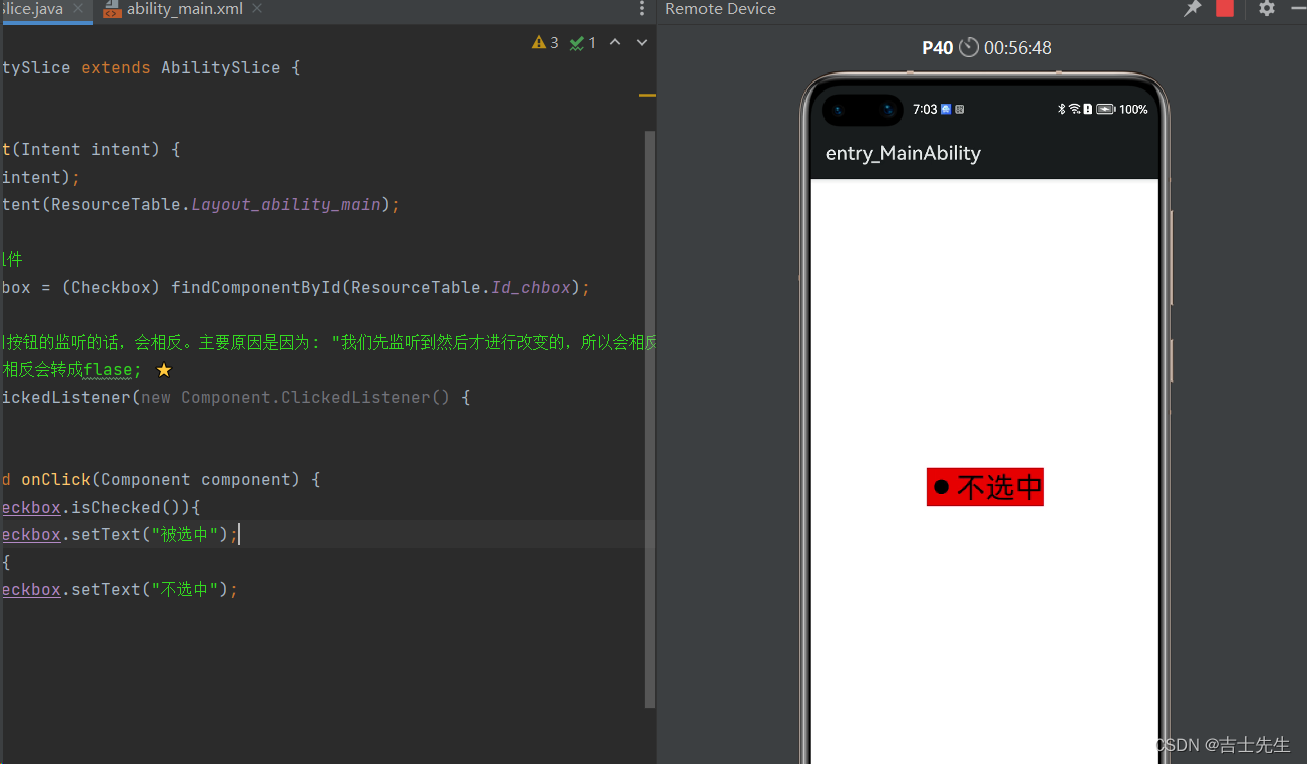
小结:
- 多选框绑定单击事件的时候,在onclick方法中,获取的是点击之前的状态。
- 当多选框绑定状态改变事件的时候,在onCheckedChanged方法中,获取的是点击之后的状态。
(4.3).综合练习
我们通过多选框控制我们的时间组成单位
<?xml version="1.0" encoding="utf-8"?>
<DirectionalLayout
    xmlns:ohos="http://schemas.huawei.com/res/ohos"
    ohos:height="match_parent"
    ohos:width="match_parent"
    ohos:orientation="vertical">

    <Clock
        ohos:id="$+id:clock"
        ohos:height="match_content"
        ohos:width="match_content"
        ohos:mode_24_hour="yyyy年MM月dd日 HH:mm:ss"
        ohos:text_size="25fp"
        ohos:top_margin="50vp"
        ohos:layout_alignment="horizontal_center"
        />


    <Checkbox
        ohos:id="$+id:year"
        ohos:height="50vp"
        ohos:width="350vp"
        ohos:background_element="#FF2AD0BC"
        ohos:text="年"
        ohos:marked="true"
        ohos:text_size="30fp"
        ohos:top_margin="60vp"
        />
    <Checkbox
        ohos:id="$+id:month"
        ohos:height="50vp"
        ohos:width="350vp"
        ohos:background_element="#FF2AD0BC"
        ohos:marked="true"
        ohos:text="月"
        ohos:text_size="30fp"
        ohos:top_margin="10vp"
        />
    <Checkbox
        ohos:id="$+id:day"
        ohos:height="50vp"
        ohos:width="350vp"
        ohos:background_element="#FF2AD0BC"
        ohos:marked="true"
        ohos:text="日"
        ohos:text_size="30fp"
        ohos:top_margin="10vp"
        />
    <Checkbox
        ohos:id="$+id:time"
        ohos:height="50vp"
        ohos:width="350vp"
        ohos:marked="true"
        ohos:background_element="#FF2AD0BC"
        ohos:text="时"
        ohos:text_size="30fp"
        ohos:top_margin="10vp"
        />

    <Button
        ohos:id="$+id:btu1"
        ohos:height="80vp"
        ohos:width="200vp"
        ohos:text_size="30fp"
        ohos:text="确定"
        ohos:background_element="#FF2EE217"
        ohos:layout_alignment="horizontal_center"
        ohos:top_margin="50vp"
        ohos:text_alignment="center"
        />

</DirectionalLayout>
package com.jsxs.checkboxapplication.slice;

import com.jsxs.checkboxapplication.ResourceTable;
import ohos.aafwk.ability.AbilitySlice;
import ohos.aafwk.content.Intent;
import ohos.agp.components.*;
import ohos.agp.utils.Color;

public class MainAbilitySlice extends AbilitySlice {
    @Override
    public void onStart(Intent intent) {
        super.onStart(intent);
        super.setUIContent(ResourceTable.Layout_ability_main);

        // 1. 找到各个组件
        Clock clock = (Clock) findComponentById(ResourceTable.Id_clock);
        Checkbox year = (Checkbox) findComponentById(ResourceTable.Id_year);
        Checkbox month = (Checkbox) findComponentById(ResourceTable.Id_month);
        Checkbox day = (Checkbox) findComponentById(ResourceTable.Id_day);
        Checkbox time = (Checkbox) findComponentById(ResourceTable.Id_time);
        Button button = (Button) findComponentById(ResourceTable.Id_btu1);

        button.setClickedListener(new Component.ClickedListener() {
            @Override
            public void onClick(Component component) {
                if (year.isChecked()&&day.isChecked()&&month.isChecked()&&time.isChecked()){
                    clock.setFormatIn24HourMode("yyyy年MM月dd日 HH:mm:ss");
                    clock.setTextColor(Color.RED);
                }else if (year.isChecked()&&!day.isChecked()&&!month.isChecked()&&!time.isChecked()){
                    clock.setFormatIn24HourMode("yyyy年");
                    clock.setTextColor(Color.GREEN);
                }
            }
        });

    }

    @Override
    public void onActive() {
        super.onActive();
    }

    @Override
    public void onForeground(Intent intent) {
        super.onForeground(intent);
    }
}
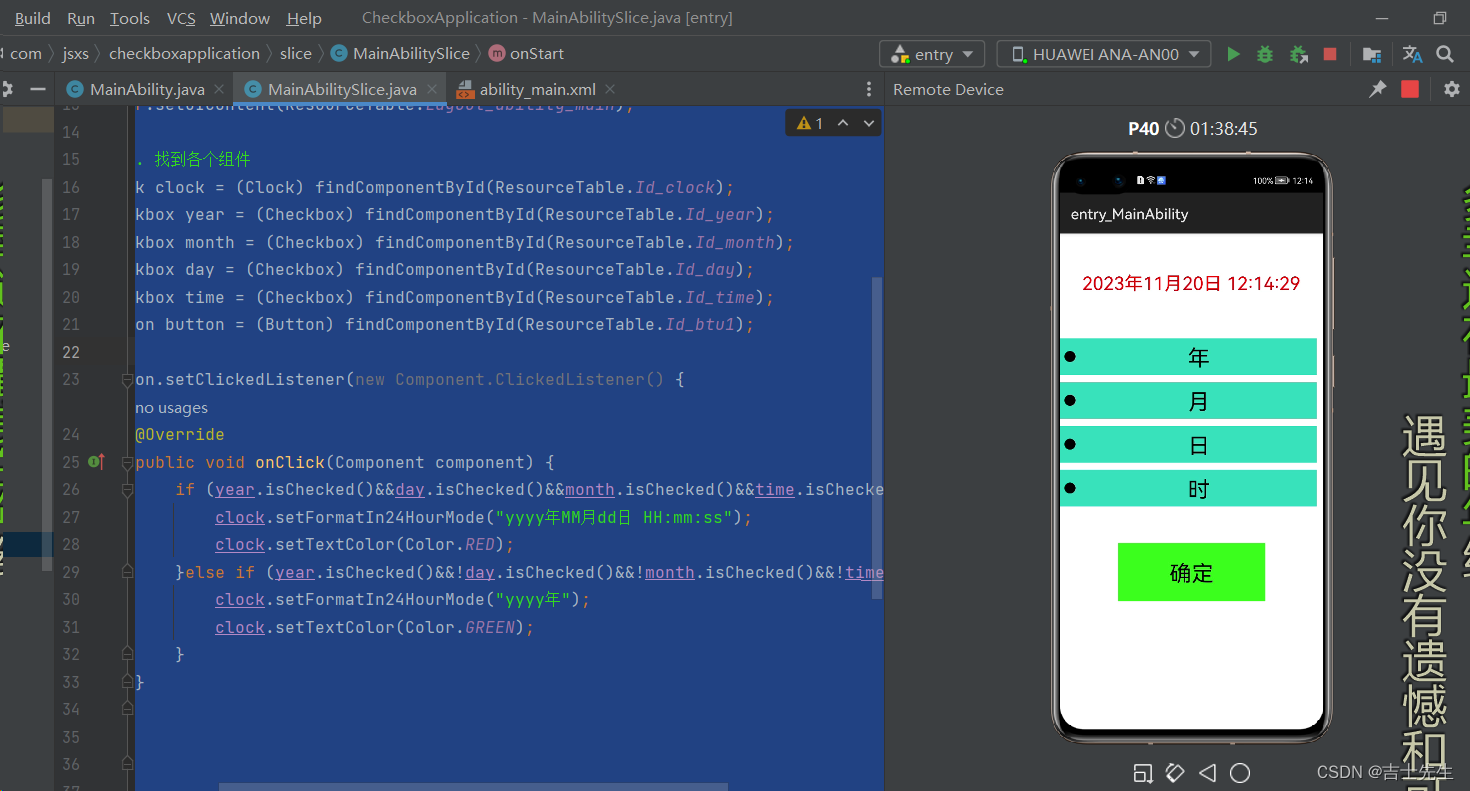
(5).RadioButton单选框组件
父类是AbsButton,而AbsButton的父类是Button。在使用的时候需要用到单选按钮的按钮组。
RadioContainer,在一组内多选按钮只能选择其中一个。当需要监听单选框的状态时,不要用AbsButton里面的CheckedStateChangedListener。而是给按钮组RadioContainer添加事件。用RadioContainer里面的CheckedStateChangedListener
常见属性:

常见方法:

按钮组RadioContainer常见方法:

(5.1).基本用法
<?xml version="1.0" encoding="utf-8"?>
<DirectionalLayout
    xmlns:ohos="http://schemas.huawei.com/res/ohos"
    ohos:height="match_parent"
    ohos:width="match_parent"
    ohos:alignment="center"
    ohos:orientation="vertical">

<!--    因为是单选框,所以我们要进行分组管理-->
    <RadioContainer
        ohos:height="match_content"
        ohos:width="match_content"
        ohos:background_element="red"
        >

        <RadioButton
            ohos:height="match_content"
            ohos:width="match_content"
            ohos:text="男"
            ohos:text_size="30fp"
            ohos:text_alignment="center"
            ohos:marked="false"
            />

        <RadioButton
            ohos:height="match_content"
            ohos:width="match_content"
            ohos:text="女"
            ohos:text_size="30fp"
            ohos:text_alignment="center"
            ohos:marked="false"
            ohos:top_margin="10vp"
            />

    </RadioContainer>

</DirectionalLayout>
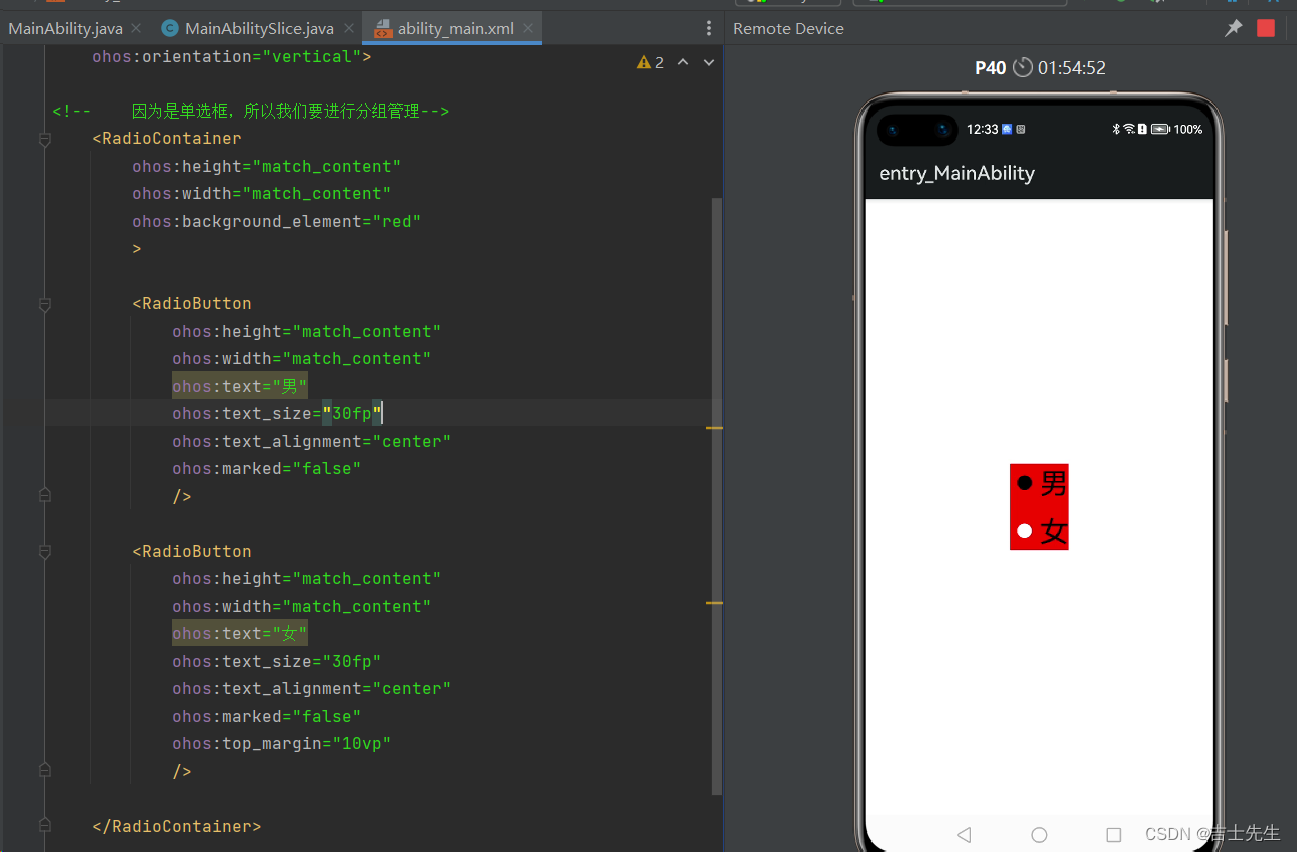
(5.2).监听事件
package com.jsxs.myapplication.slice;

import com.jsxs.myapplication.ResourceTable;
import ohos.aafwk.ability.AbilitySlice;
import ohos.aafwk.content.Intent;
import ohos.agp.components.Component;
import ohos.agp.components.RadioButton;
import ohos.agp.components.RadioContainer;
import ohos.agp.utils.Color;

public class MainAbilitySlice extends AbilitySlice {
    @Override
    public void onStart(Intent intent) {
        super.onStart(intent);
        super.setUIContent(ResourceTable.Layout_ability_main);

        RadioContainer radioContainer = (RadioContainer) findComponentById(ResourceTable.Id_rc);
        RadioButton boy = (RadioButton) findComponentById(ResourceTable.Id_boy);
        RadioButton girl = (RadioButton) findComponentById(ResourceTable.Id_girl);

        radioContainer.setMarkChangedListener(new RadioContainer.CheckedStateChangedListener() {

            /**
             *
             * @param radioContainer 参数一: 是哪个单选组
             * @param i 参数而: 表示当前选中的是第几个单选框
             */
            @Override
            public void onCheckedChanged(RadioContainer radioContainer, int i) { //当按钮组里面的按钮状态发生改变的时候,就会触发这个方法
                RadioButton radioButton = (RadioButton) radioContainer.getComponentAt(i);
                if (radioButton.isChecked()){
                    radioButton.setText(radioButton.getText()+"111");
                }
            }
        });
    }

    @Override
    public void onActive() {
        super.onActive();
    }

    @Override
    public void onForeground(Intent intent) {
        super.onForeground(intent);
    }
}